Manual
General guidelines
ARPHA uses one-stop registration/login for all its products. Once registered with ARPHA, users are able to author and review in all journals published on the ARPHA journal publishing platform.
Listed below are guidelines relevant to all ARPHA users. For user-specific rights and guidelines, see the next chapters in the manual.
- Create а new ARPHA account
- Update profile (e.g. email; affiliation; expertise; ORCID ID)
- Merge multiple accounts
- Deactivate account
- Subscribe to journal newsletter
- Post your news to a journal's community
- User dashboard and tasks
- Manuscript submission
- Browse manuscripts
- Pitch a Special issue / Topical collection
- Handle a Special issue / Topical collection
- Comment on published articles
- Clickable objects
Create а new ARPHA account
1 Register from the homepage of any journal published on the ARPHA platform.

2 Fill in the short form with your basic details (name, email address etc.) Make sure to fill the mandatory fields marked with *.
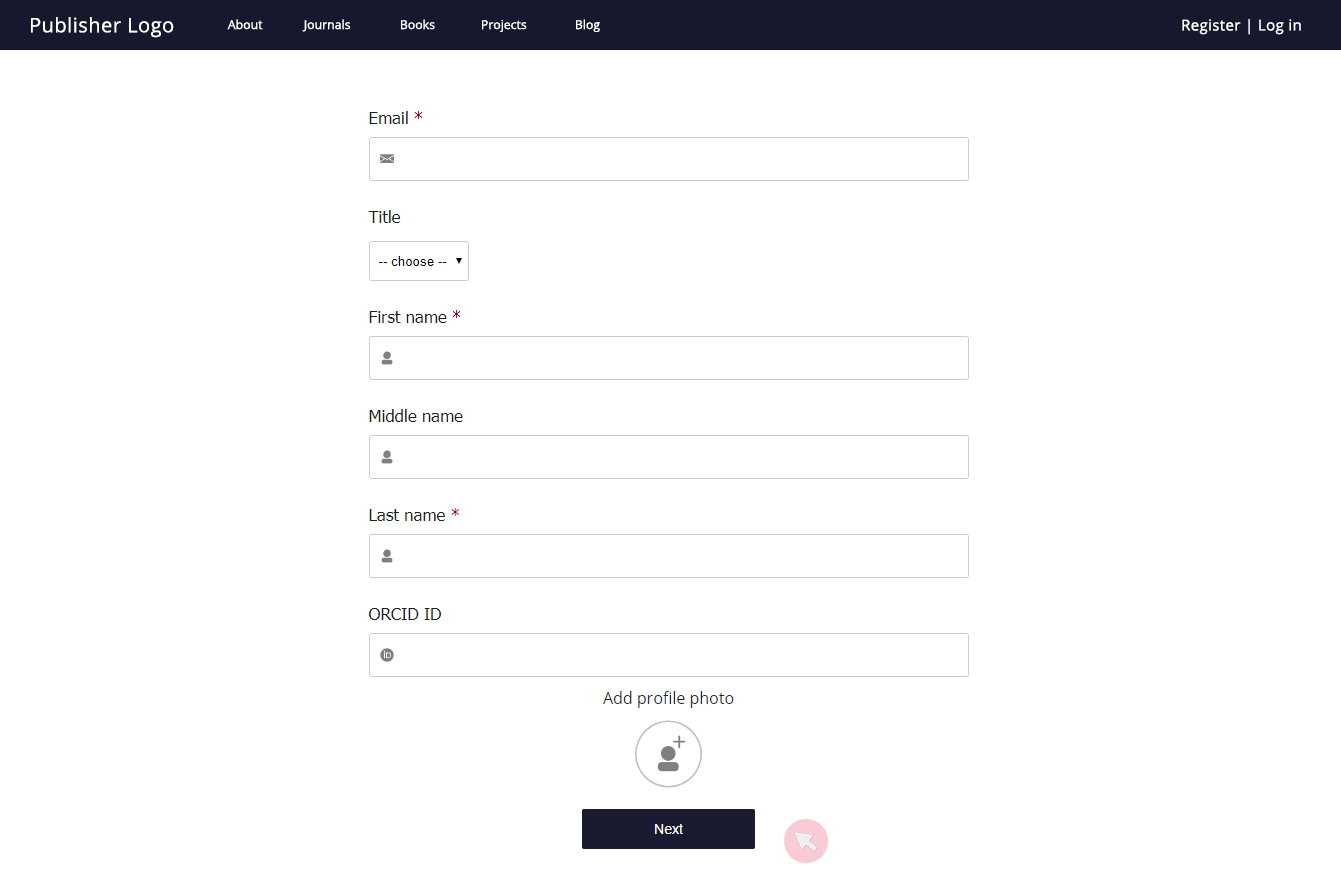
3 The next step suggests that you subscribe to a customisable newsletter.
4 Make sure to confirm your registration using the link sent to your email. If you fail to locate it in your inbox, request a new link.

5 The confirmation link sent to your inbox will navigate you to a webpage where you will be able to set up your password and finalise your registration.

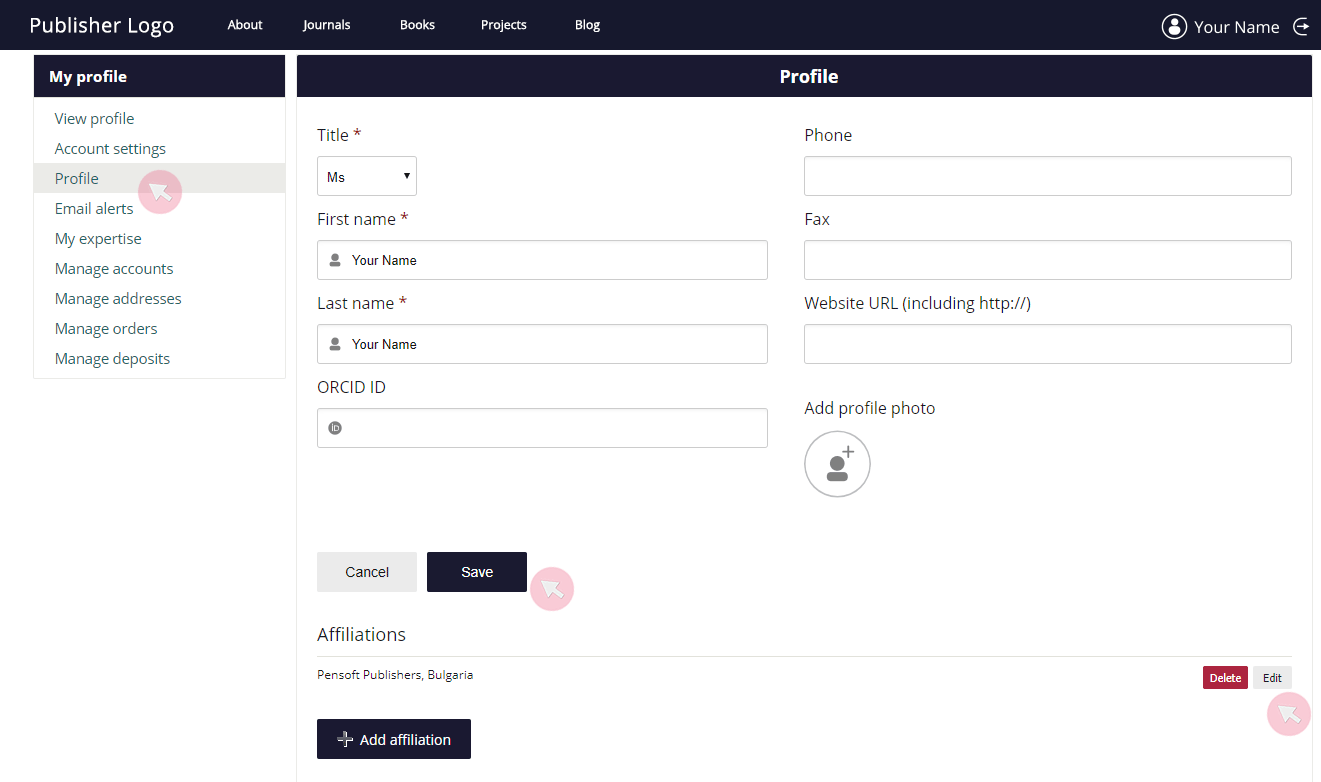
Update profile
Users are strongly recommended to update their profiles regularly, especially if changes in their contact details, affiliation or areas of expertise have occurred. Accurate and detailed information facilitate users’ discoverability in the system (e.g. when a colleague wants to list them as co-authors in a paper, when approached for peer review etc.)
1 Click on your user name to access your profile and account settings.

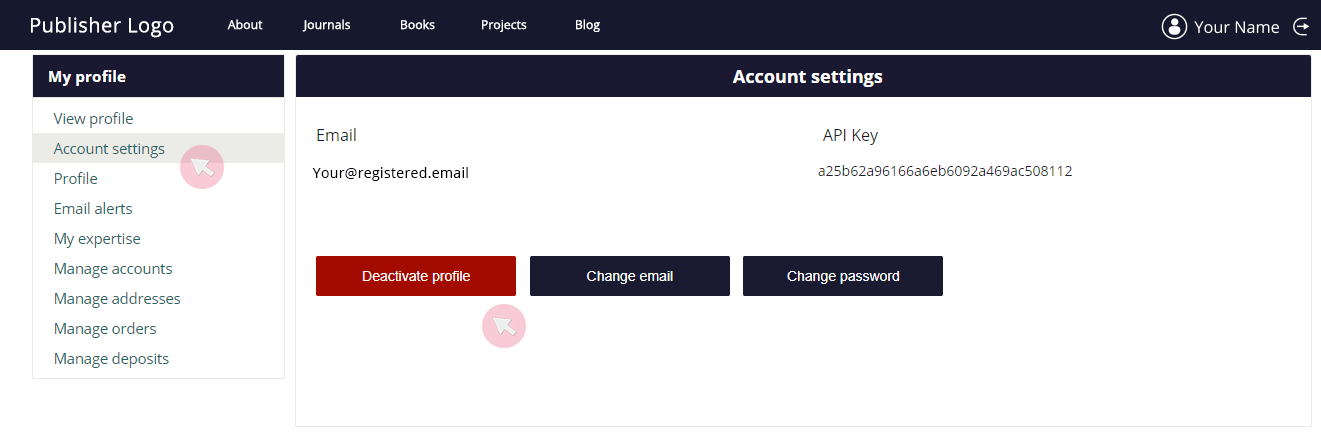
2 Use Account settings to change your password and/or email address; deactivate your account; and view your API key.
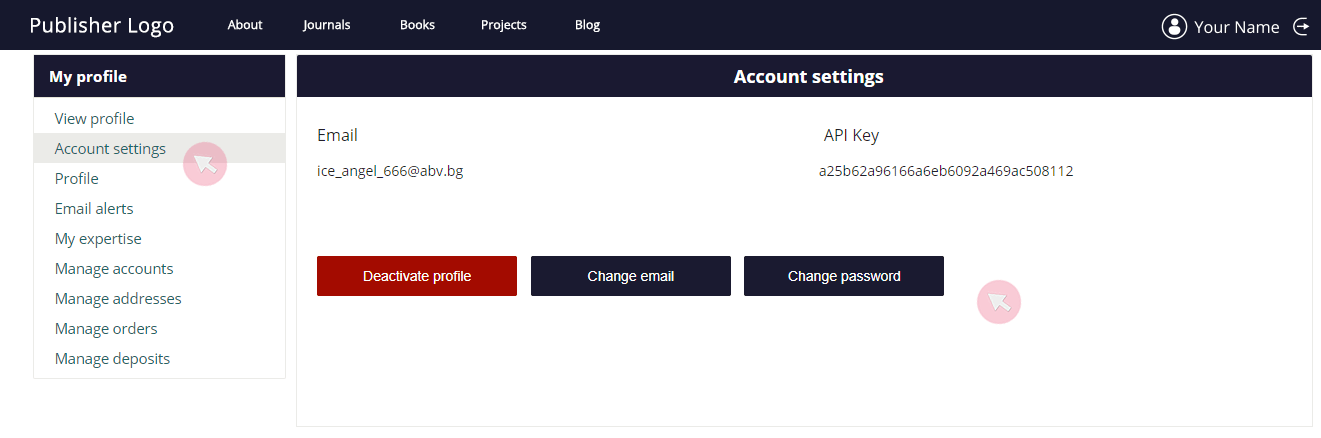
3 Edit your personal information and affiliations via Profile.
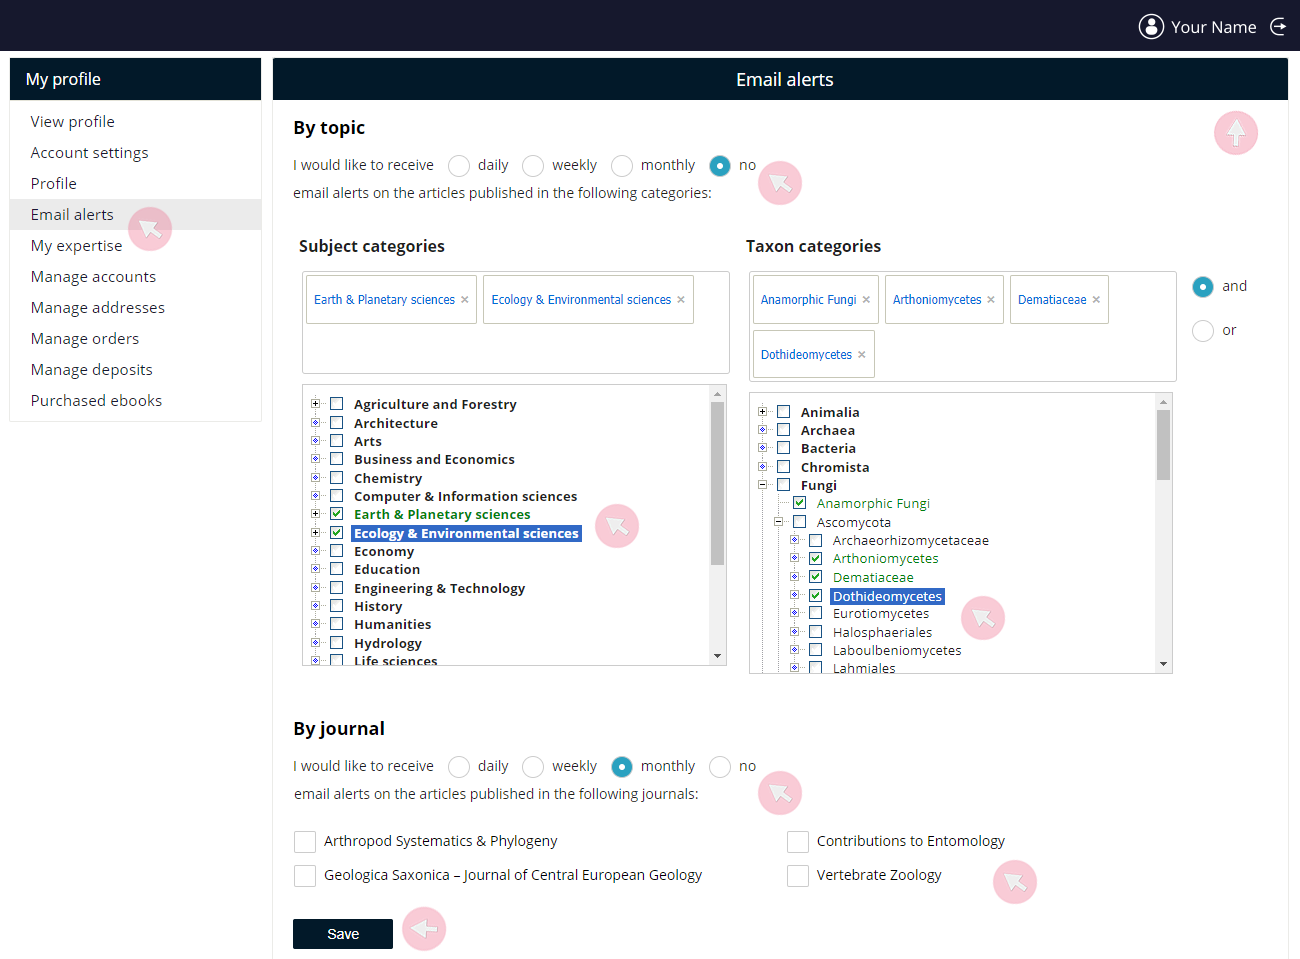
4 To edit your newsletter subscription, go to Email alerts.

Note: Make sure that you access this page from the website of the journal of interest or another journal published by the same publisher. There, you will be able to see and select from all journals published by the same journal and hosted on ARPHA.
5 Use My expertise to set your expertise. This information might be used to avoid peer review invitations in scientific areas which lie outside a reviewer’s competence. Either type in your expertise in the box or use the hierarchical tree to select it. Use the plus (+) symbol on the left-hand side to access the subcategories, if available.
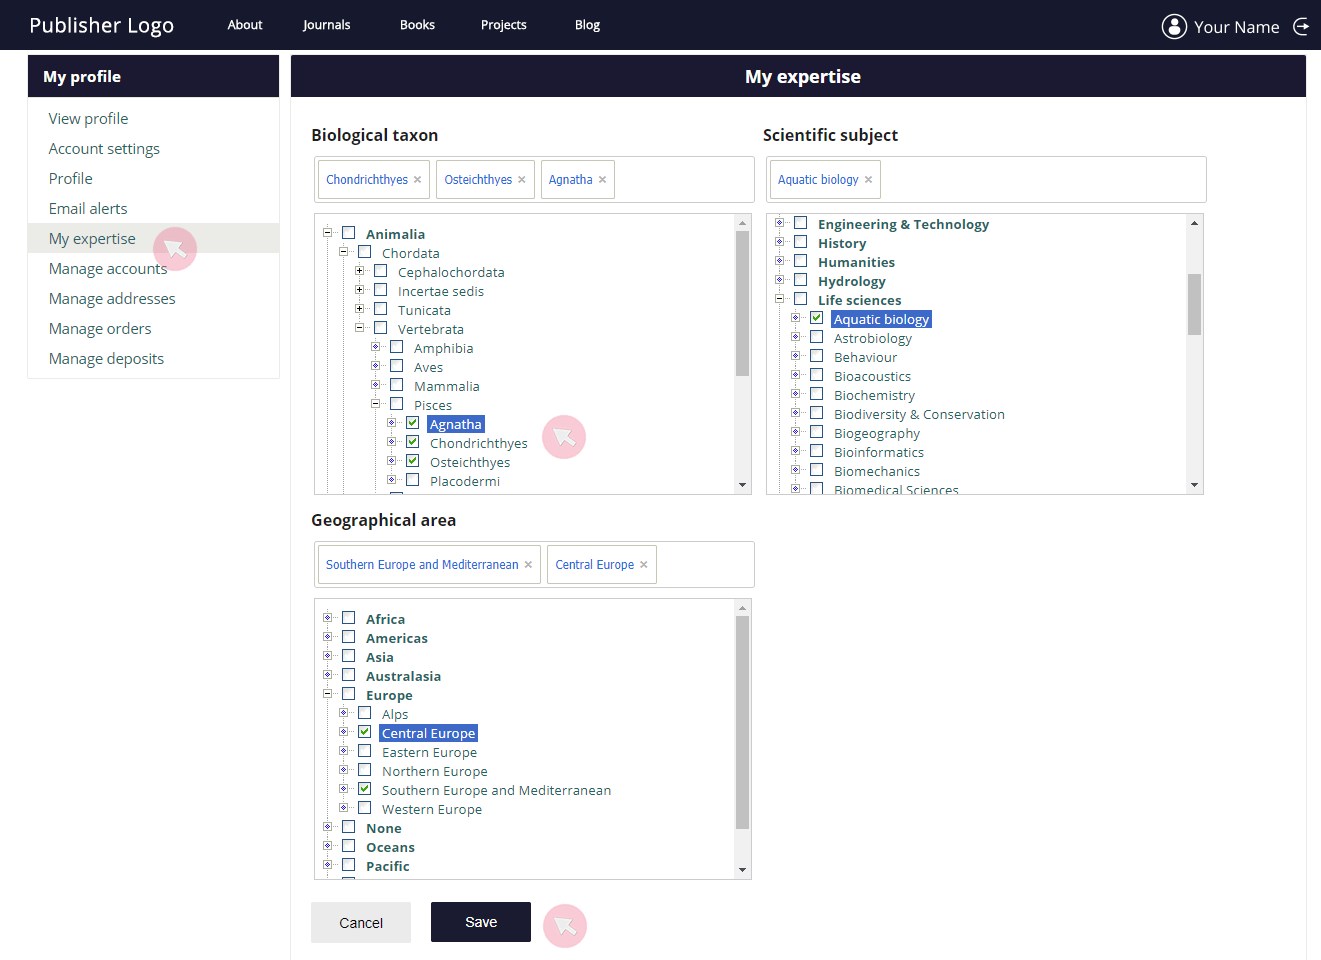
Note 1: We strongly recommend that you select the lowest possible categories in your areas of expertise.
Note 2: If you are invited to join the Editorial board, your expertise as a Subject editor (SE) may differ from the one that you have set as your expertise. It is the Editor-in-Chief who has the responsibility for setting and updating your SE expertise.
Merge multiple accounts
In case you have multiple registrations with ARPHA, you are strongly recommended to merge your accounts, along with their user rights and tasks.
1 Make sure you have logged in to the account you wish to set as primary.
2 Click on your user name to access your profile and account settings.
3 Go to the Manage accounts tab and type in the email address(es) used for the registration of your other account(s). Click Add.

4 A confirmation link will be sent to the secondary email address(es) in order to authorise and finalise the operation.
5 Once your accounts have been successfully merged, you will receive your notifications on the email address set as primary.
Please contact our support team if you experience problems with merging your accounts.
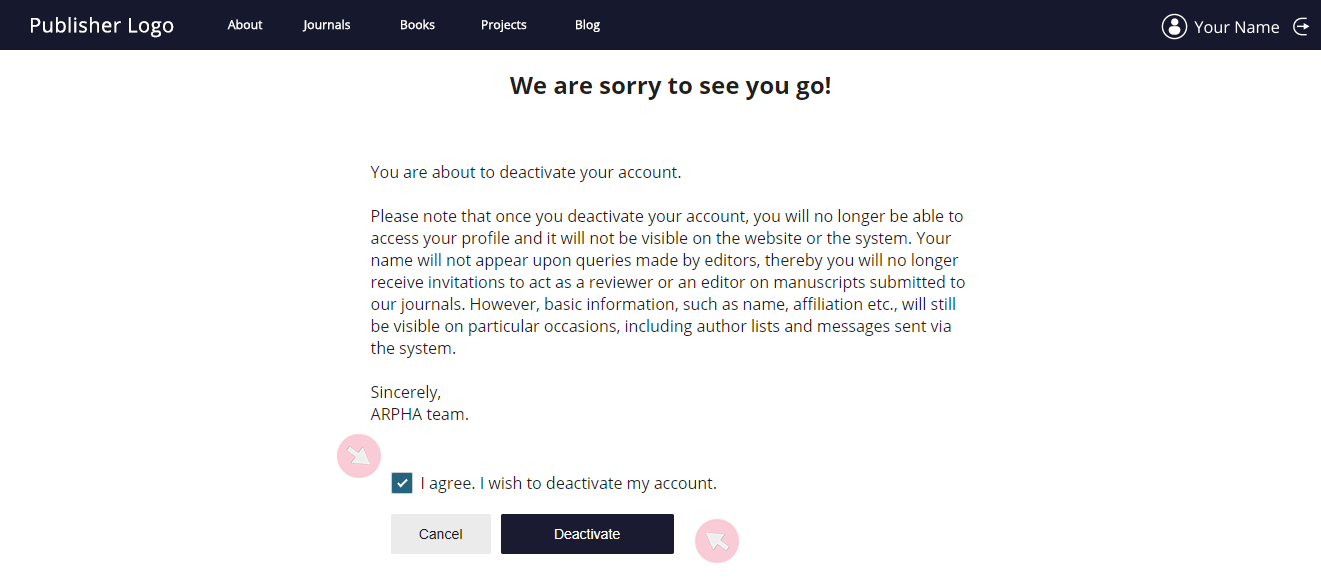
Deactivate account
1 Click on your user name to access your profile and account settings.
3 After you agree to the terms and click Deactivate, you will need to confirm your account deactivation using the link that will be sent to your email.
Note 1: Your name, affiliation and contact details will be still showing in articles you have authored / reviewed / edited even after you have deactivated your user account.
Note 2: Both published and archived articles you have authored / reviewed / edited will remain in the system after you have deactivated your user account.
Subscribe to journal newsletter
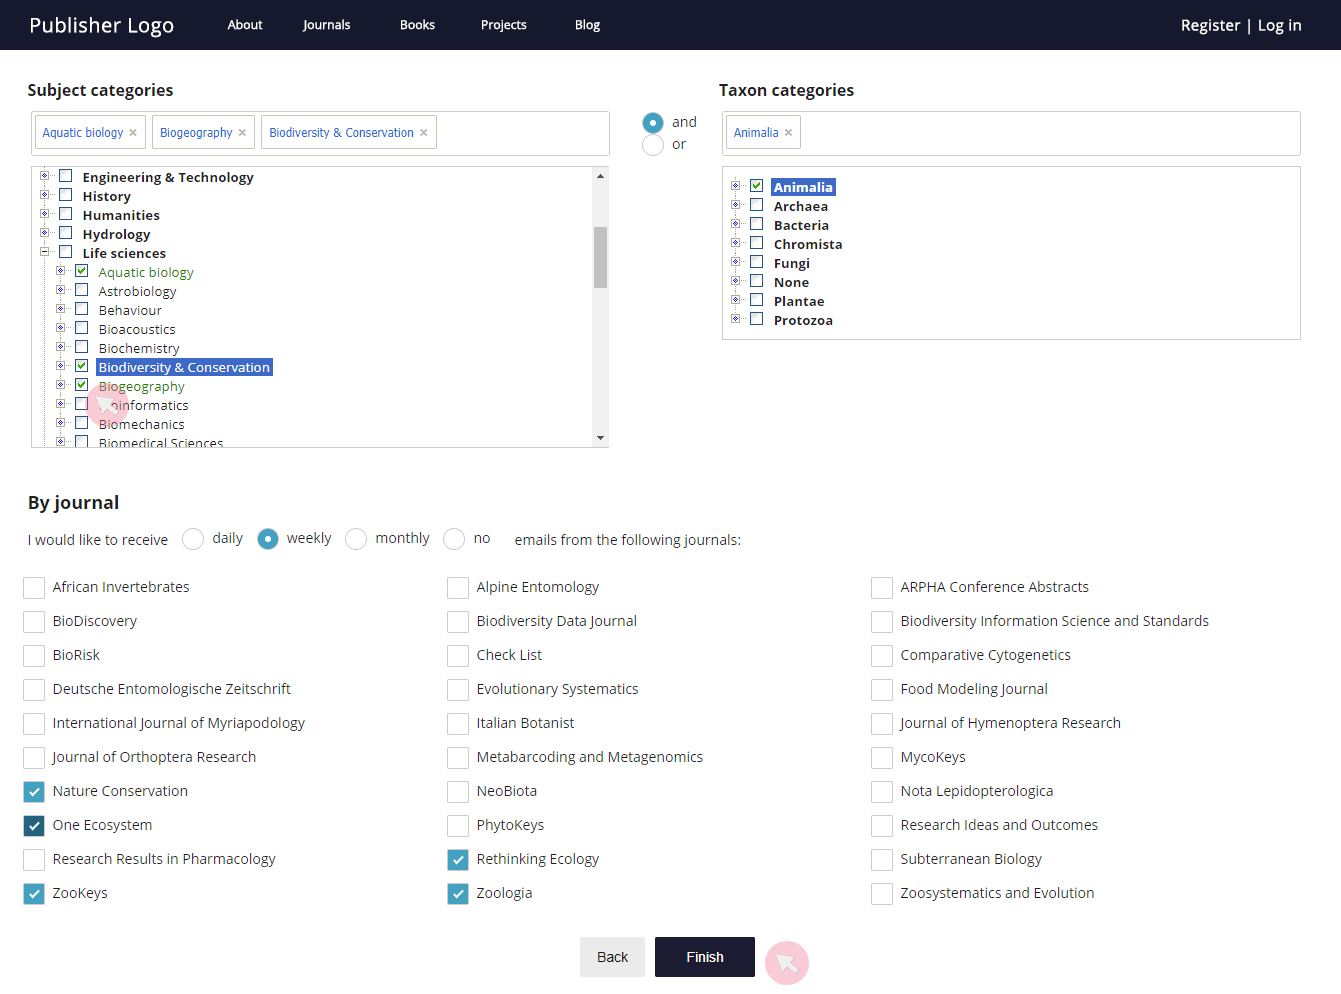
Journals hosted on ARPHA allow for people to subscribe to newsletter emails, which are sent to their inboxes whenever articles have been published within the selected timeframe. Subscribers may also limit their notifications by topic of interest.
If there are more than one journals by the same publisher that are hosted on ARPHA, users may subscribe to multiple of those at once, so that they receive the articles within the same newsletter.
Note: A newsletter is only sent if at least one article has been published in the last day / week / month, depending on the user’s mailing preferences. Weekly newsletters are emailed on Monday, and monthly - on the first day of the month.
1a If you already have an account with an ARPHA-hosted journal, log in to the journal website.
2a Click on your user name displayed in the top right corner of your screen to access your profile settings.
3a Go to Email alerts to set up the content and regularity of your newsletter.
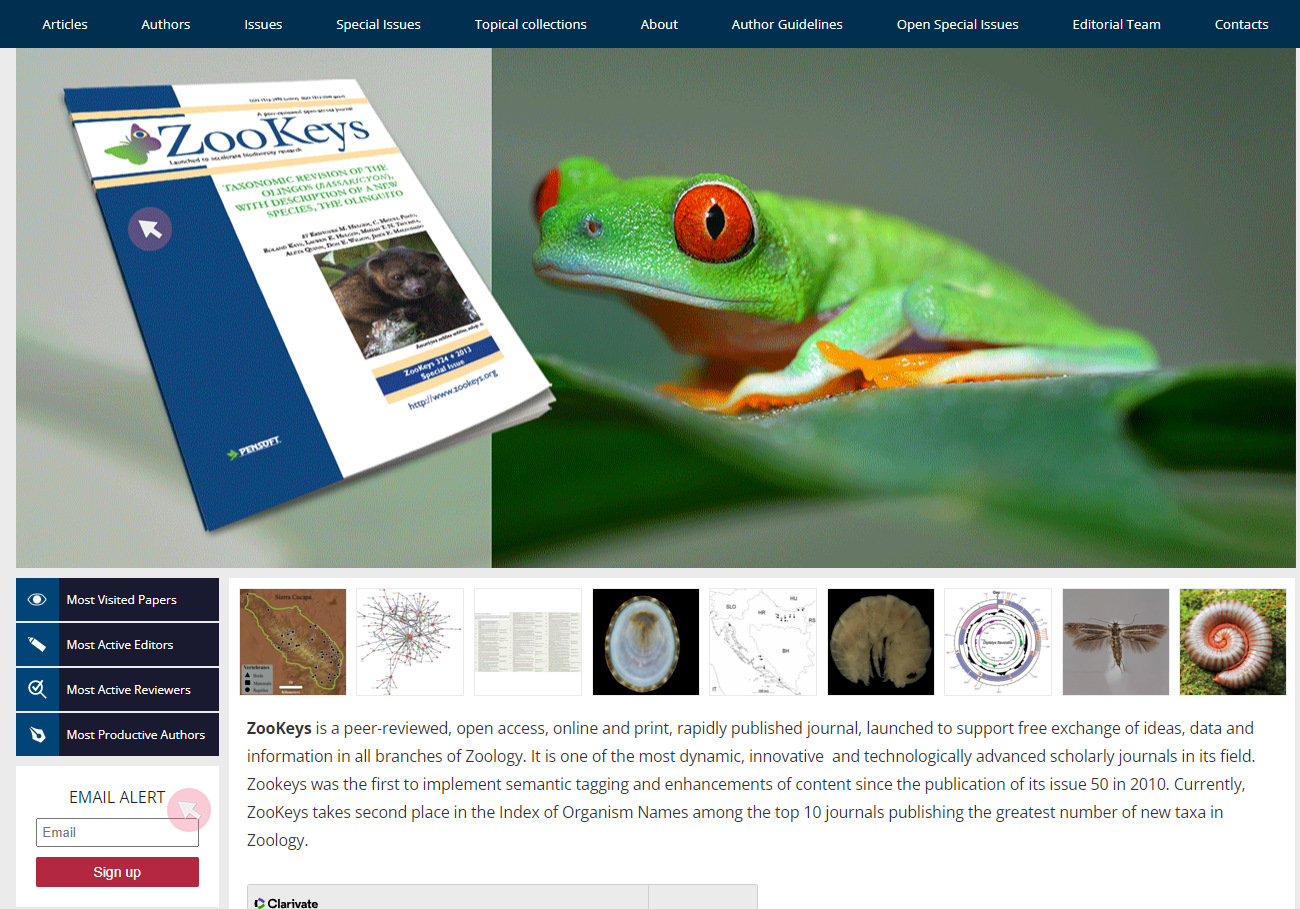
1b If you have not previously registered with any ARPHA-hosted journal, go to the journal website’s homepage.
2b Type your email in the Email alert box and click the Sign up button.
3b Check your email and follow the link to set up your mailing preferences.
Post your news to a journal's community
Some ARPHA-hosted journals have opted to integrate the Post your news feature on their websites to allow users to submit news items that - subject to moderation - are published on the journal’s homepage within a designated News section. From there, the news items are automatically featured in the journal’s newsletter. The aim of those news items is to further strengthen and engage the journal’s community.
To be eligible for publication, a news item must either be directly linked to the journal’s published content or relevant to the journal’s scope or community of readers, authors, reviewers and editors. It also needs to comply with the criteria listed in the submission form.
1 Log in to your ARPHA account. Note that only a registered user can submit news items to a participating journal.
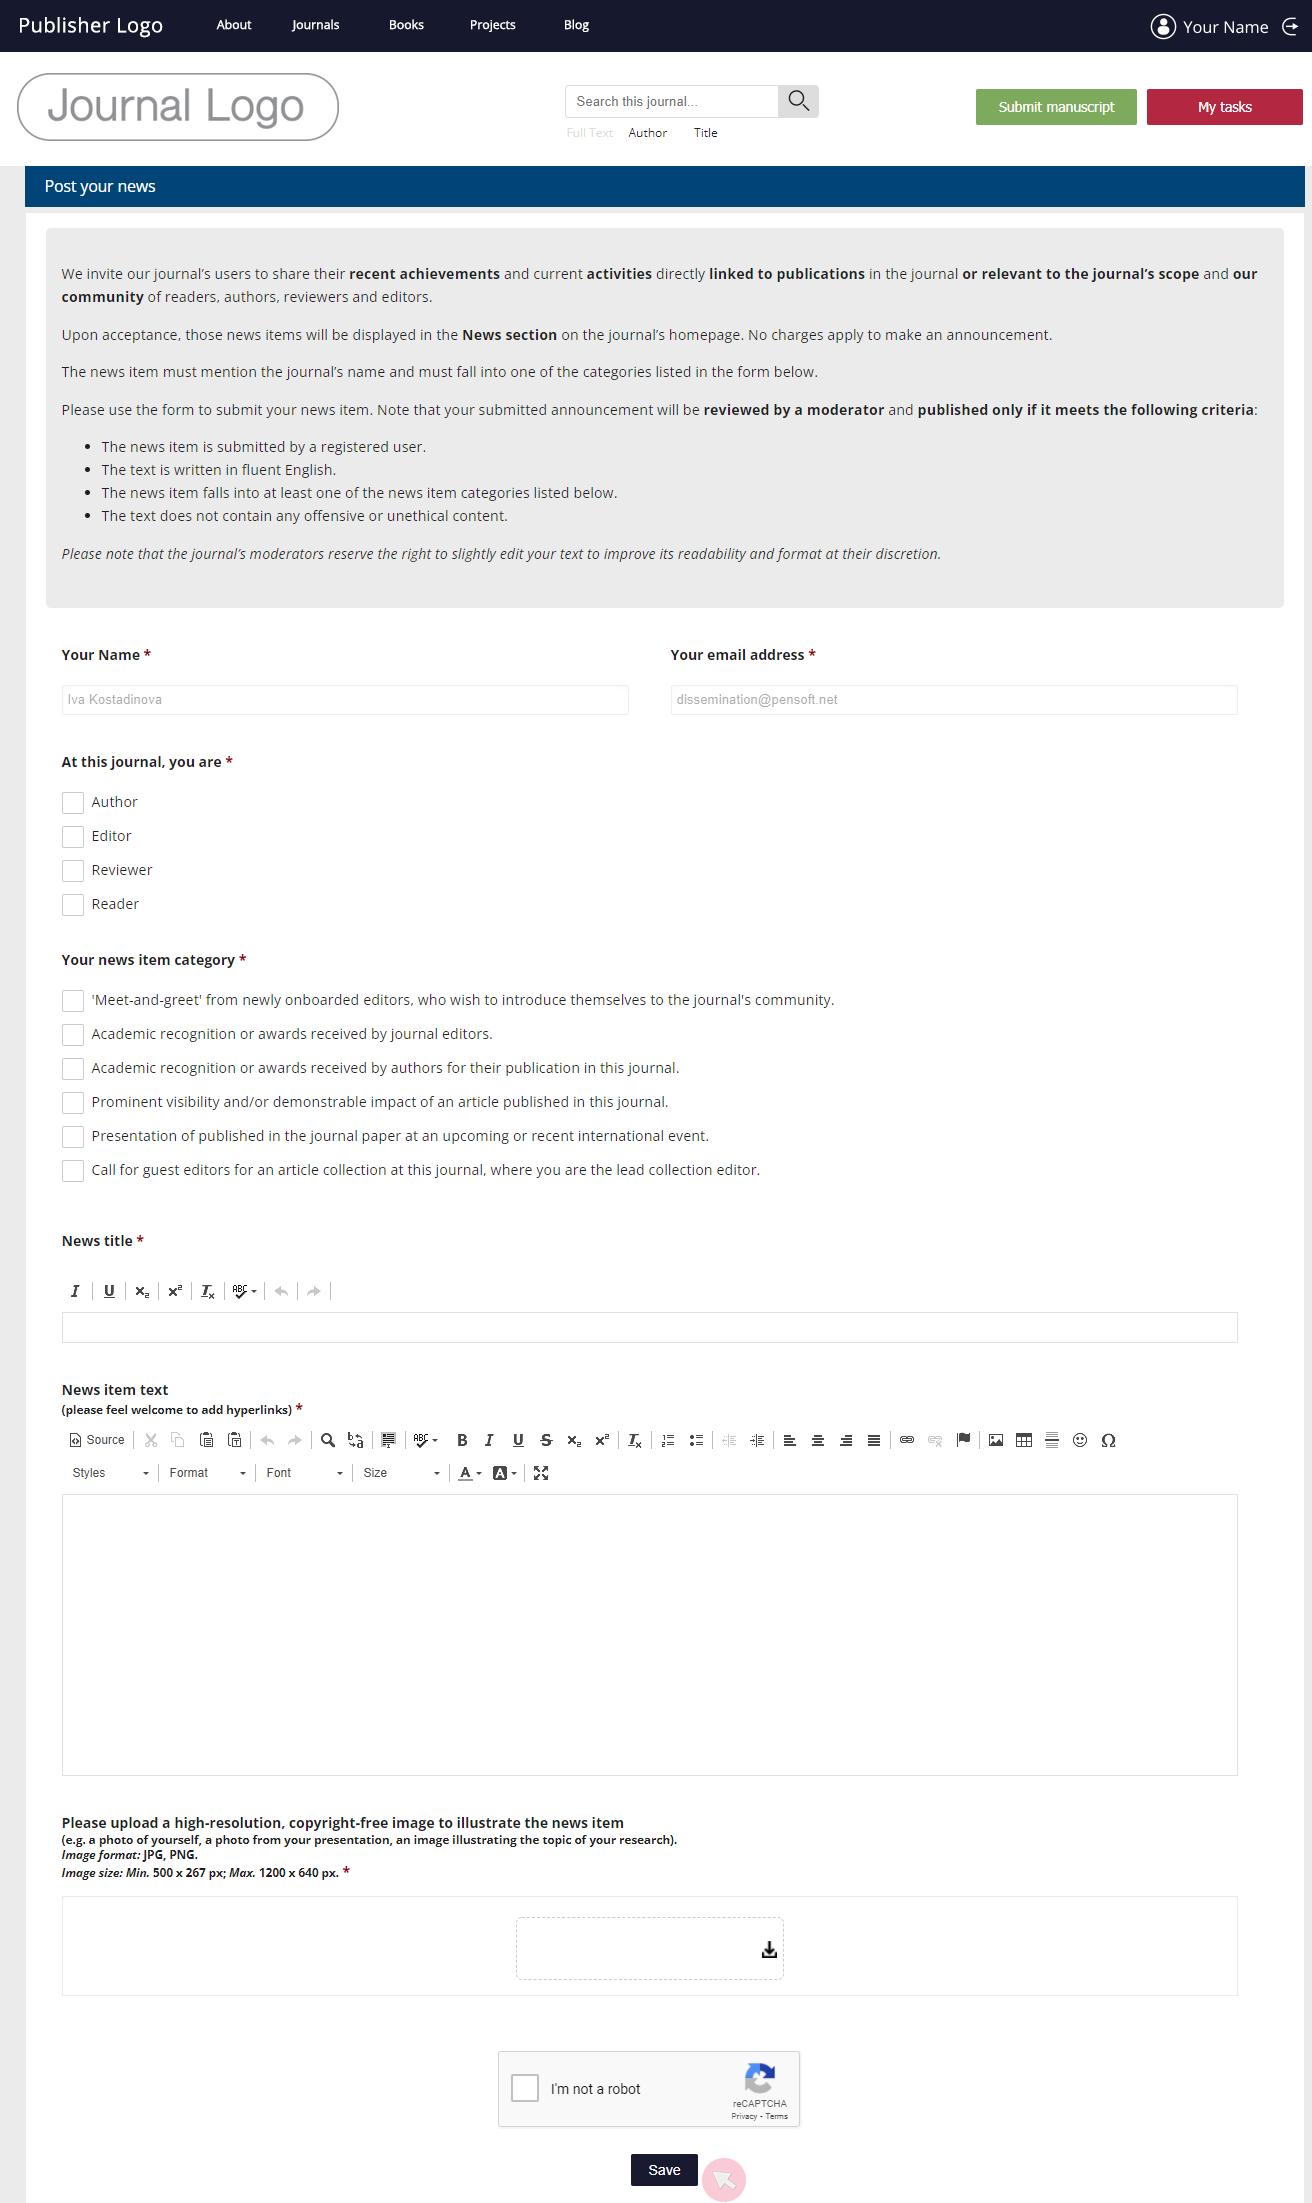
2 Use the Post your news button on the homepage of the journal’s website to access the submission form.

3 Fill in all mandatory fields marked with * and click Save to submit your news item. The image file you upload is to be used as a thumbnail. You will receive an email acknowledging the submission. Once your news item has been checked by a moderator, you will be notified whether it has been approved or rejected.
Note: The moderators might slightly edit your news item at their discretion, in order to improve its comprehensibility or format.
4 If your news item is approved by a moderator, it will appear on the journal’s homepage within the designated News section. While it is displayed on the website, it will also be automatically featured in the journal’s newsletter.

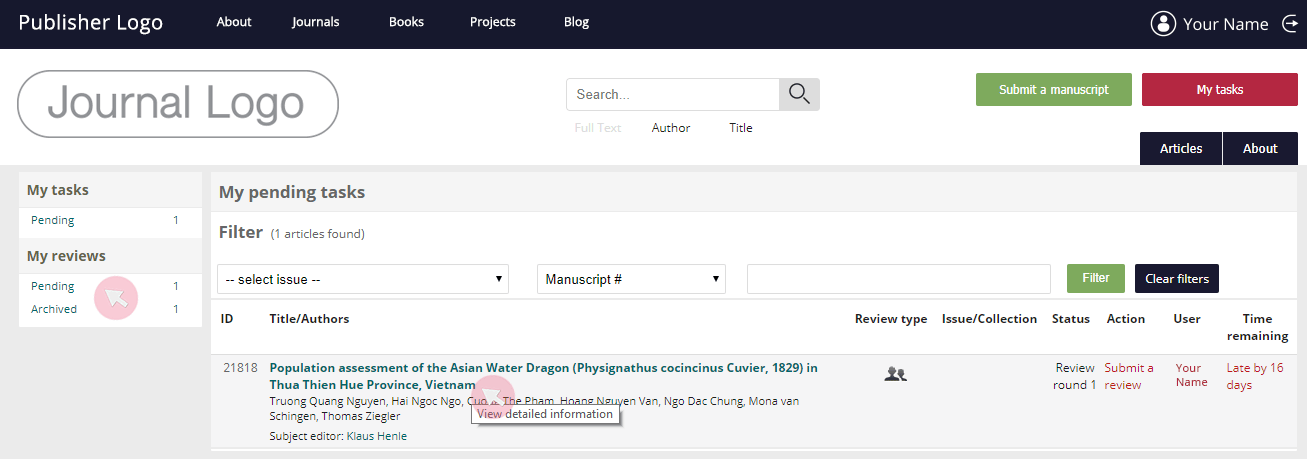
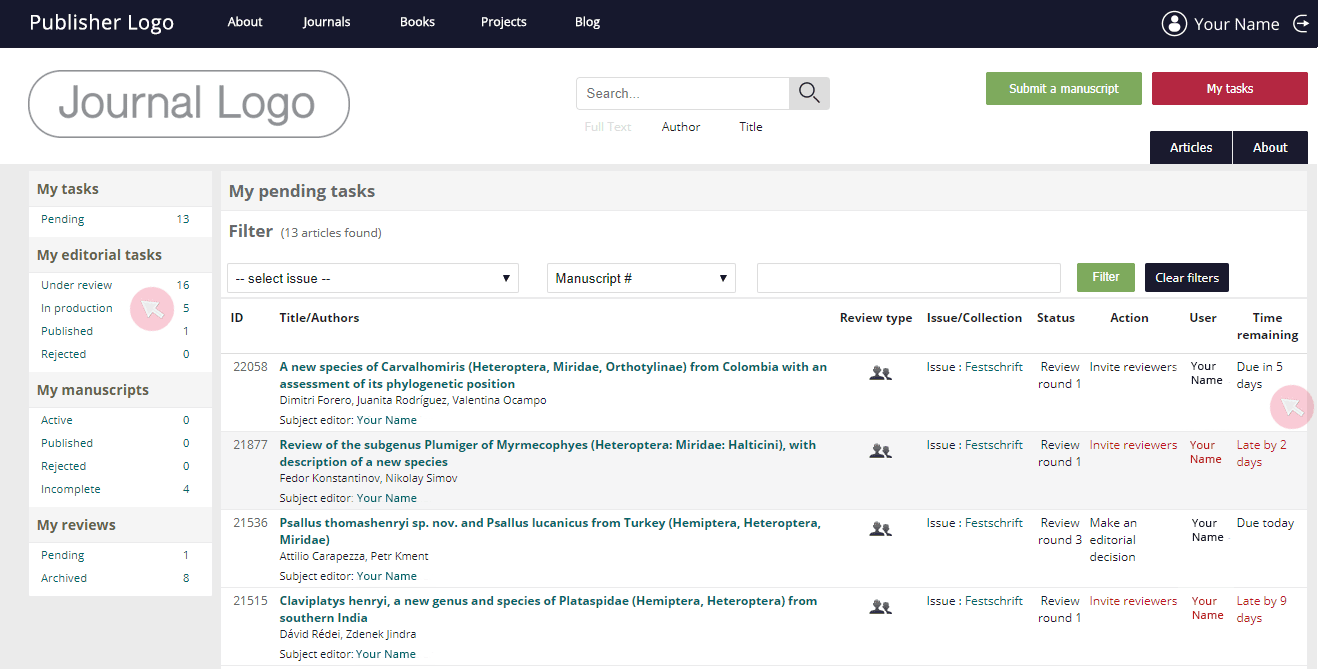
User dashboard and tasks
1 Once you have logged in to your account, you will be able to see and use the My tasks button in the header of the journal’s website.
2 Go to My tasks* to access your user dashboard. There you will find all manuscripts you are working on (authoring, co-authoring, reviewing, editing).
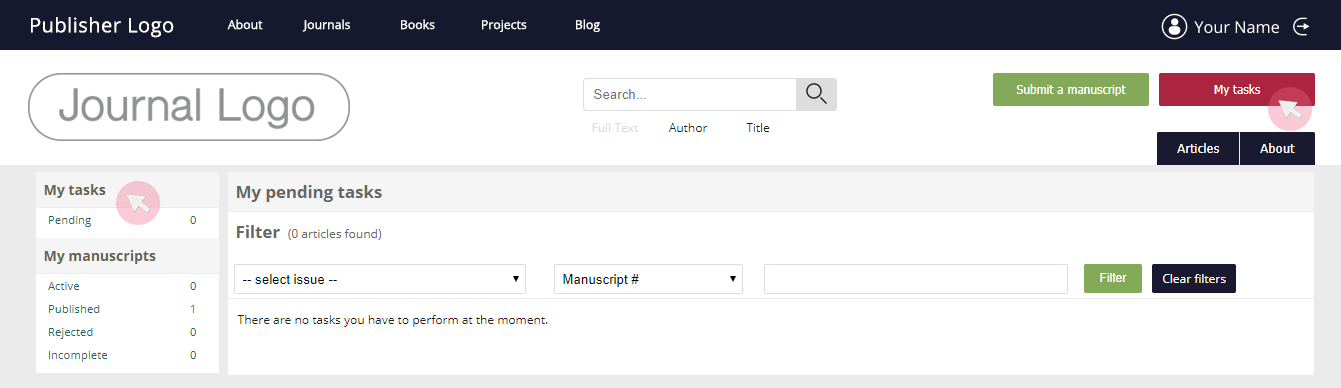
*The My tasks button will not be visible until you have submitted a manuscript or been assigned a task.
Note: If you have been assigned with a specific journal role or granted extra user rights, you will be able to see corresponding tabs and menus, so that you can act as either a Journal manager, Editor-in-Chief, Subject editor, Author or Reviewer.
Submit a manuscript
Once logged in to your account, click the Submit a manuscript button in the header of the journal’s website to launch the manuscript submission interface.
For full instructions on how to prepare and submit a manuscript, see the Author Guidelines section at any journal’s website or the Author chapter in the present manual.

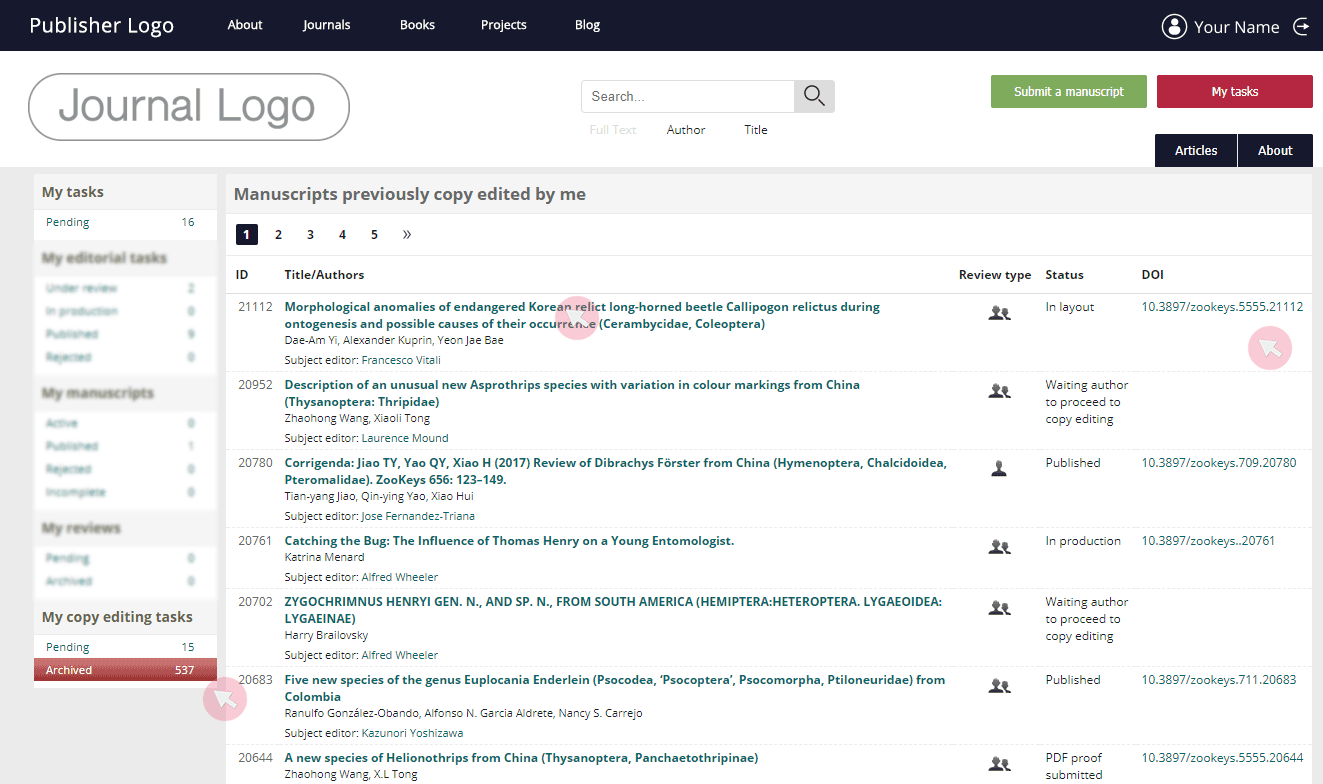
Browse manuscripts
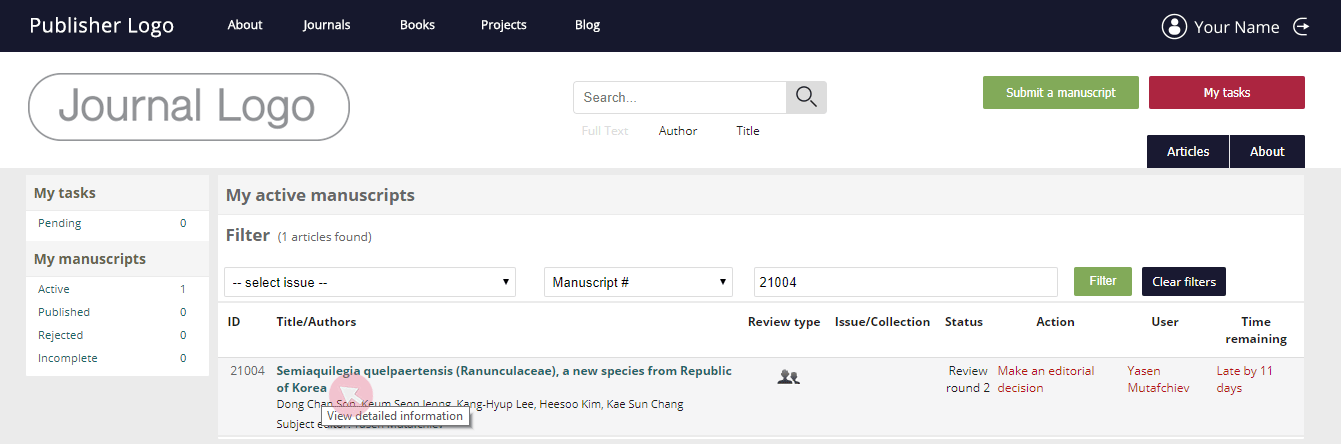
1 Find your manuscripts in the My manuscripts menu grouped by their status (Active, Published, Rejected and Incomplete). To browse through the manuscripts, click a status group to see the full list. The figure next to each category indicates the number of manuscripts in it.
2 Browse the list using any filter. Filter out manuscripts by their issue or a type of details available in the drop-down list in the second field.

Note: Make sure to fill in the number / text in the leftmost field according to the criteria you have set in the middle field (e.g. type in the name of the author in the leftmost field only after you have selected Author in the middle one).
3 To access a submission, click on the manuscript title.
Pitch a Special issue or Topical collection
In participating journals hosted on ARPHA, everyone can propose a Special issue (SI) or a Topical collection (TC). Guest editors do not need to be registered users in the system. If your proposal is approved by the journal’s Editor-in-Chief, and you do not have a user account, such will be created for you automatically. You will receive an email with a confirmation link, which you will need to use to verify your new accounts and/or assume your guest editors roles.
Note: Before pitching a SI / TC, visit the About section of the journal to learn about the difference between SIs and TCs, the user rights and responsibilities of the Collection and Guest editors, and the workflow.
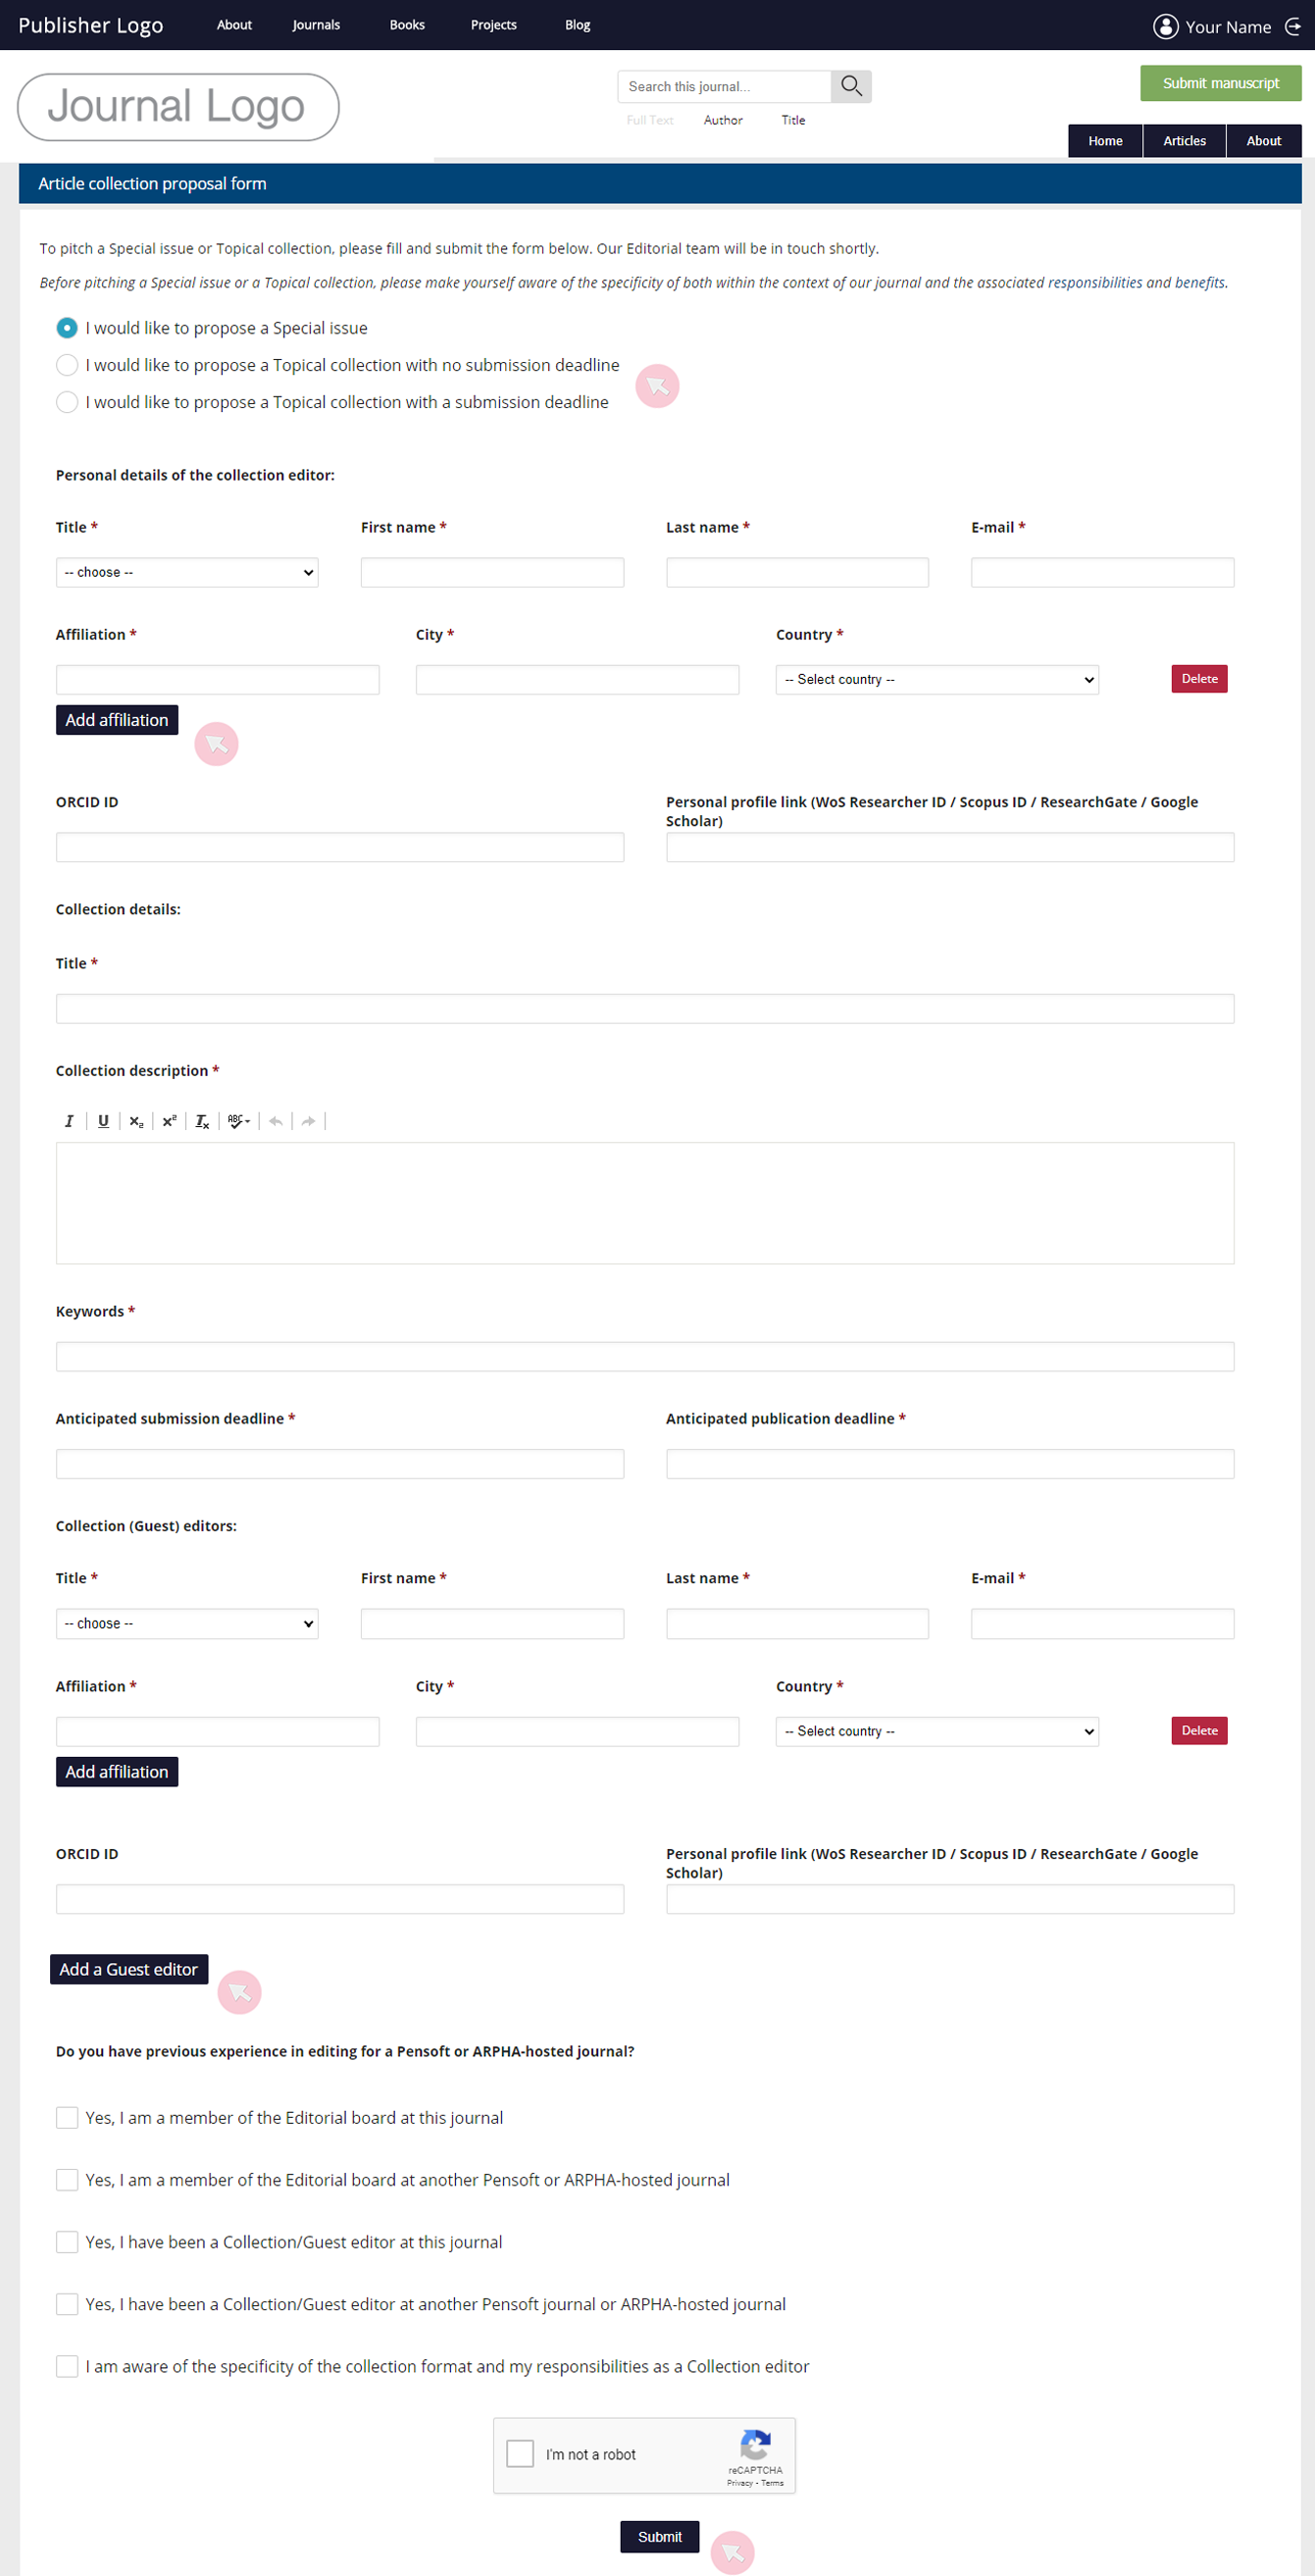
1 To pitch a SI / TC, go to the journal’s homepage and use the Edit a Special Issue button to access the proposal form.
2 In the proposal form, ensure that all fields marked with * are filled in. Add extra affiliations or guest editors by clicking the relevant Add button, which will insert additional fields.
3 Once you complete and submit the form, your pitch will be emailed directly to the journal’s Editor-in-Chief. Once the Editor-in-Chief approves or declines your proposal, you will receive an automated email.
Handle a Special issue or Topical collection
Collection editors are able to access and edit the Special issue (SI) / Topical collection (TC), approve / decline submissions and assign Guest editors to handle the peer review of each manuscript. They can also assign manuscripts to themselves, thus also acting as Guest editors.
The user rights of the associated Guest editors are limited to handling the peer review of their assigned manuscripts and making an editorial decision.
Note: The system allows for only one user to act as a Collection editor. In case you wish to have multiple Collection editors for your collection, you are expected to coordinate the tasks and duties between yourselves.
1 Every time an author assigns a manuscript to your SI / TC upon submission, you will receive an email notification from the system with a link to the submission.
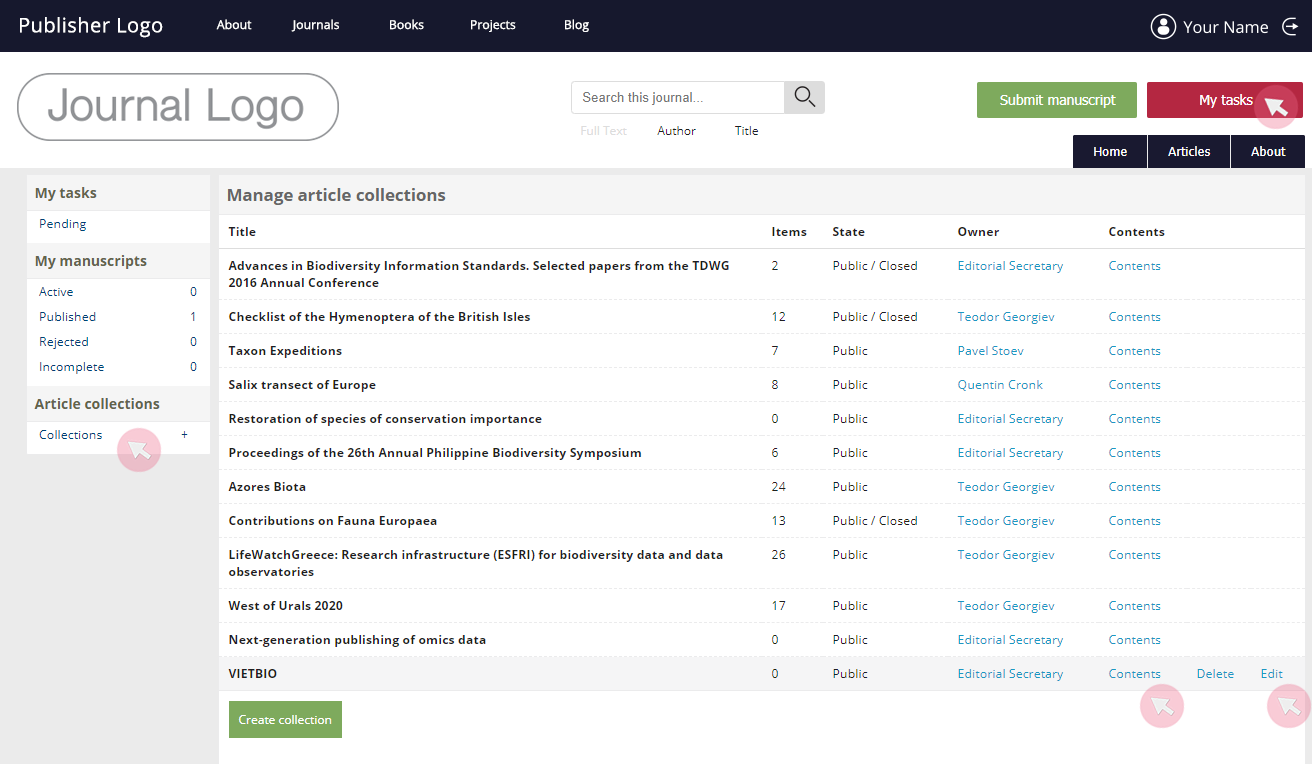
To find your collection, log into your user account on the journal’s website and access your dashboard from the My tasks button. Click Collections from the Article collections space (it will become visible once you become a Collection editor) to edit your collection (e.g. update its name, description, classifications or cover image) and access its contents.
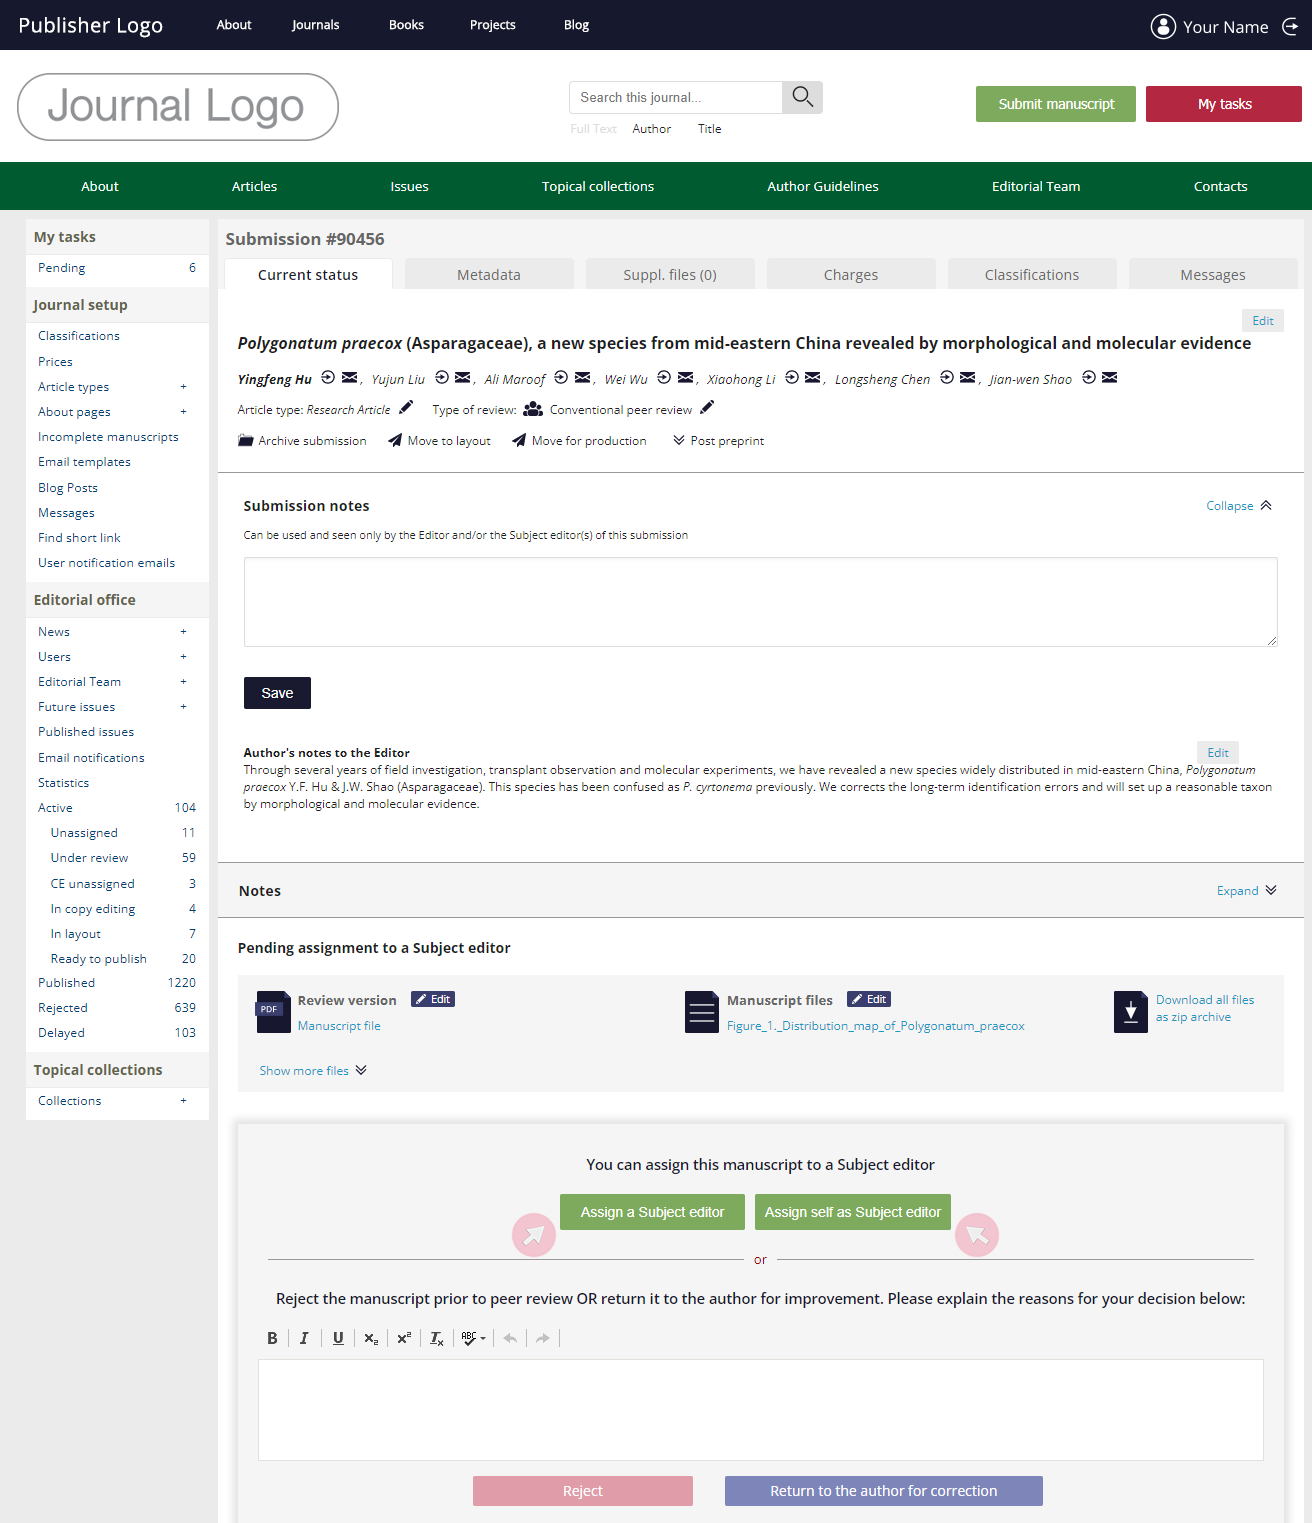
2 When you are notified that a new manuscript has been submitted to your collection, you will need to accept or decline the manuscript for your collection. In case you approve it, you will need to assign a Guest editor to the manuscript. If you decline it, it will be returned to the author, who will be able to either submit the manuscript to a regular issue of the journal or withdraw the submission.
3 To assign a Guest editor to the manuscript, click on the title of the submission and go to the Current status tab. Use the buttons to assign an editor for the manuscript.
If you opt to assign the manuscript to someone else, you will see a drop-down menu allowing you to select one of the Guest editors.
Note 1: Once an editor is assigned, he/she will be able to find the manuscript in My editorial tasks in his/her user dashboard, accessible from My tasks.
Note 2: In case you are editing multiple manuscripts, which might or might not be part of a SI / TC, you will be seeing all of them in your My editorial tasks space. To see whether any of those is intended for a regular journal issue or for a specific SI / TC, go to the submission and scroll down in the Metadata tab.
4 Once the peer review is completed and an editorial decision about the acceptance / rejection of the manuscript is made, the manuscript will proceed to copy and layout editing, and publication.
Note 1: To see how to handle the peer review and make an editorial decision, see the Subject editor chapter in this manual.
Note 2: In some journals, the acceptance of a manuscript might be subject to approval from the Editor-in-Chief (see Verify a Subject editor’s decision in the Managing Editor and Editor-in-Chief chapter).
Comment on published articles
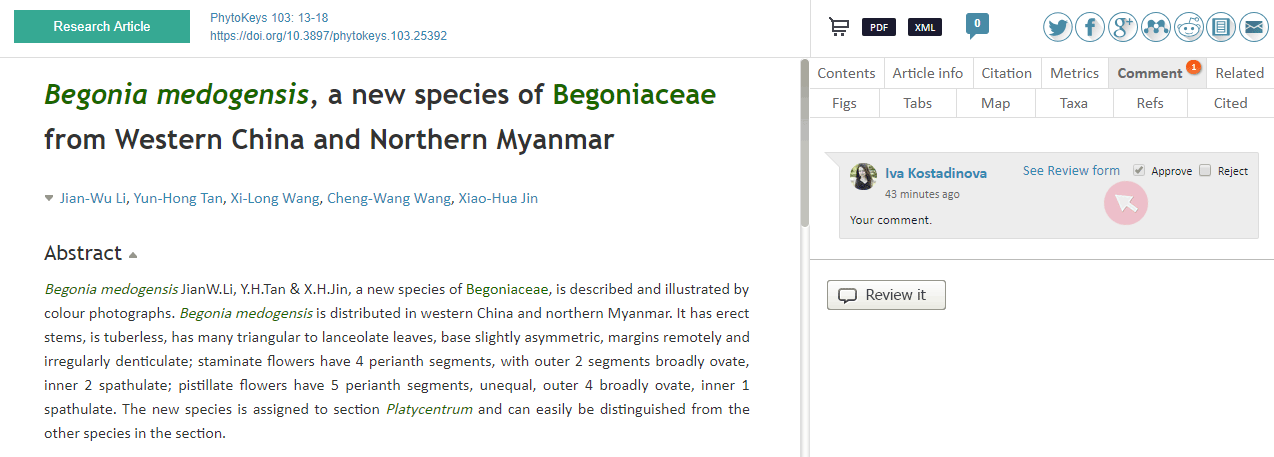
1 Once you have accessed the article, go to the Comment section and click the Review it button to leave your comment in the text box.
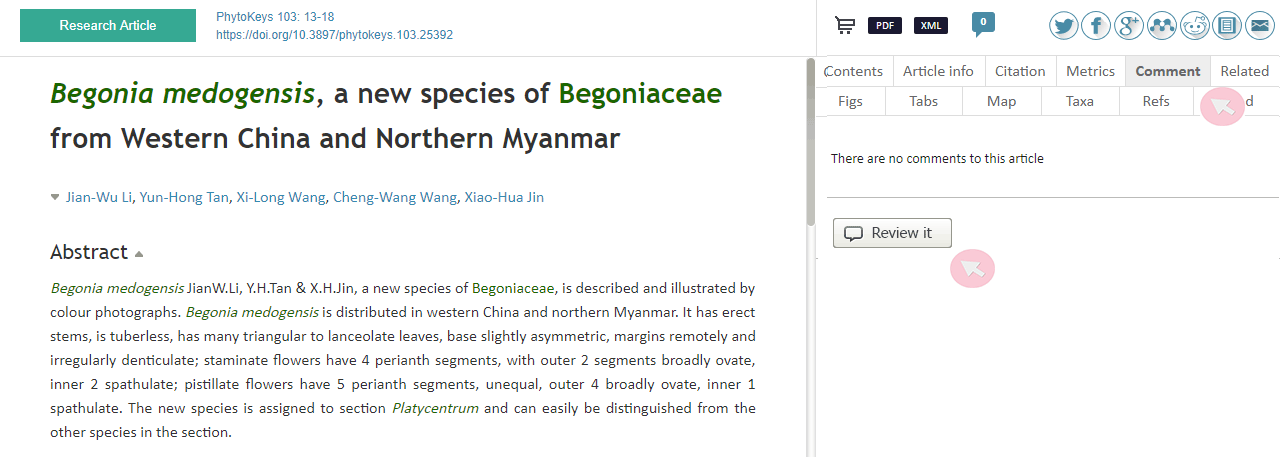

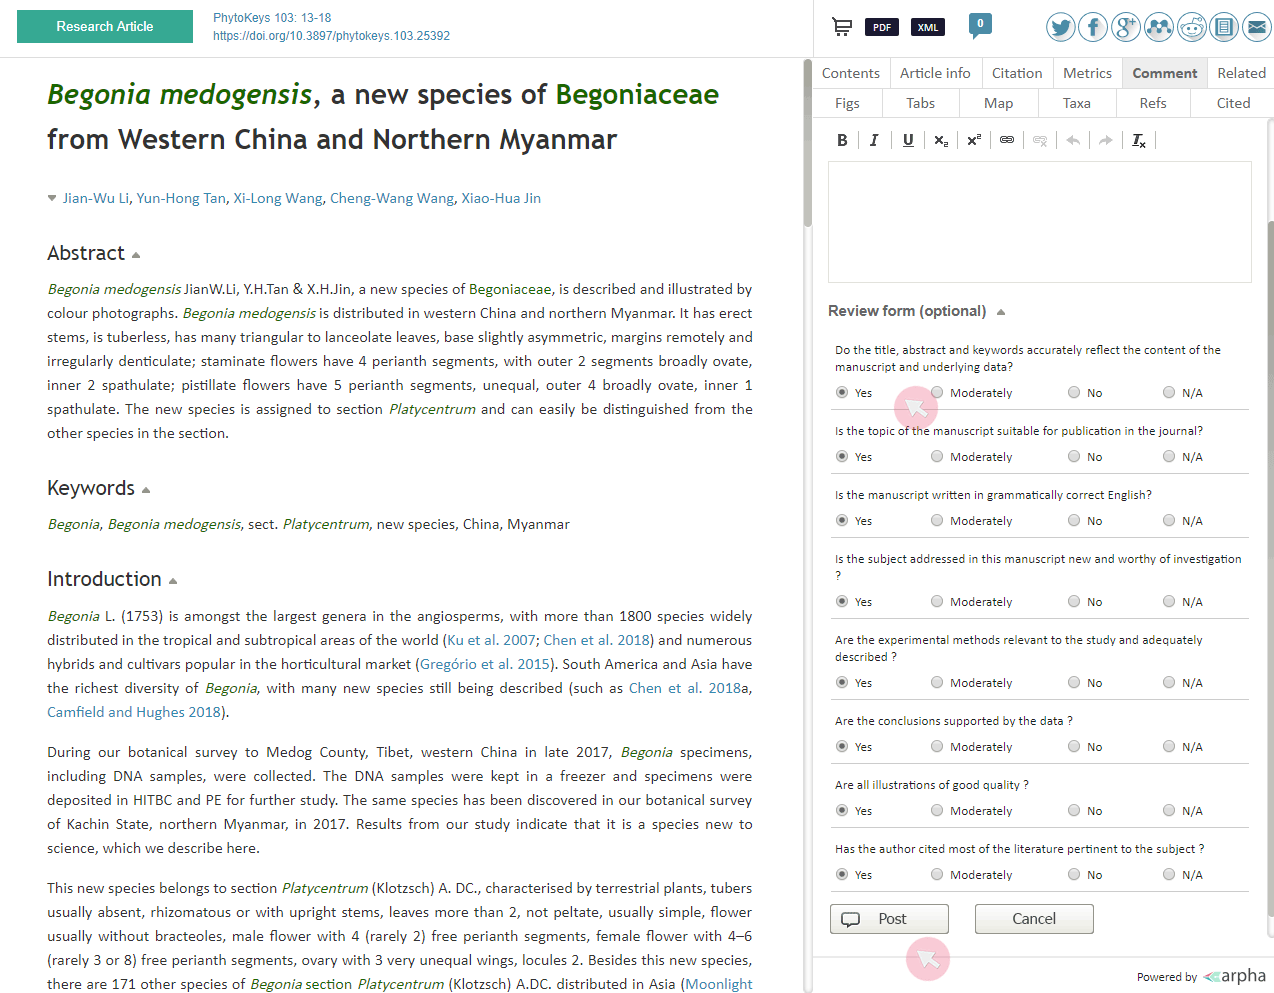
Note: Your comment, review form and name will be publicly available.
Clickable objects
ARPHA uses a number of clickable objects (i.e. symbols and texts).
To identify a clickable object, your mouse arrow (

1 Often the clickable text is self-explanatory enough (e.g. appears under a column entitled Actions or reads Assign).
2 To find the use of a certain clickable object, hold the mouse pointer over it for a moment to see a brief explanation.
- The clickable
next to a user’s name generates an email to that person.* Alternatively, right click the icon (
- The
allows for edits. Hover over the symbol to find out what edits can be done for the particular occasion.
Modify information on the journal’s website
1 Access and manage the pages and subpages in the About section of the journal from About pages in the Journal setup menu.
2 Click the plus (+) symbol on the About pages tab to add a new page.
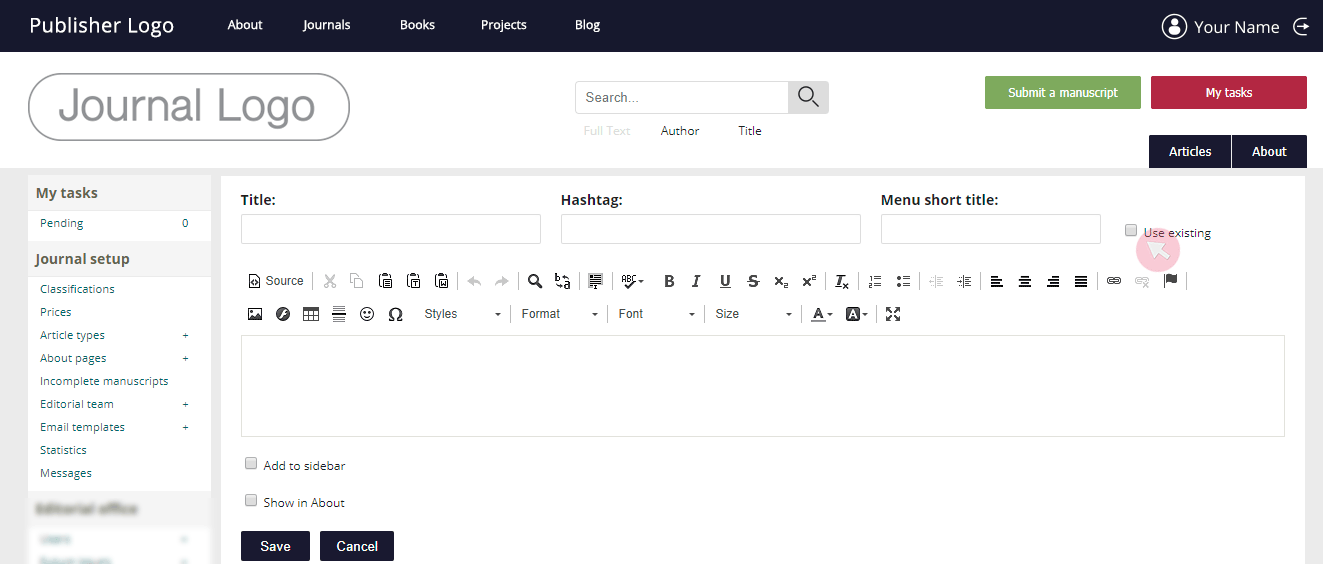
3 When creating a new (sub)page, make sure to fill in all the fields:
- Title: page title visible in the About section;
- Hashtag: uninterrupted string added to the URL link for easier navigation;
- Menu short title: page title visible in the About section menu used as an anchor within the menu.

4 To manage existing (sub)pages and add new subpages, click on the About pages tab to access all (sub)pages.
- Access and edit the contents of a (sub)page by clicking on its title;
- Create a new subpage by clicking on the (+) icon to the right;
- Delete a page along with all of its subpages by clicking (X) to the right;
- To move a page up/down the order along with all of its subpages, click and hold the button on the left of the page to drag and drop it.
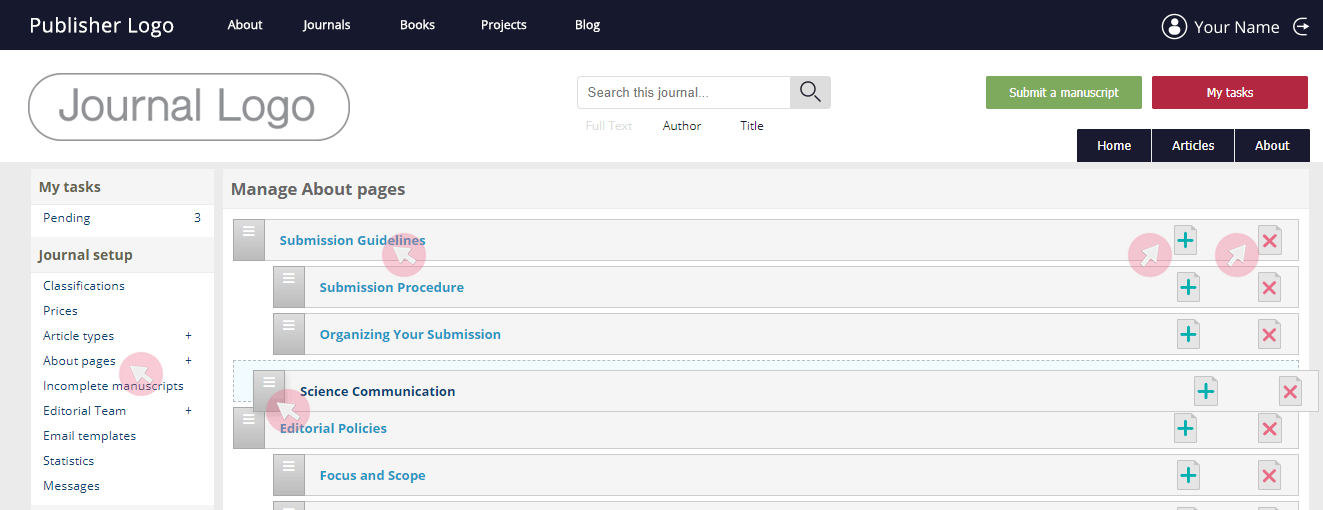
Note: If you drop a page in between the subpages of another page, the former will appear as a subpage to the latter. Hence, ensure that you drop a page right above another page.
5 To copy-paste a (sub)page from another ARPHA journal tick Use existing.
Additional fields will appear to let you select the journal and its (sub)page you want to copy.
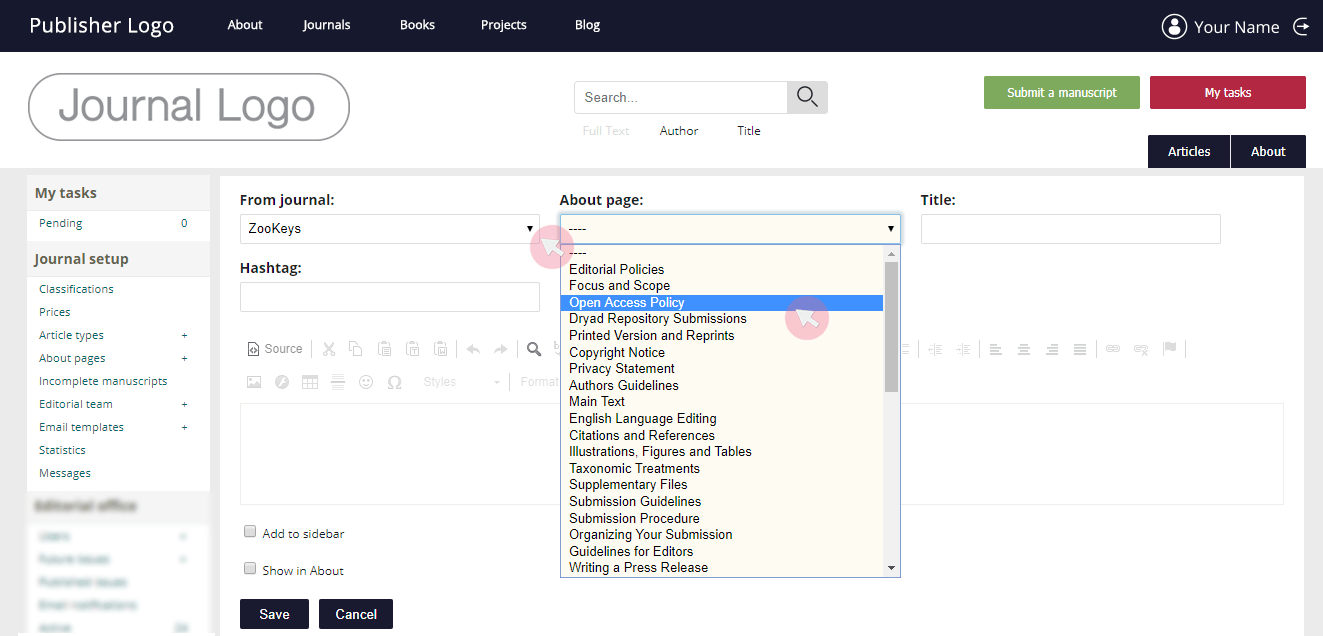
Note: The application of Use existing does not allow you to modify the text. It simply copy-pastes it as it is. An error or a typing mistake can only be corrected at the journal for which it was initially set. Likewise, if the content of the original page changes, these edits will influence any copy-pasted pages.
6 Tick Add to sidebar to make the (sub)page visible on the journal’s homepage.
7 Tick Show in About to make it visible in the journal’s About section.
8 Click Save to finalise your edits.
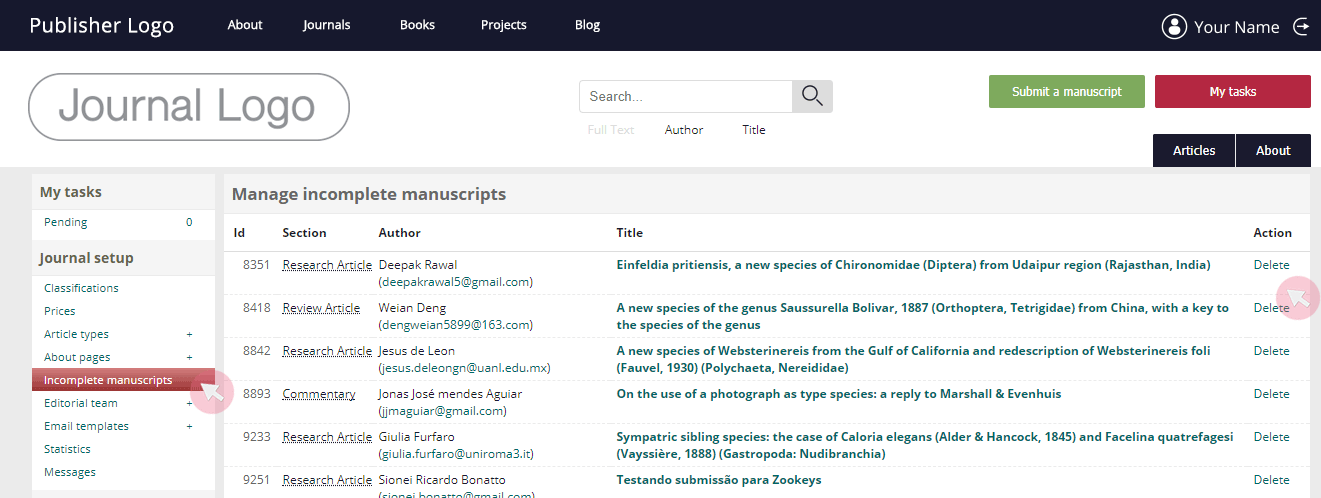
Access incomplete manuscripts
1 To access manuscripts, which have been created for the journal, but have not been successfully submitted, go to the Incomplete manuscripts tab in the Journal setup menu.
Note: Incomplete manuscripts are often submission forms left blank.
2 To delete an incomplete submission, use the command on the right-hand side.
3 To access the submission on behalf of the submitting author, click on the manuscript’s title.
Set article types
1 Use Article types from the Journal setup menu to set the article types available in the journal.
2 Click the plus (+) symbol on the Article types tab to create a new article type.
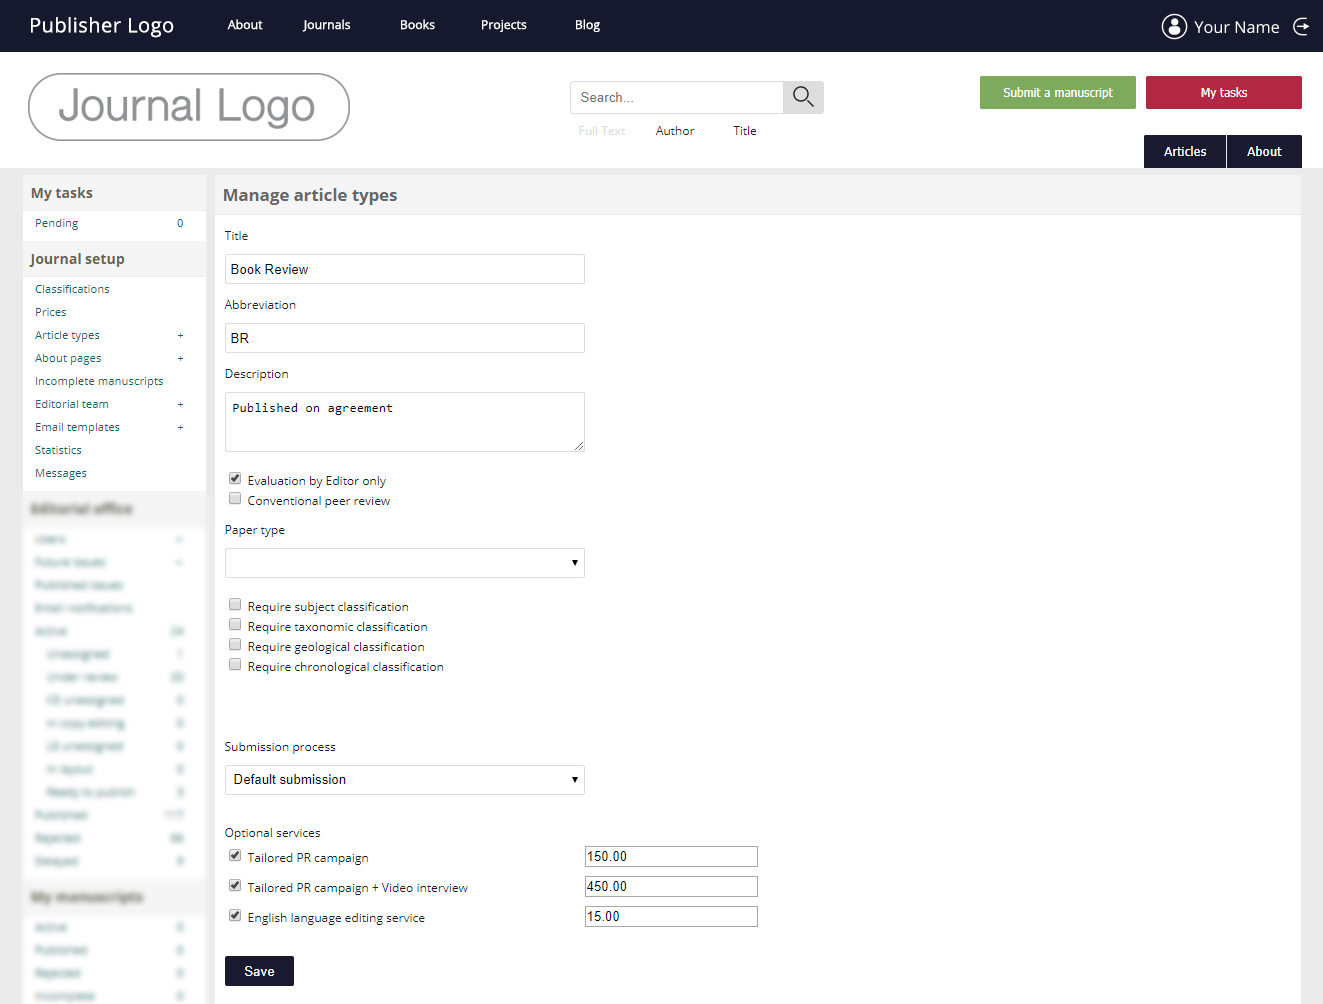
3 Click on an article type’s title to edit it.
4 Go to the far right to delete an article type and the bottom of the page to add a new one.
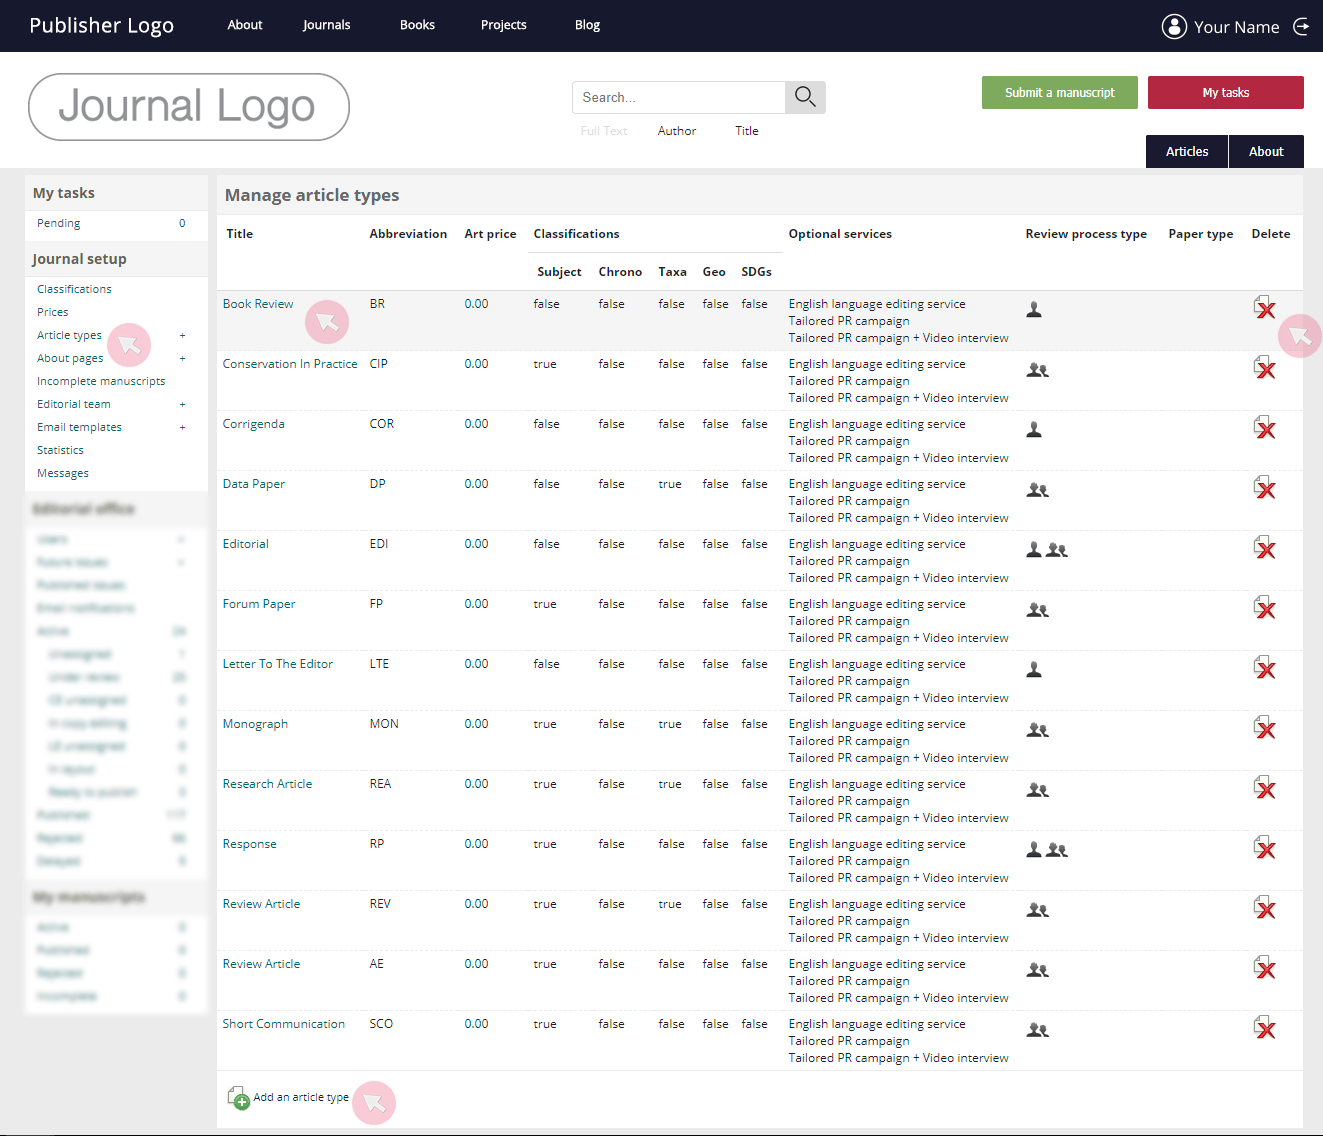
5 In the edit mode, you can change the name of an article type; set an evaluation / peer review type; add mandatory fields; set optional services etc.
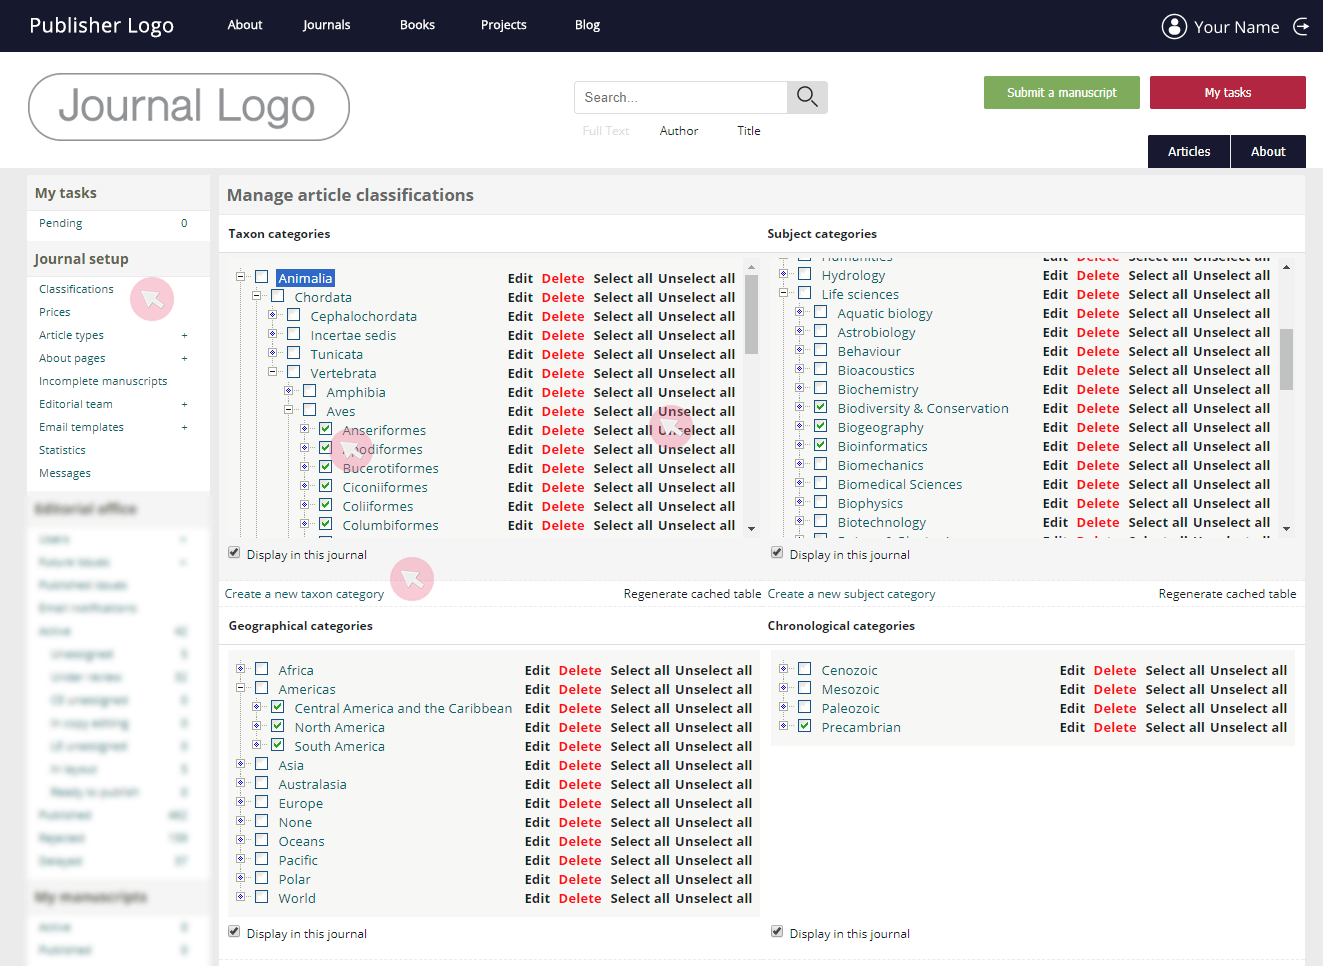
Set classifications
1 Use Classifications from the Journal setup menu to set the different categories to which the manuscripts can be assigned upon submission.
Note: These classifications are essential since they are used when inviting suitable peer reviewers. They will be also used as tags (indexed terms) after the article is published.
2 Tick all classifications from across the hierarchical trees which you find suitable for the journal. Select all ticks all lower categories within the main one. Likewise, Unselect all leaves only the higher category ticked.
Tip: Untick a higher classifier and select only the necessary child categories within it. Thus, authors will only be able to select categories lower than the unticked one during manuscript submission. Higher precision of the assigned classifications facilitates and expedites the assignment of both subject editors and reviewers.
3 If necessary, add a new category using the actionable text at the bottom of each section.
4 Click Edit to change a category’s name or its parent ID.
5 Make sure to tick Display in this journal to confirm and finalise your edits.
Role
The Editor-in-Chief (E-i-C) is responsible for the scientific quality and overall performance of a journal.
The E-i-C participates in defining the journal’s focus, scope and policies and in the assembly of the editorial board. Furthermore, the E-i-C represents the journal to the outside world and takes care for possible resolution of conflicts between authors, reviewers and editors.
The E-i-C has the right to intervene in the review and editorial process and to make final decisions over those of the Subject editors on the acceptance / rejection of manuscripts .
In some journals, an E-i-C also verifies the final decision on the acceptance / rejection of manuscripts following completion of the review process and provision of a Subject editor’s opinion.
The Managing editor (ME) monitors and coordinates the whole editorial process, from submission through peer review, editing, production and publication, as well as other services available.
The ME can also manage users and user rights, provide manuscript screening prior to peer review and assign subject editors. The ME is responsible for the communication between the different actors in the publishing process.
Rights
In ARPHA, the user rights of the Managing editor and the Editor-in-Chief overlap. Therefore, for the purposes of the system and these guidelines, they are both referred to as Editor (E). It is a matter of agreement between the Editor-in-Chief and the Managing editor to define their responsibilities in managing the journal, using the same access and user rights.
- Create new user accounts
- Access user database
- Assign / Remove user rights
- Modify Editorial team / Contacts list on the journal’s website
- Merge user accounts
- Mark Subject editors as temporarily unavailable
- Log in as third-party users and perform tasks on their behalf
- Edit and/or submit reviews on behalf of a reviewer
- Manage submissions and monitor their progress
- Check manuscripts for plagiarism prior to Subject editor assignment (optional)
- Manage Subject editor assignments
- Return manuscripts for corrections prior to peer review
- Reject manuscripts prior to peer review
- Verify Subject editor’s decisions (optional)
- Manage linguistic editing
- Access journal statistics
- Manage journal issues
- Send emails to user groups
- Moderate news item submissions
- Add badges to publications
Create new user accounts
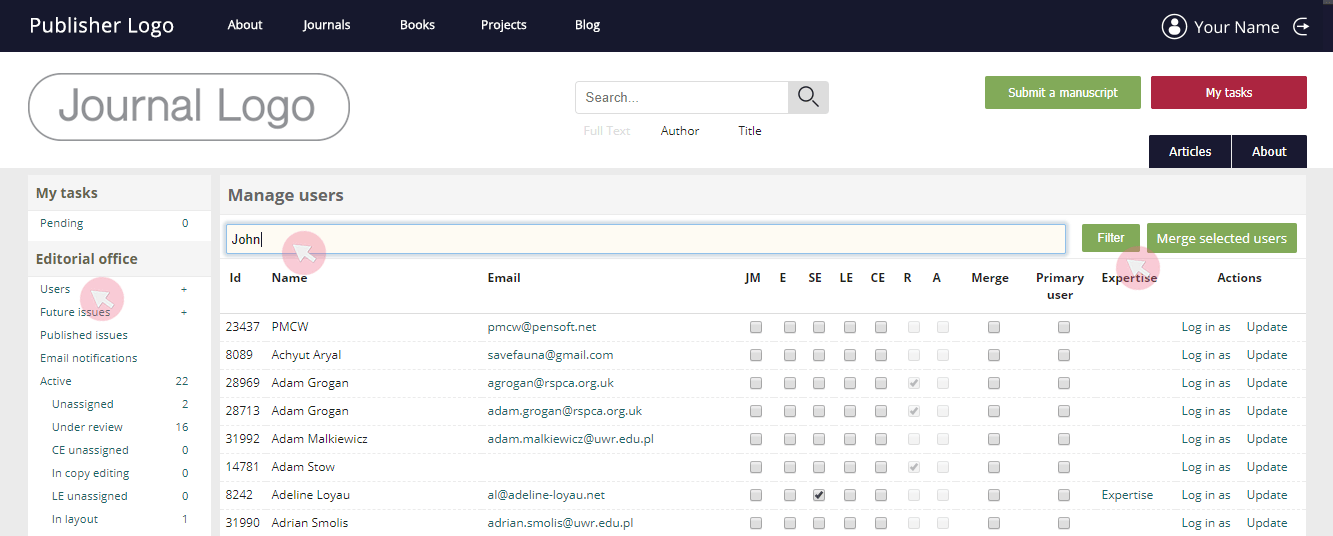
1 Before creating a new account, check whether a person is already registered with ARPHA. Go to the Users tab from the Editorial office menu to search for him/her by typing in a name or email address and clicking Filter.
2 To create a new user account, click the plus (+) symbol on the Users tab from the Editorial office menu. Complete the form by ensuring that all mandatory fields (marked with *) are filled in. Use the form to also assign a role to the new user where necessary.
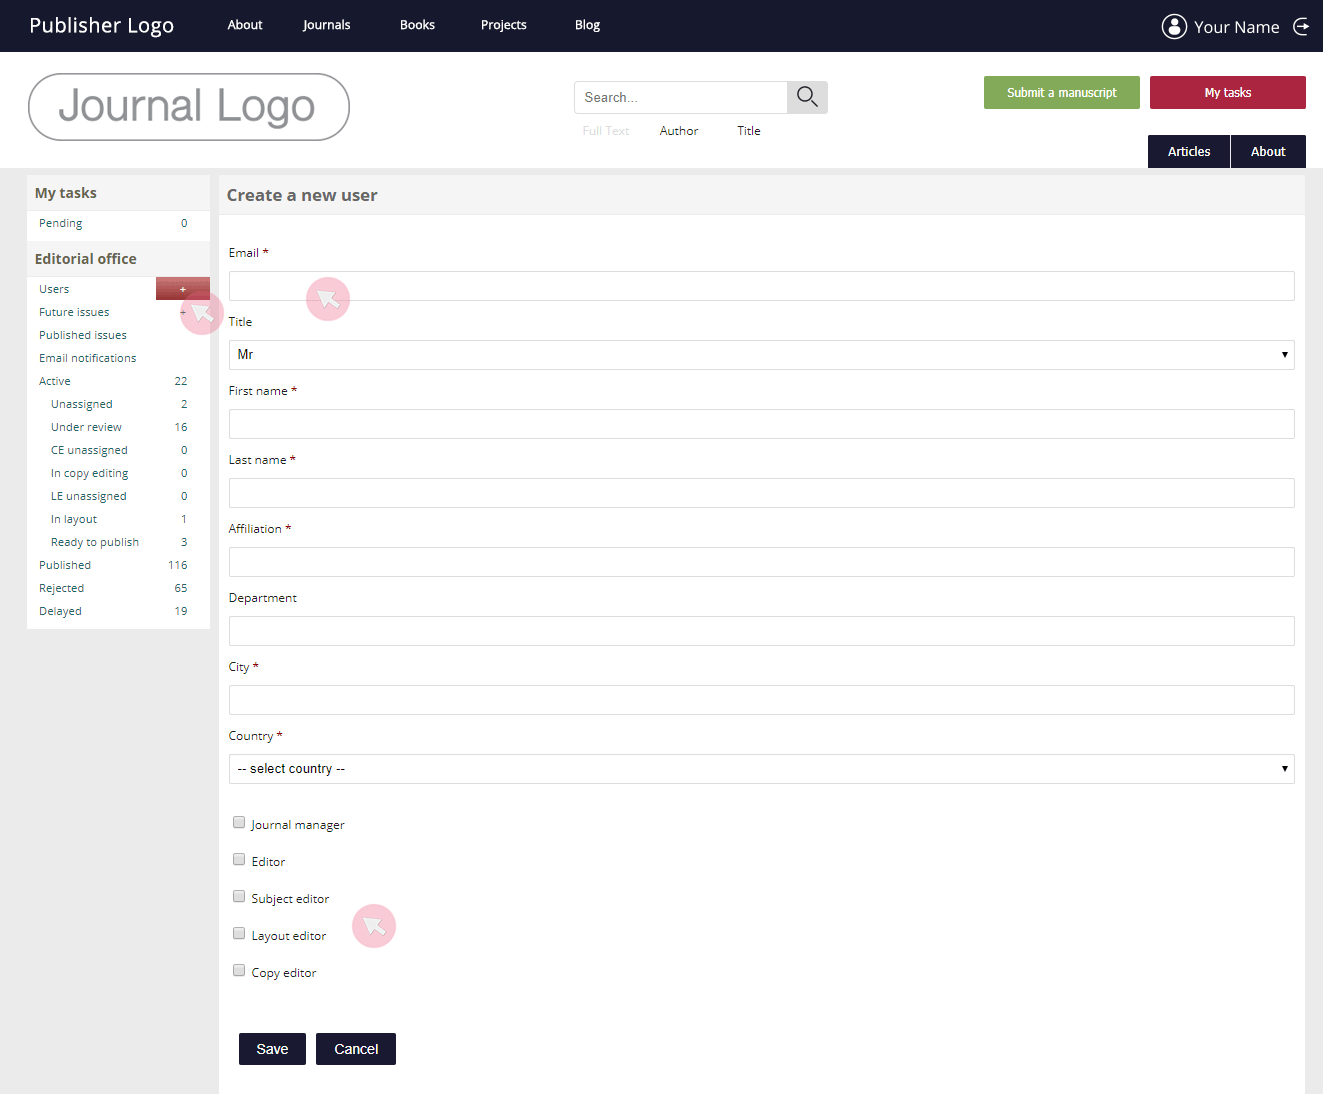
Note 1: If the mandatory fields fill in automatically, there is an existing account associated with this email address. Do not try to make any further updates, as the changes will not be saved. If you still need to make an update, contact the Editorial office.
Note 2: These details will appear on the journal’s website. Depending on the role, the user might be added to the Editorial board / Subject editors list along with his/her personal details.
Assign / Remove user rights
1 Click on Users in the Editorial office menu to access all registered users.
2 Type in the name or email address of the user, whose user rights you wish to update, and click Filter.
3 Tick the box(es) corresponding to the user rights you want to grant him/her (E – Managing editor; SE – Subject editor; LE – Layout editor; CE – Copy editor; M - Member) and confirm the edit.
Note: To select the scientific areas for which a particular SE will take responsibility, use the clickable Expertise (visible for all SEs). We strongly recommend that you select the lowest category possible (e.g. family or order for biodiversity-themed journals).
4 To remove a user’s specific user rights, untick the corresponding box. When removing SE user rights, we strongly recommend that you do not untick the SE box, as the user will have all his/her past SE activity removed from his/her user profile. Untick the Active box instead. To restore his/her SE rights, tick the Active box again.

Note 1: The SE’s expertise can only be set and updated by the E. This expertise may differ from the one set by the user in his/her profile. The user’s expertise as a SE is the one that will be displayed on the journal’s website. These categories will be also used by the system when suggesting a suitable SE for a particular manuscript.
Note 2: Depending on his/her role, the user might be added to the Editorial board / Subject editors list along with his/her personal details.
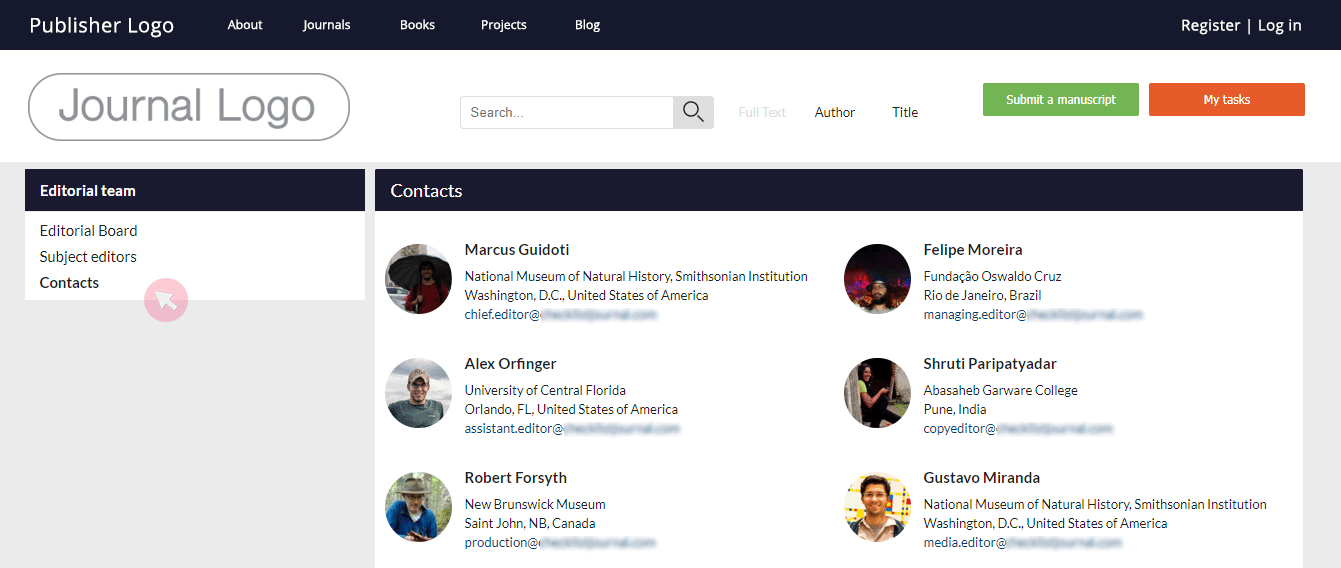
Modify Editorial team / Contacts lists
Managing editors and Editors-in-Chief can edit the Editorial board and the Contacts lists visible as separate tabs on the homepage of the journal.

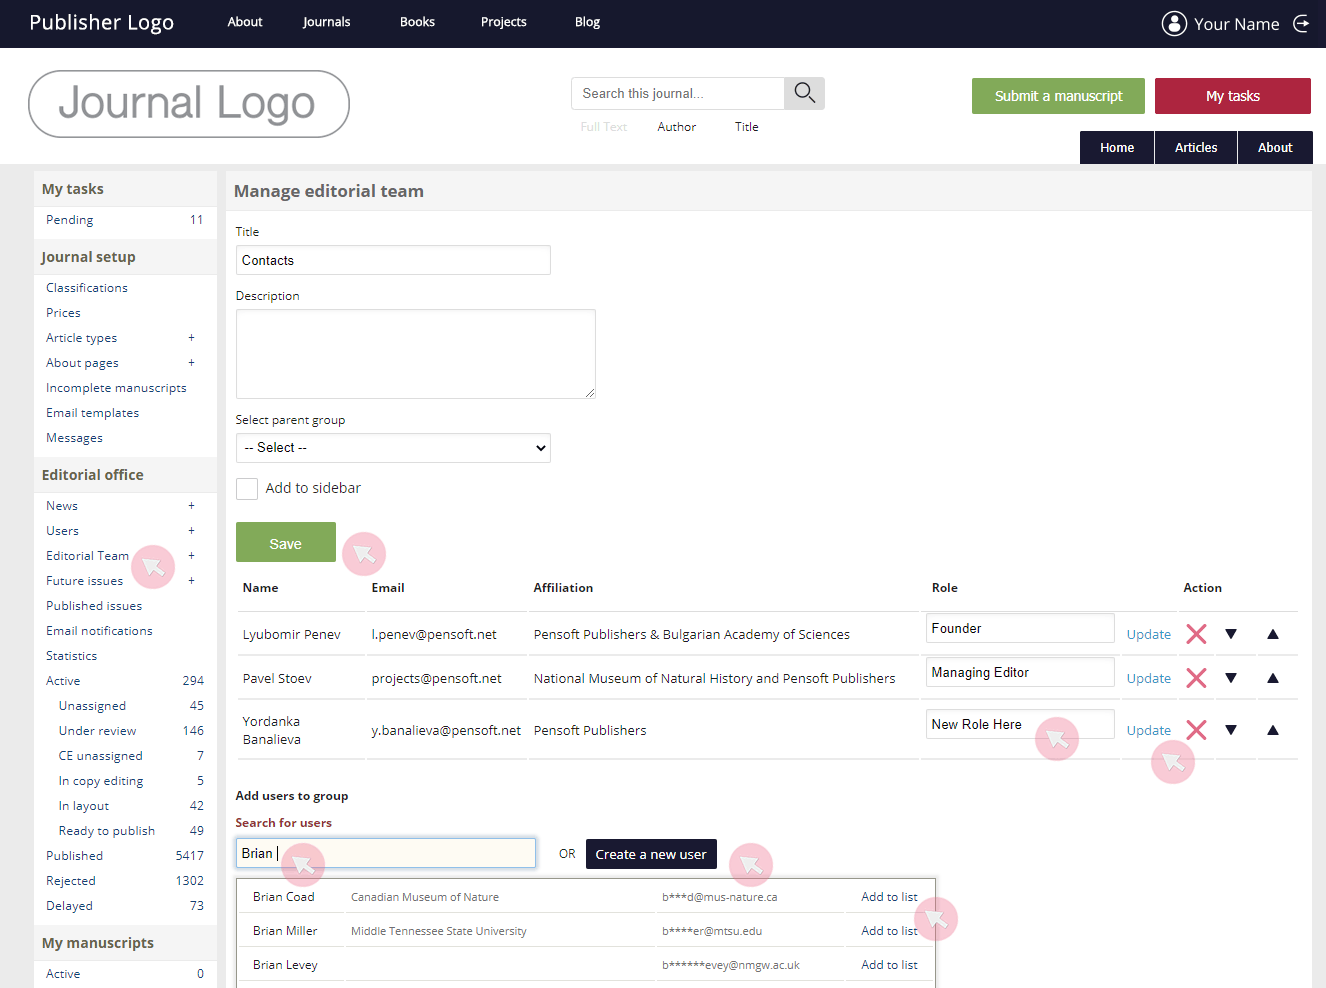
1 Use the Editorial team tab from the Editorial office menu to access and edit the lists.
Here you can Edit or Delete an existing group, or Add a (new) group within your journal’s editorial team. Click on the dots on the left and drag it up / down to change the order of the groups as they appear in the Editorial team section.
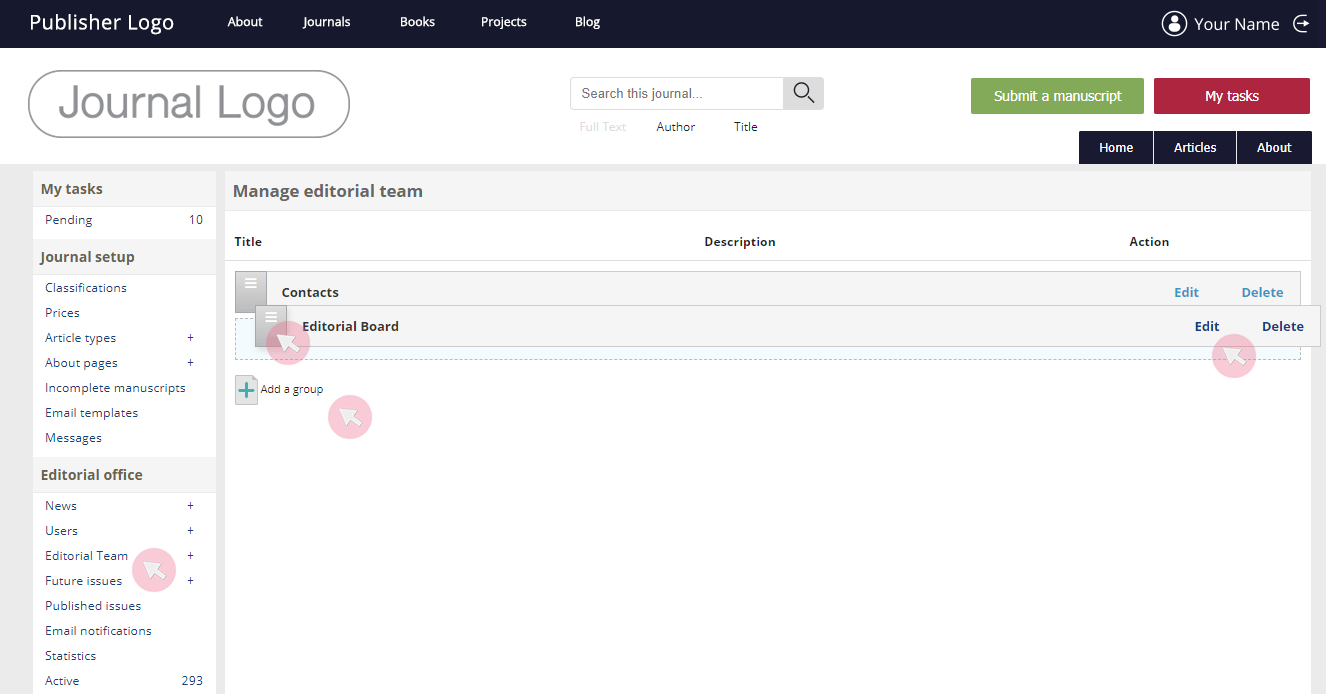
2 Click Edit to update the corresponding list.
- To add a new user, type in his name or email and click Add to list. If you fail to find him/her in the database, Create a new user.
- To remove a user from the list, use the
opposite his/her name;
- To change the order of the users in the list, use the arrows on the right-hand side;
- To update a user’s role, type in the corresponding box and click Update to save the changes.
- To edit the appearance of the group list (title, description and parent list, if any), use the space above and click Save to keep the changes made.
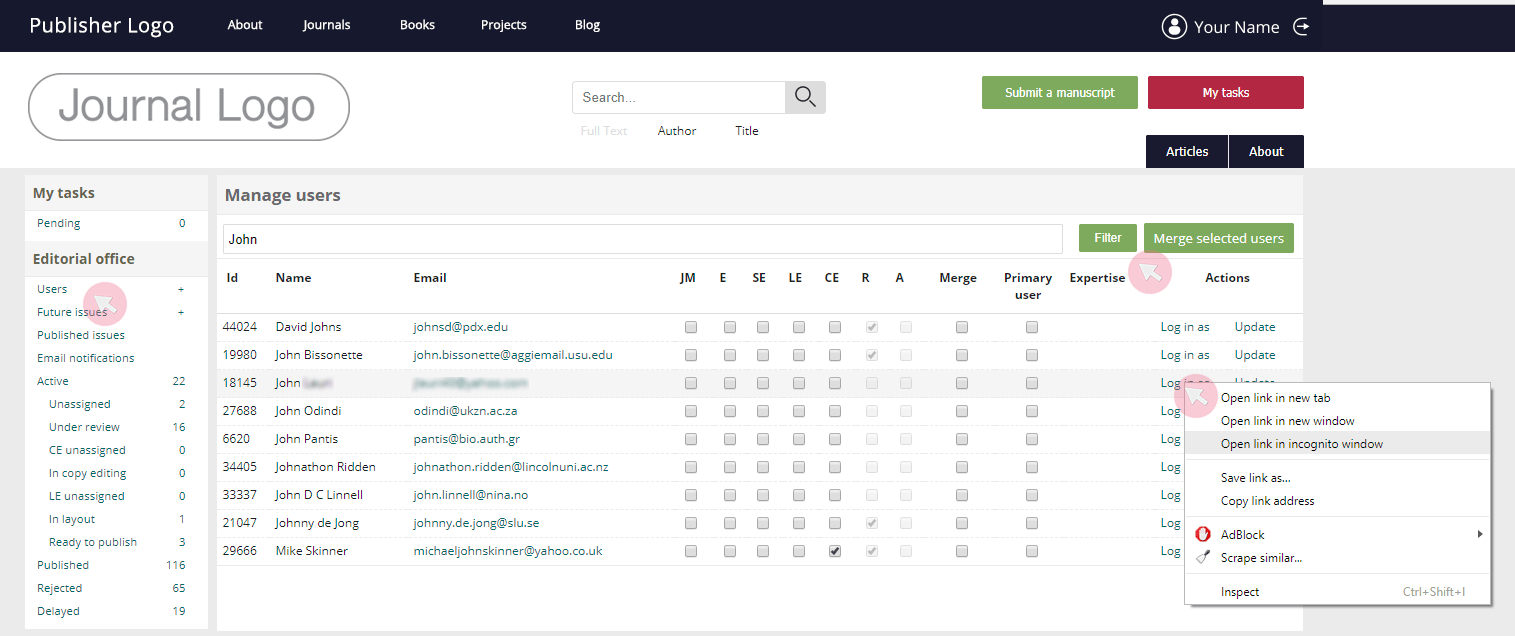
Merge user accounts
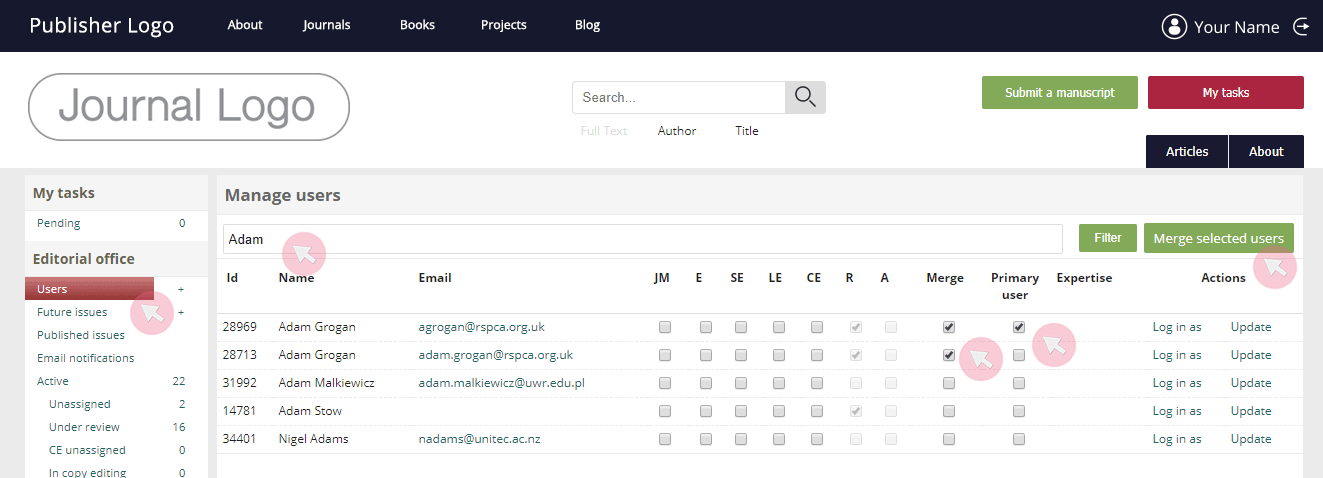
1 Click on Users in the Editorial office menu to access all registered users.
2 Type a user’s name in the field to filter out a specific user and his/her multiple accounts. Use the Merge box to tick all accounts intended for merging.
3 Select one of the accounts as a Primary user by ticking the corresponding box.
4 Click the Merge selected users button to confirm and save the new settings.
5 Once the operation is authenticated, the email address associated with the primary user account will be used for all correspondence that the user receives via the ARPHA system. It will also appear anywhere in the system when needed (e.g. user listed as Corresponding author in a published article).
Note 1: Merging a user’s separate accounts also merges his/her user rights and roles, tasks etc. Please be aware that merging the wrong accounts will lead to permanent loss of personal information associated with the secondary account(s).
Note 2: If that user has different profile photos, the system will set the one from the primary account.
Please contact our support team immediately, in case you have merged a wrong account or experience any other problem with merging accounts. Merging wrong accounts will lead to permanent loss of personal information about the secondary
Mark Subject editors as temporarily unavailable
Managing editors and Editors-in-Chief (E) can mark a Subject editor (SE) as temporarily unavailable at the journal, in order to warn other journal editors who wish to assign thе particular user as a SE to a manuscript.
Note: The warning is for informational purposes only. An E will still be able to assign the manuscripts to a SE even if that user is marked as unavailable.
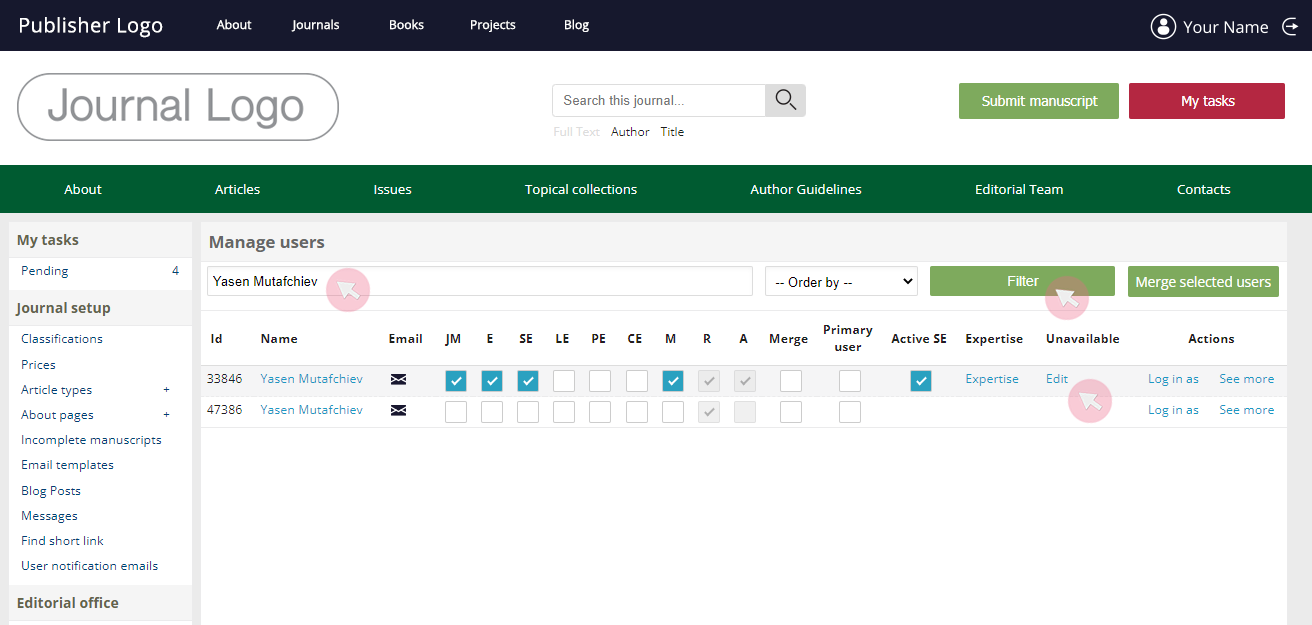
1 Click on Users in the Editorial office menu to access all registered users.
2 Type in the name or email address of the user, whose user rights you wish to update, and click Filter.
3 In the Unavailable column, click Edit. You will only be able to see this column and command if the user is a SE at the journal.
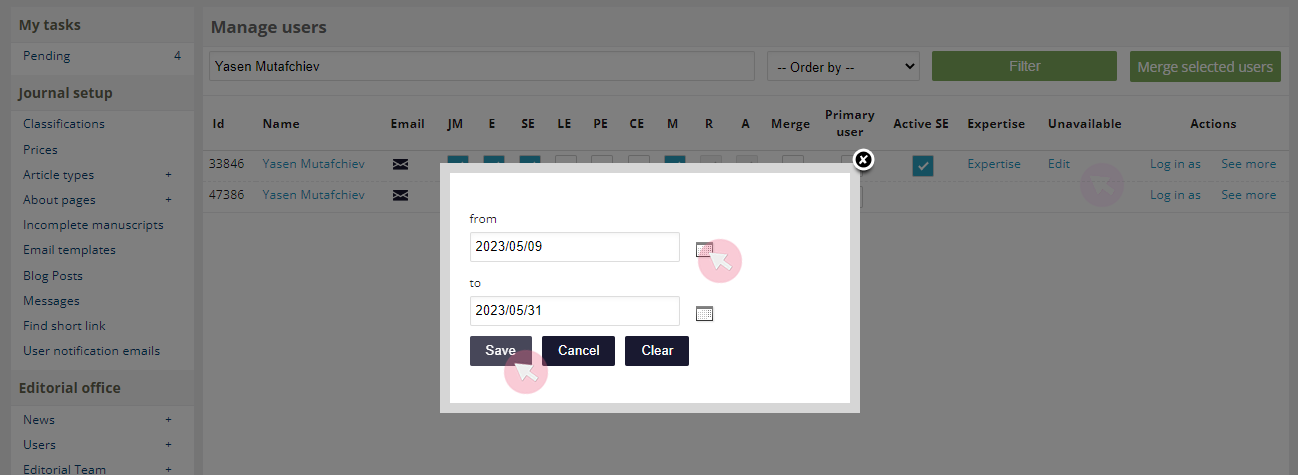
4 In the pop-up window, use the calendar widgets on the right to set a start and an end date for the period when the user will not be available as a SE. Click Save to confirm your selection.
Likewise, to remove the Unavailable status for a SE, click Clear to erase the dates, and then use the Save button to keep your edits.
Once the SE is marked as Unavailable, the period of unavailability (even if still in the future) will be showing next to the user’s name until the period of unavailability ends or the Unavailable status is cancelled by an E (see Step 4 above). The warning will be seen by any E who accesses or seeks out the SE from the list of users from where an E browses and selects SEs for each manuscript.
The E will still be able to click Assign and assign the manuscript to the SE regardless of the status or the period of unavailability.
Note: In case the SE is also a reviewer at the journal, the warning will also be shown to any SE who might want to assign the user as a reviewer.
Note 2: The Unavailable status will be visible to all editors who might consider the user as a SE or a reviewer across all journals hosted on ARPHA Platform where the user has SE or Reviewer rights.
Log in as third-party users and perform tasks on their behalf
1 Click on Users in the Editorial office menu to access all registered users.
2 Filter out the user to whom you need to log in by typing in the user’s name in the box and clicking Filter.
3 Right click on Log in as on the right-hand side. Open the link in incognito window (otherwise you will log out of your own account).
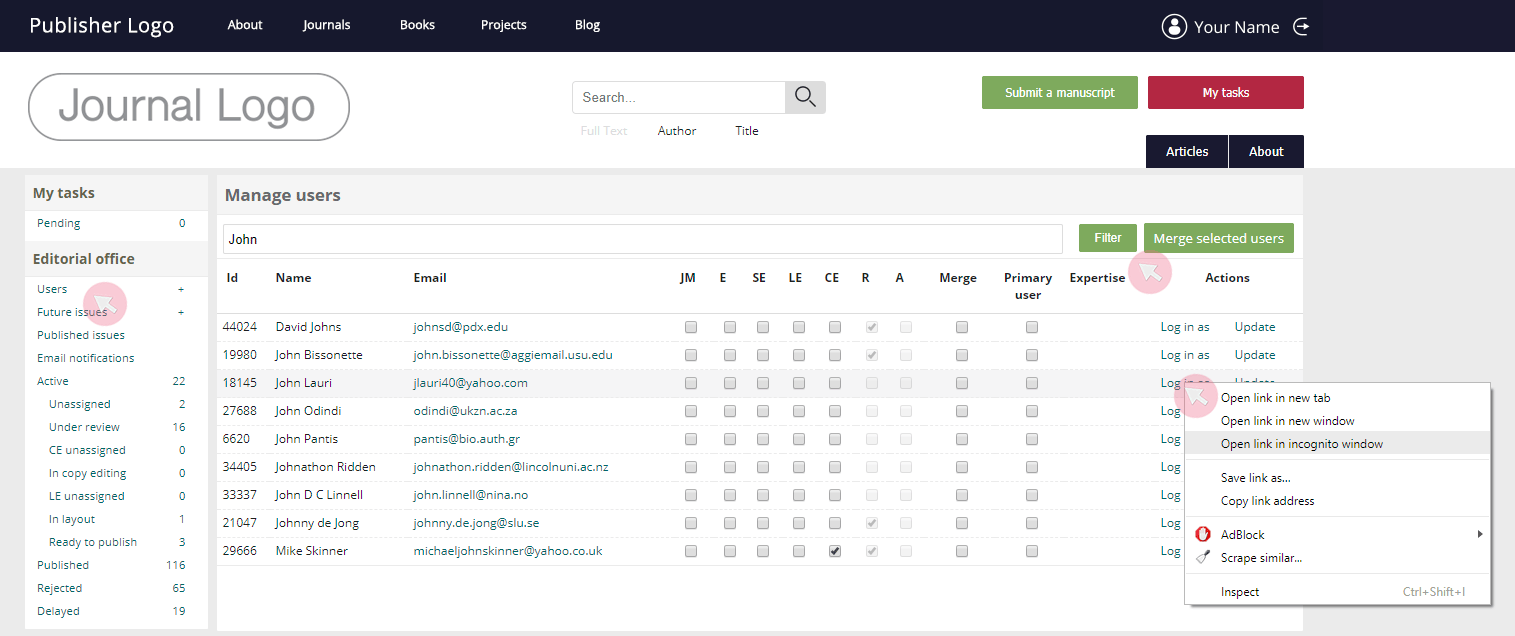
Note: While logged in as a third party user, you will be able to access only the dashboards and tasks available for that user’s role in the particular journal.
Edit a peer review on behalf of a reviewer from the Editor’s account
1 Locate the manuscript from Under review (or Active) in the Editorial office menu. Access the submission by clicking on its title.
2 Find the Reviewers list and use the

Note: You can also accept/decline a review invitation on behalf of the user using the clickable 

3 Edit or complete the form in the newly appearing pop-up window. Use the Save button at the bottom to save your edits.

Note: For more information about how to complete the peer review form in ARPHA, see the Reviewers chapter in this manual.
Edit and/or submit peer review on behalf of a reviewer
1 Locate the reviewer from the Users tab in the Editorial office menu. Log in to the reviewer’s account by right-clicking on the Log in as command.
2 Once logged in to the reviewer’s account, access his/her manuscripts assigned for peer review from Pending in the My reviews menu. Click on the title of the submission to access it.
3 To complete the peer review submission, make sure to answer all mandatory questions (marked with *).
4 Use the buttons at the bottom to either submit the peer review on behalf of the assigned reviewer or save it as a draft.
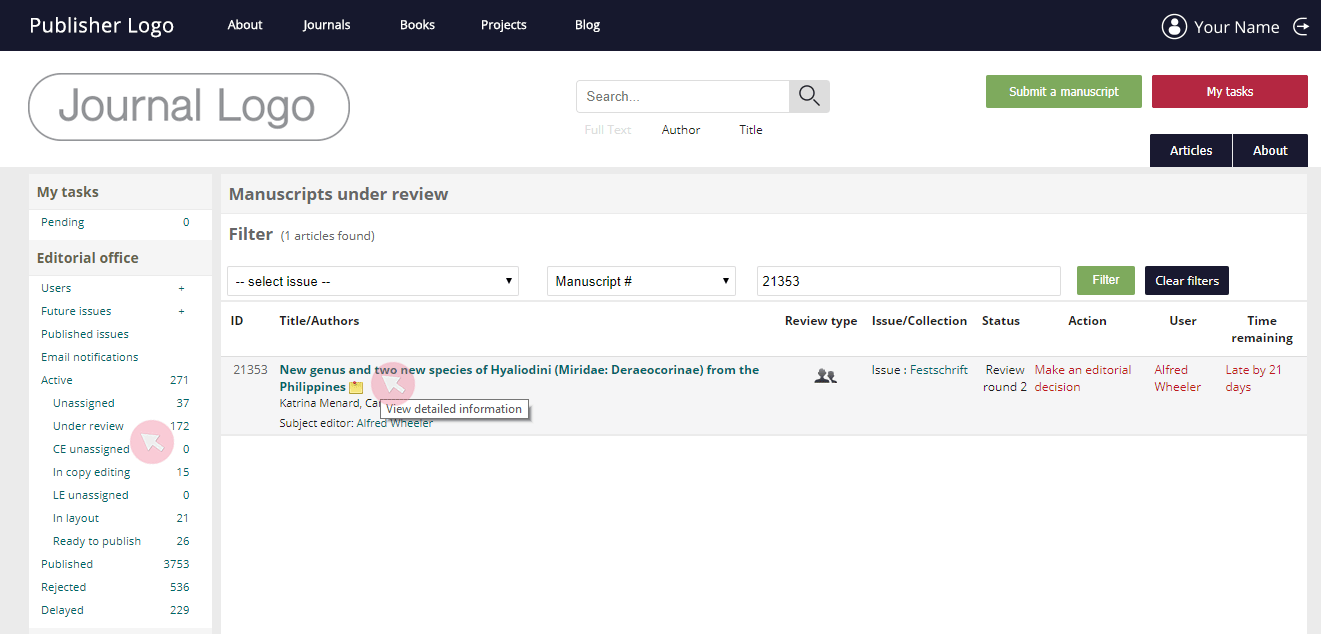
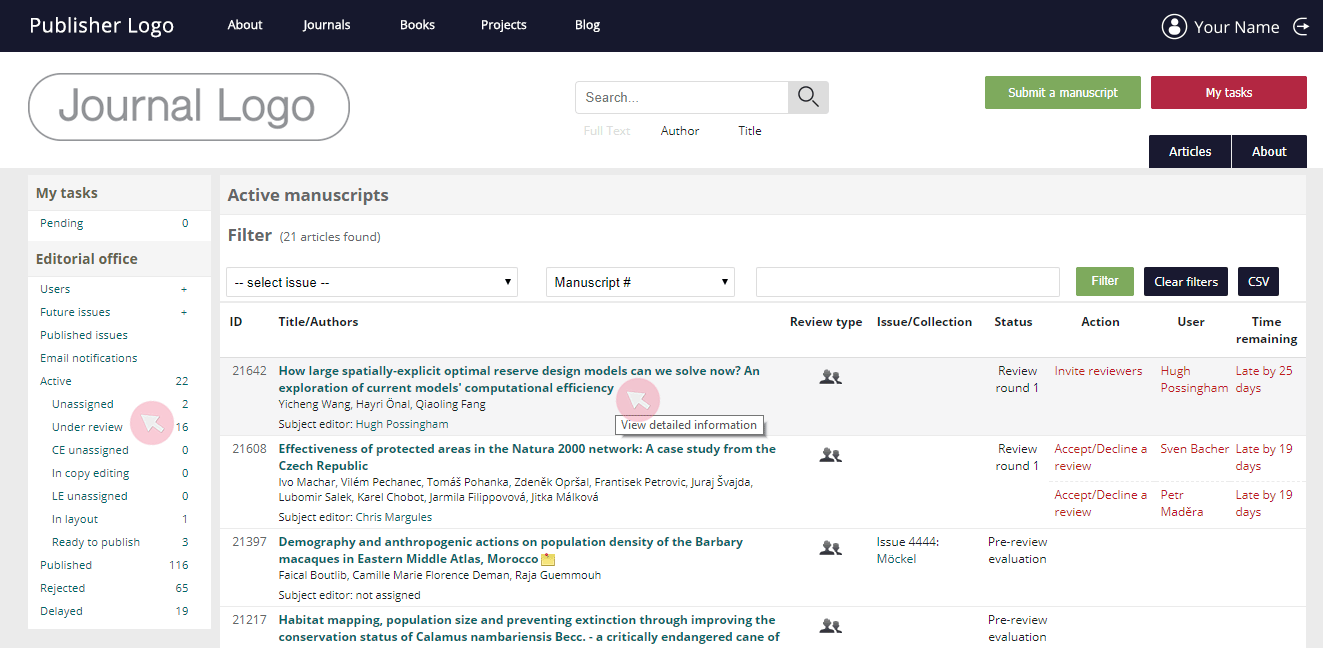
Manage submissions and monitor their progress
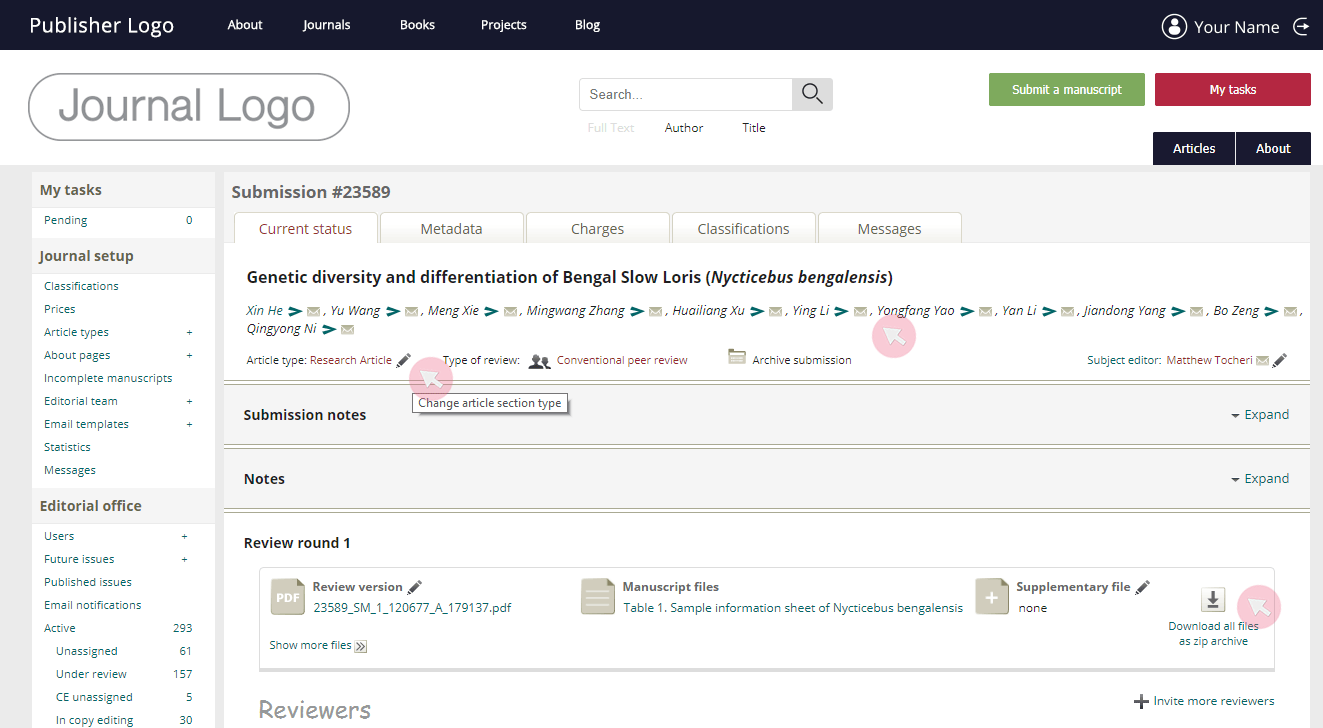
1 Access all Active, Published, Rejected and Delayed manuscripts via the Editorial office menu. For further convenience, the active submissions are split into several categories depending on their current status.
2 To access the respective submission, click on the manuscript title.
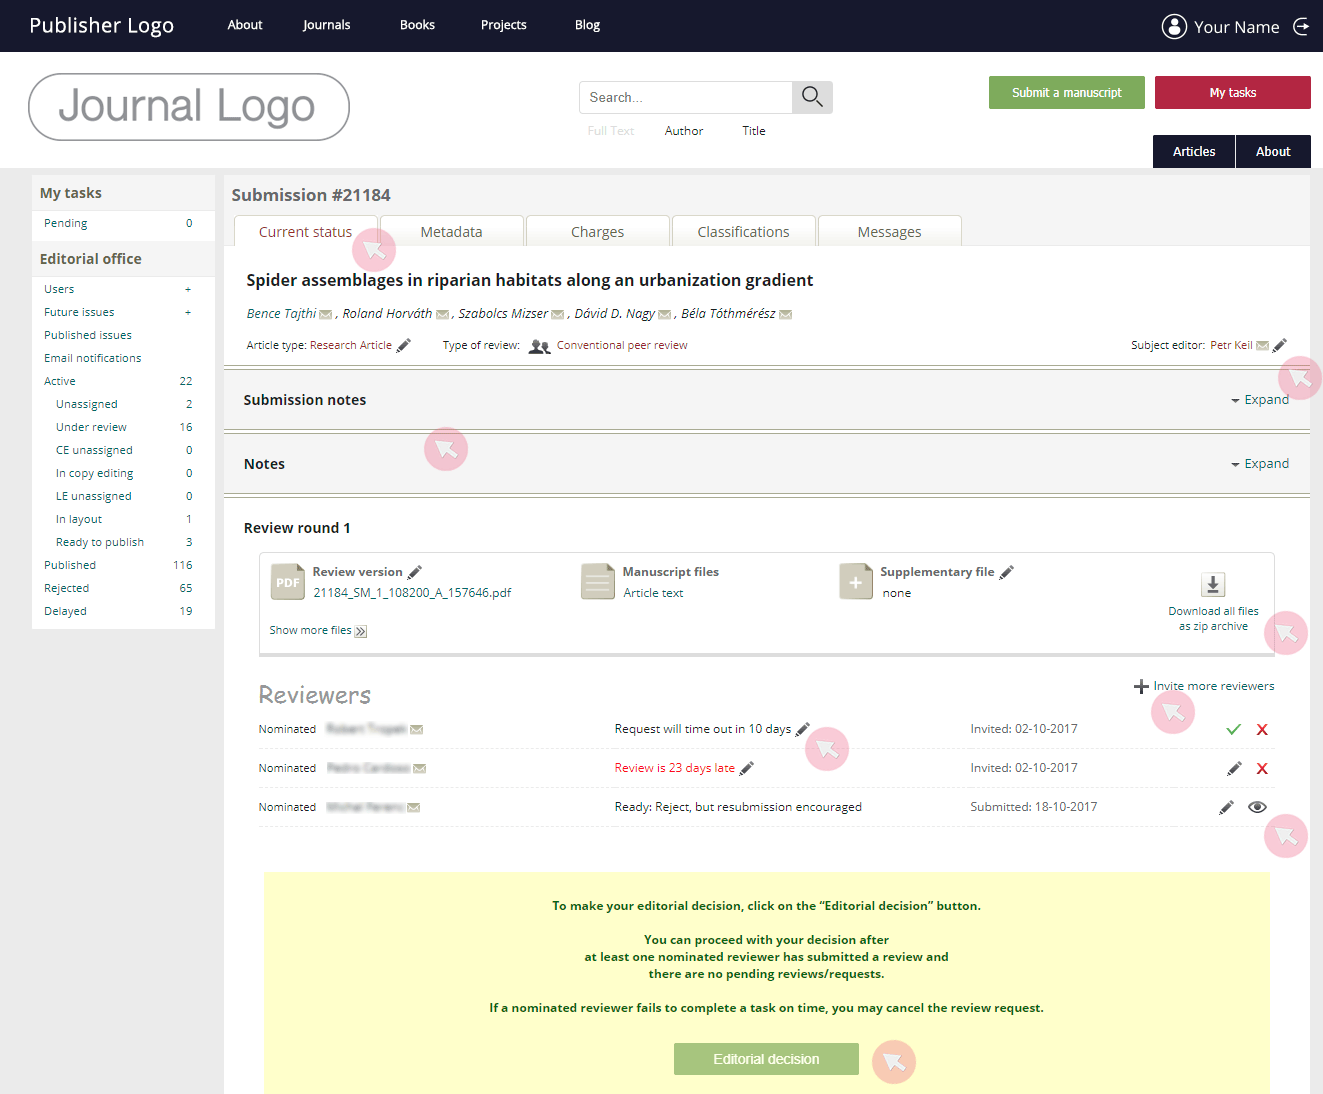
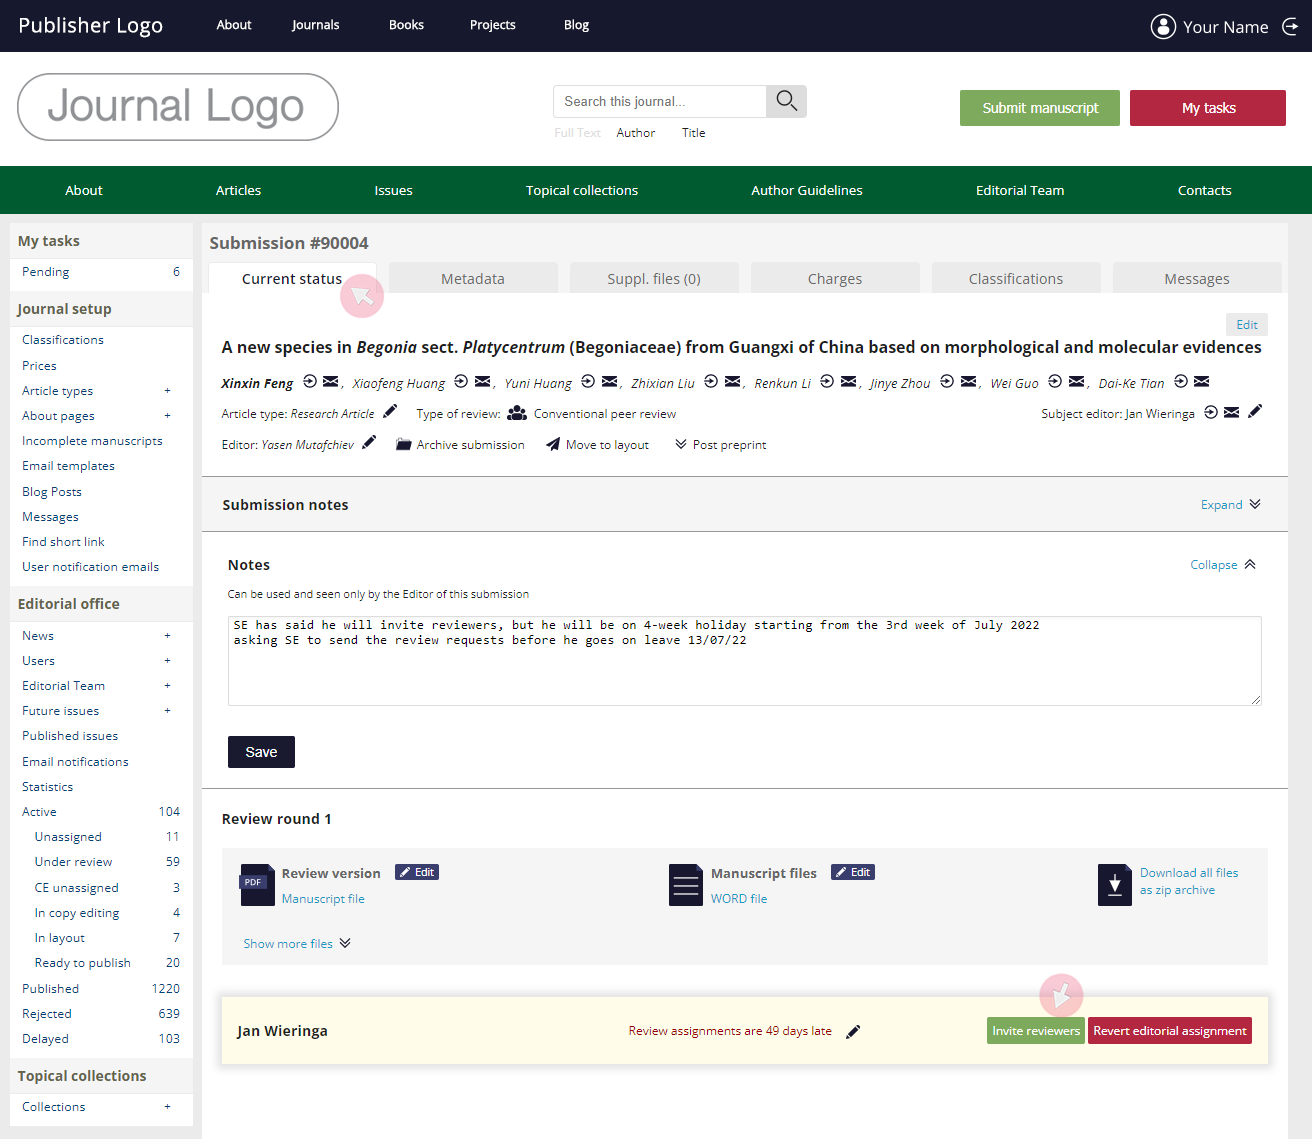
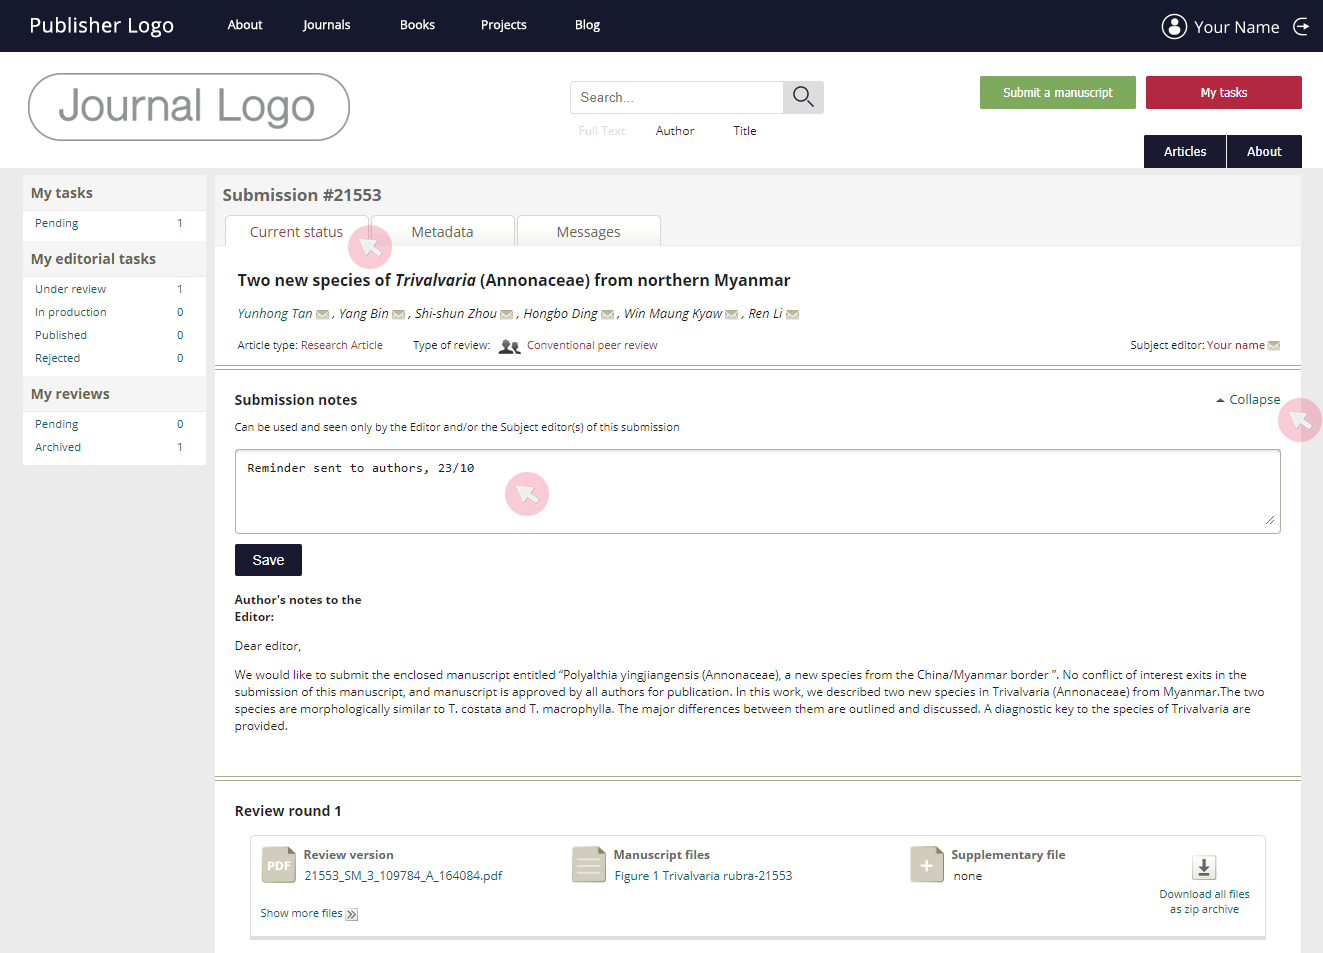
3 Use the Current status tab to:
- assign/change the SE;
- see notes left by the author upon submission;
- access and leave submission notes visible only to the Editorial office, the E and the SE(s) of the submission;
- view and download submission files;
- invite reviewers;
- cancel/change reviewers’ assignments;
- re-schedule the due date for review submission;
- accept/decline review invitations on behalf of the reviewers;
- see optional services selected from the author (e.g. data auditing, PR campaign etc.);
- submit your editorial decision via the Editorial decision button;
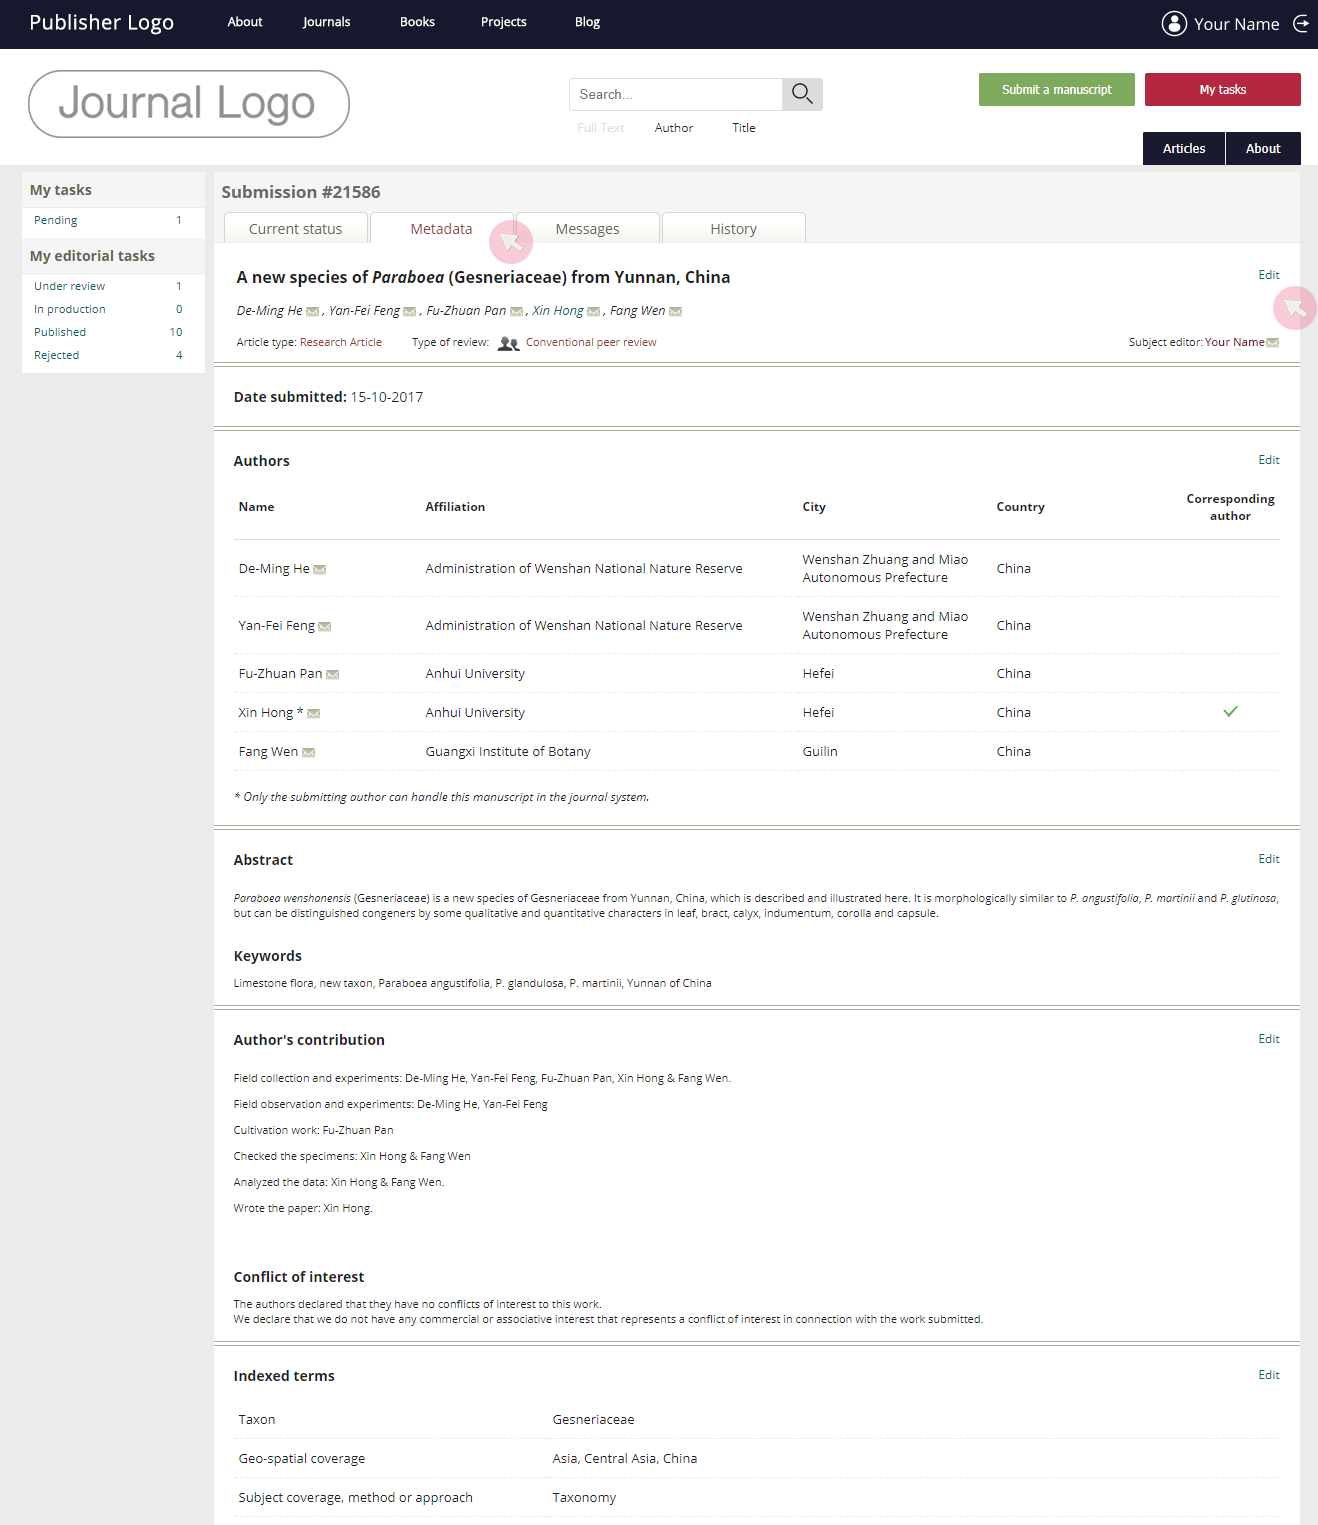
4 The Metadata tab provides access to some additional details. Use the Edit within each section to correct/change incorrect metadata on behalf of the authors:
- change the article title;
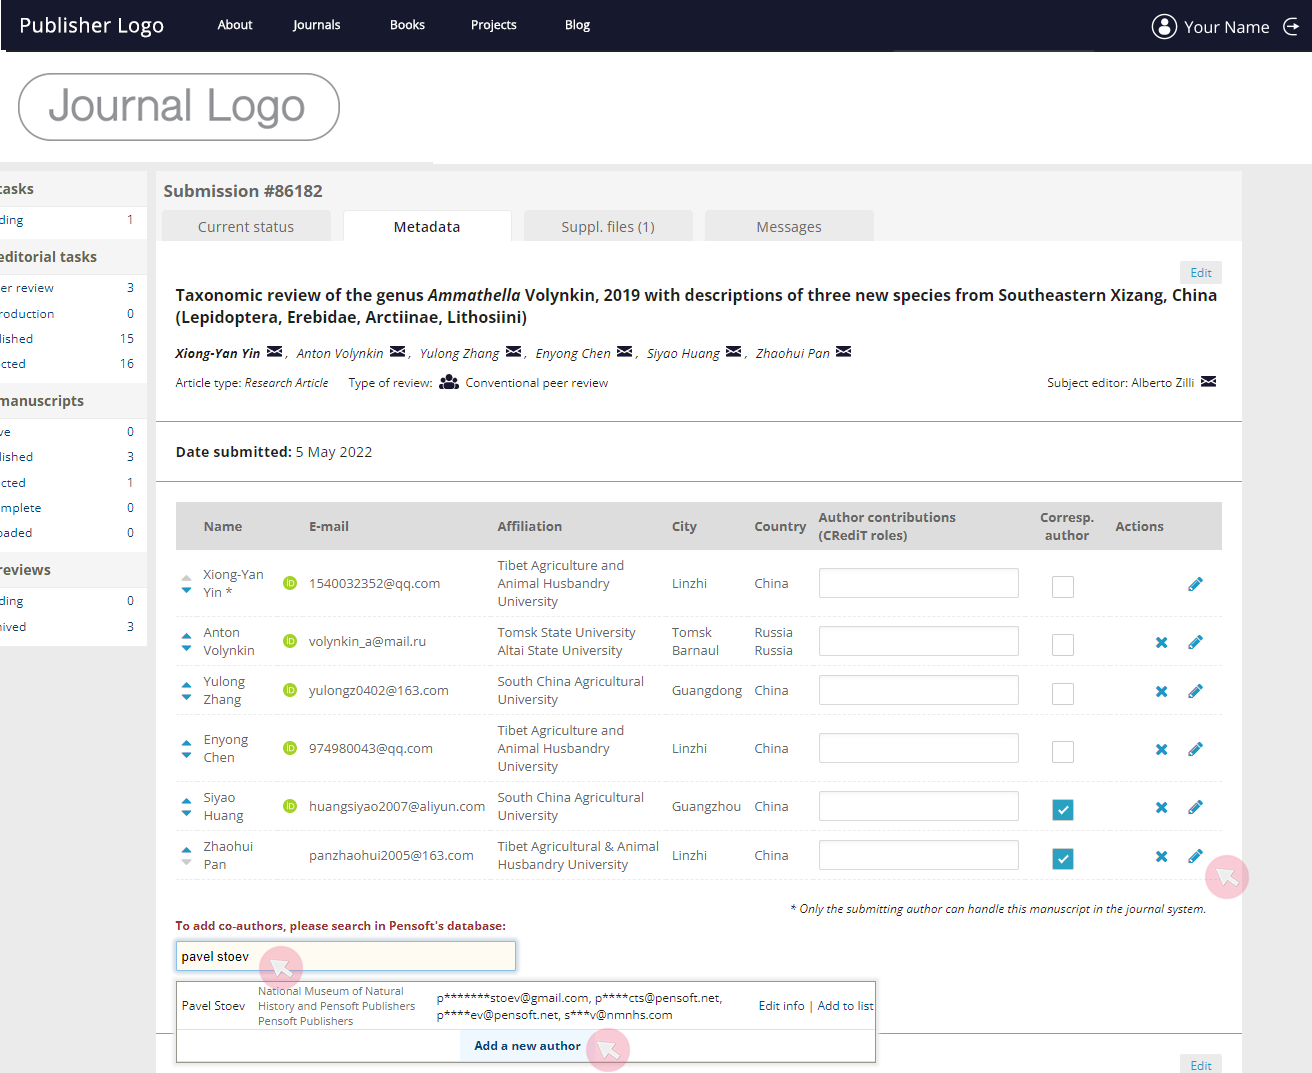
- add / delete authors*;
- re-order authors;
- change the Corresponding author and/or the Submitting author;
- edit the abstract / keywords;
- edit assigned classifications (indexed terms);
- edit the Supporting agencies / Authors contribution / Conflict of interest sections;
- re-assign the paper to a different journal issue.
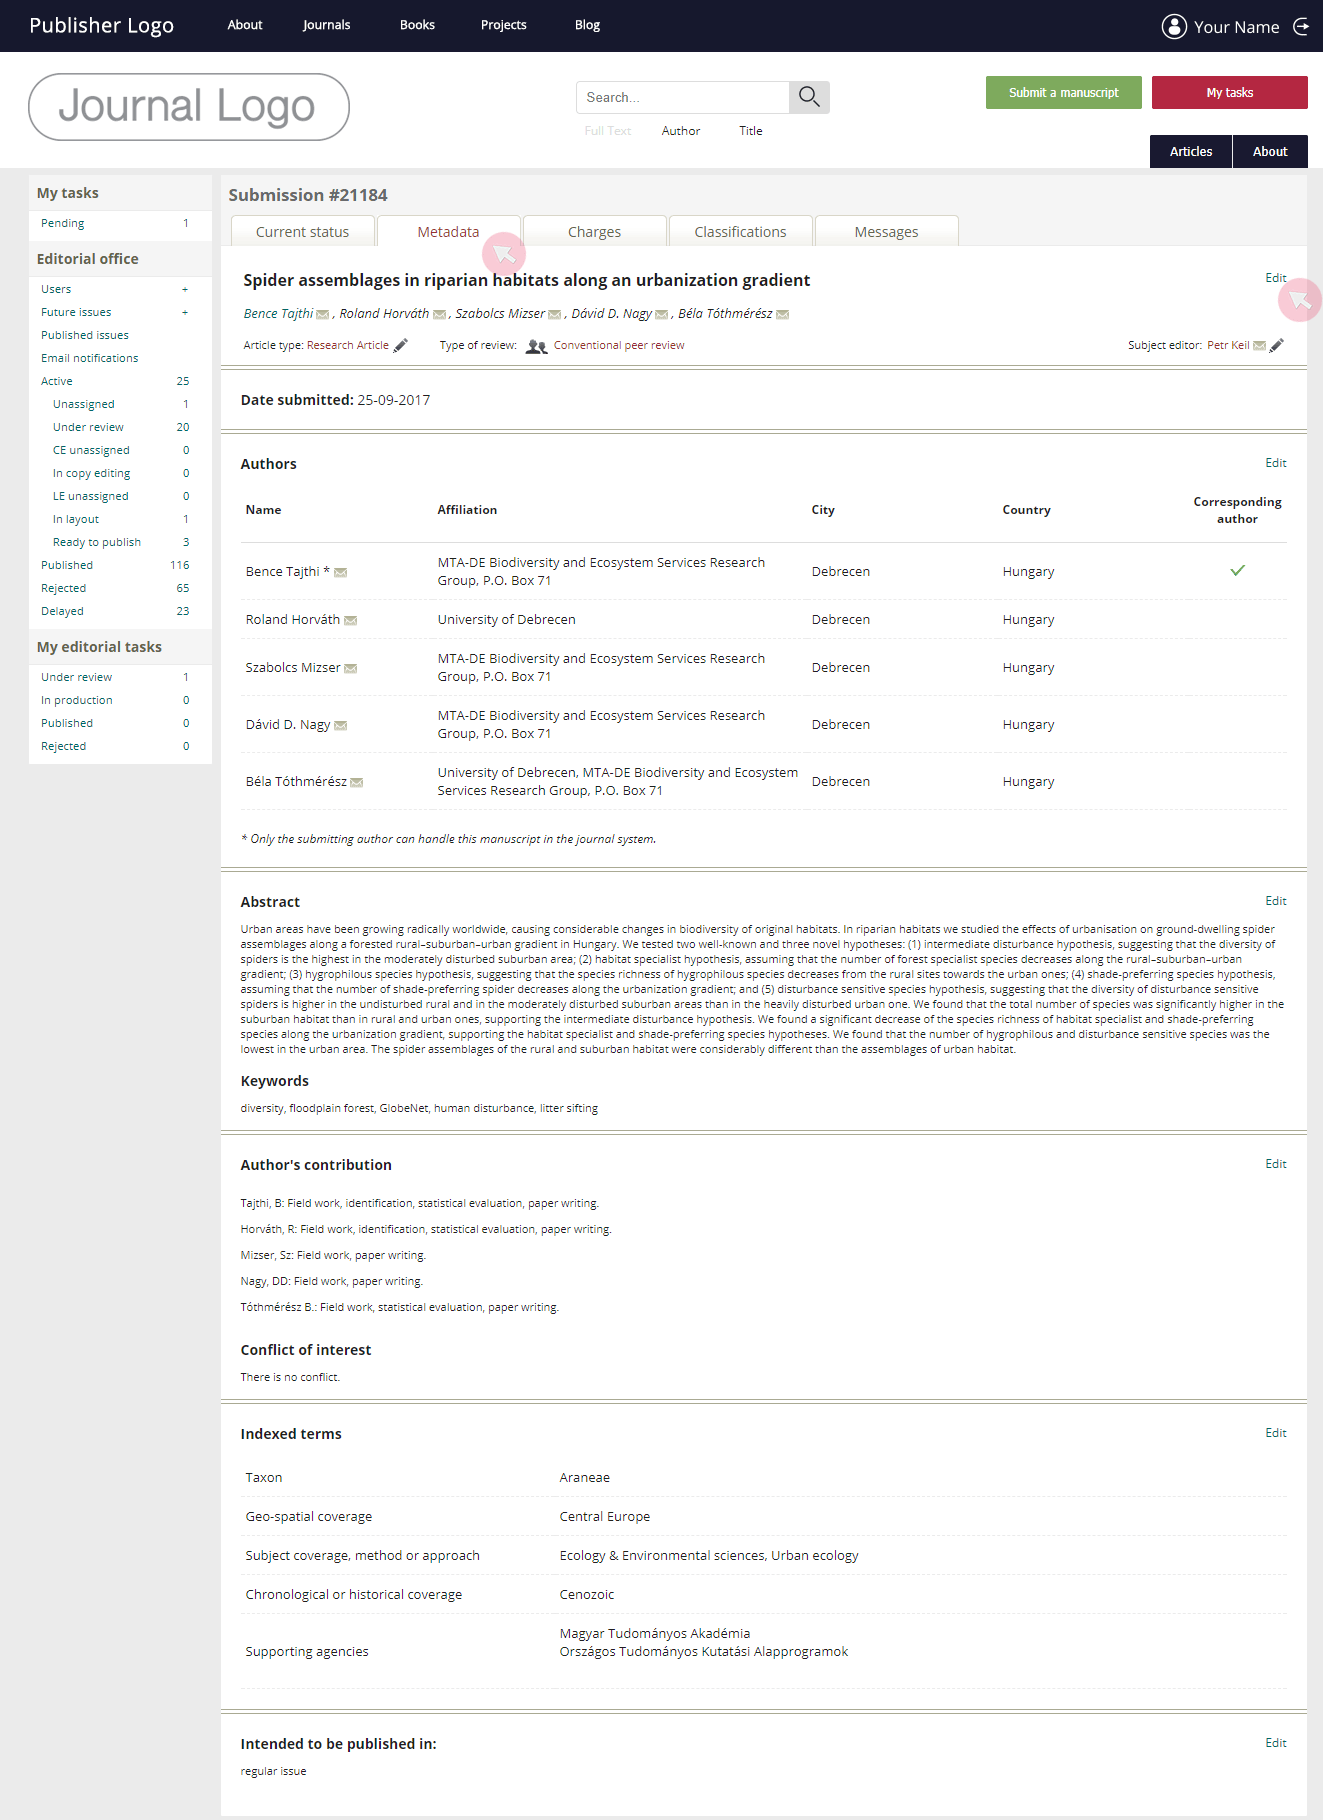
*As you type in a user’s name or email, a drop-down list of ARPHA-registered users matching the searched text string will appear. If the user you are searching for is present in the system, click Add to list. If not, use the Add a new author button at the bottom of the list to create a new user and mark him/her as a co-author of a manuscript.

5 The Charges tab provides details on the journal’s policies on APCs and payment options, including available discount / waiver conditions and the person responsible for remitting the APCs for the optional services.

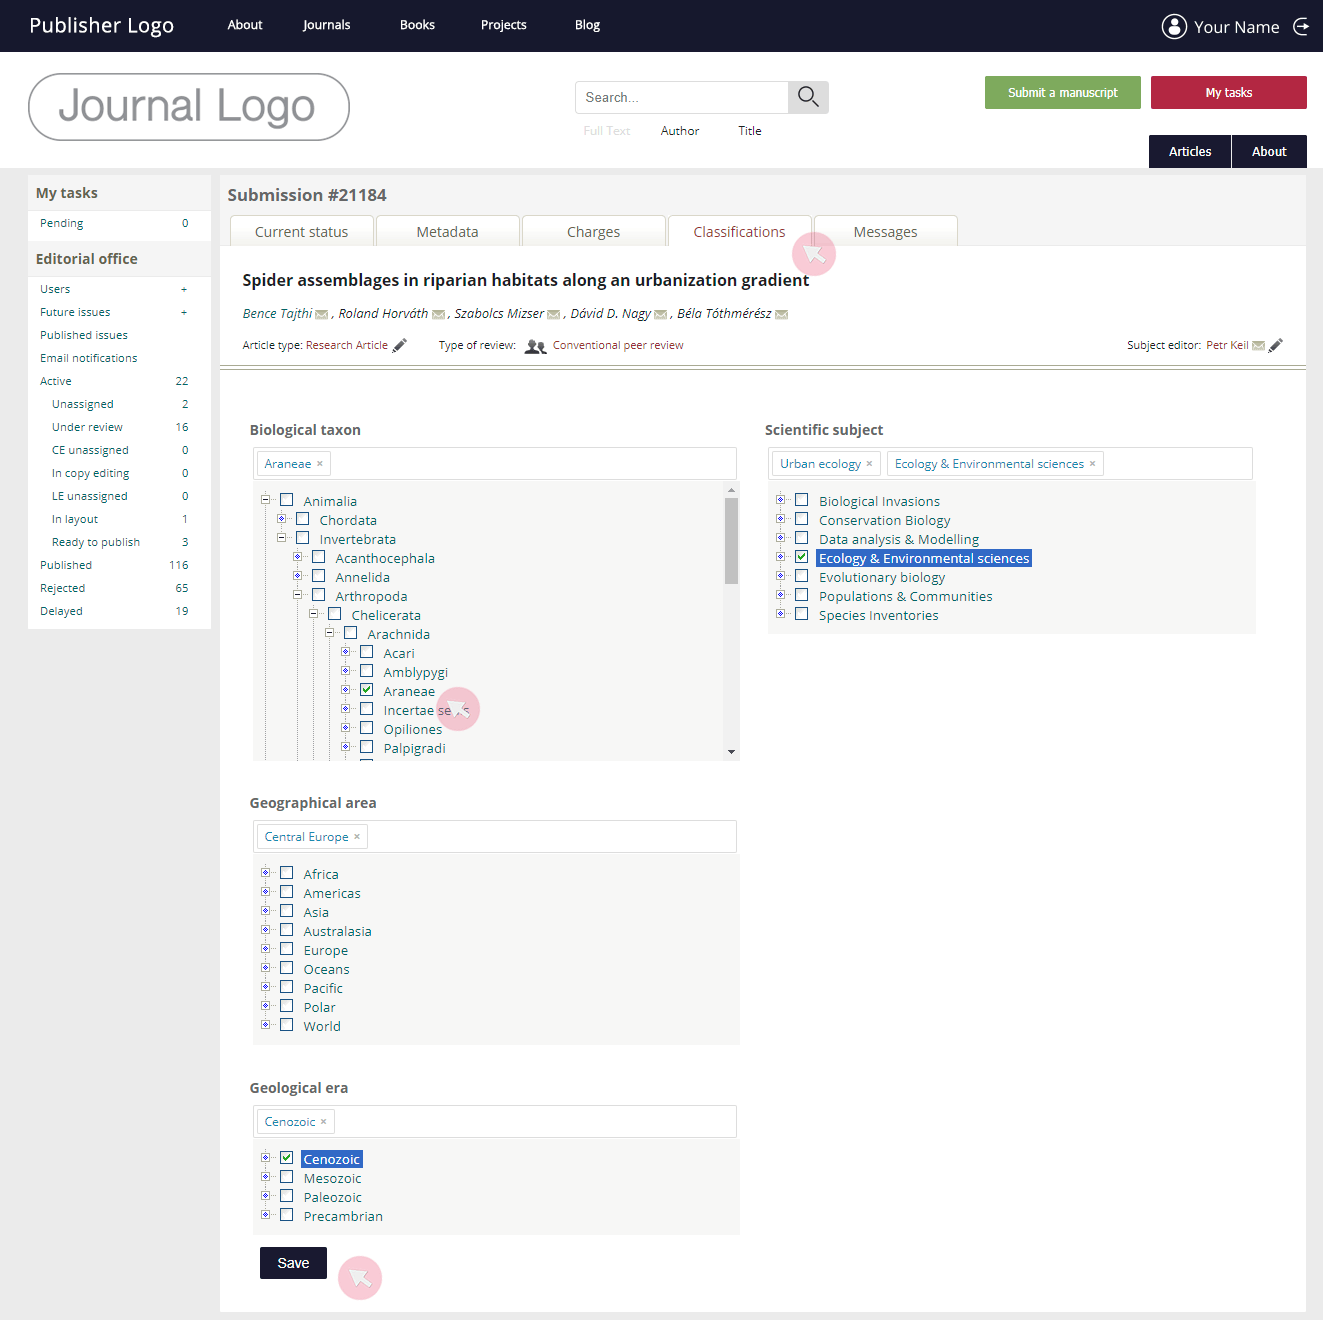
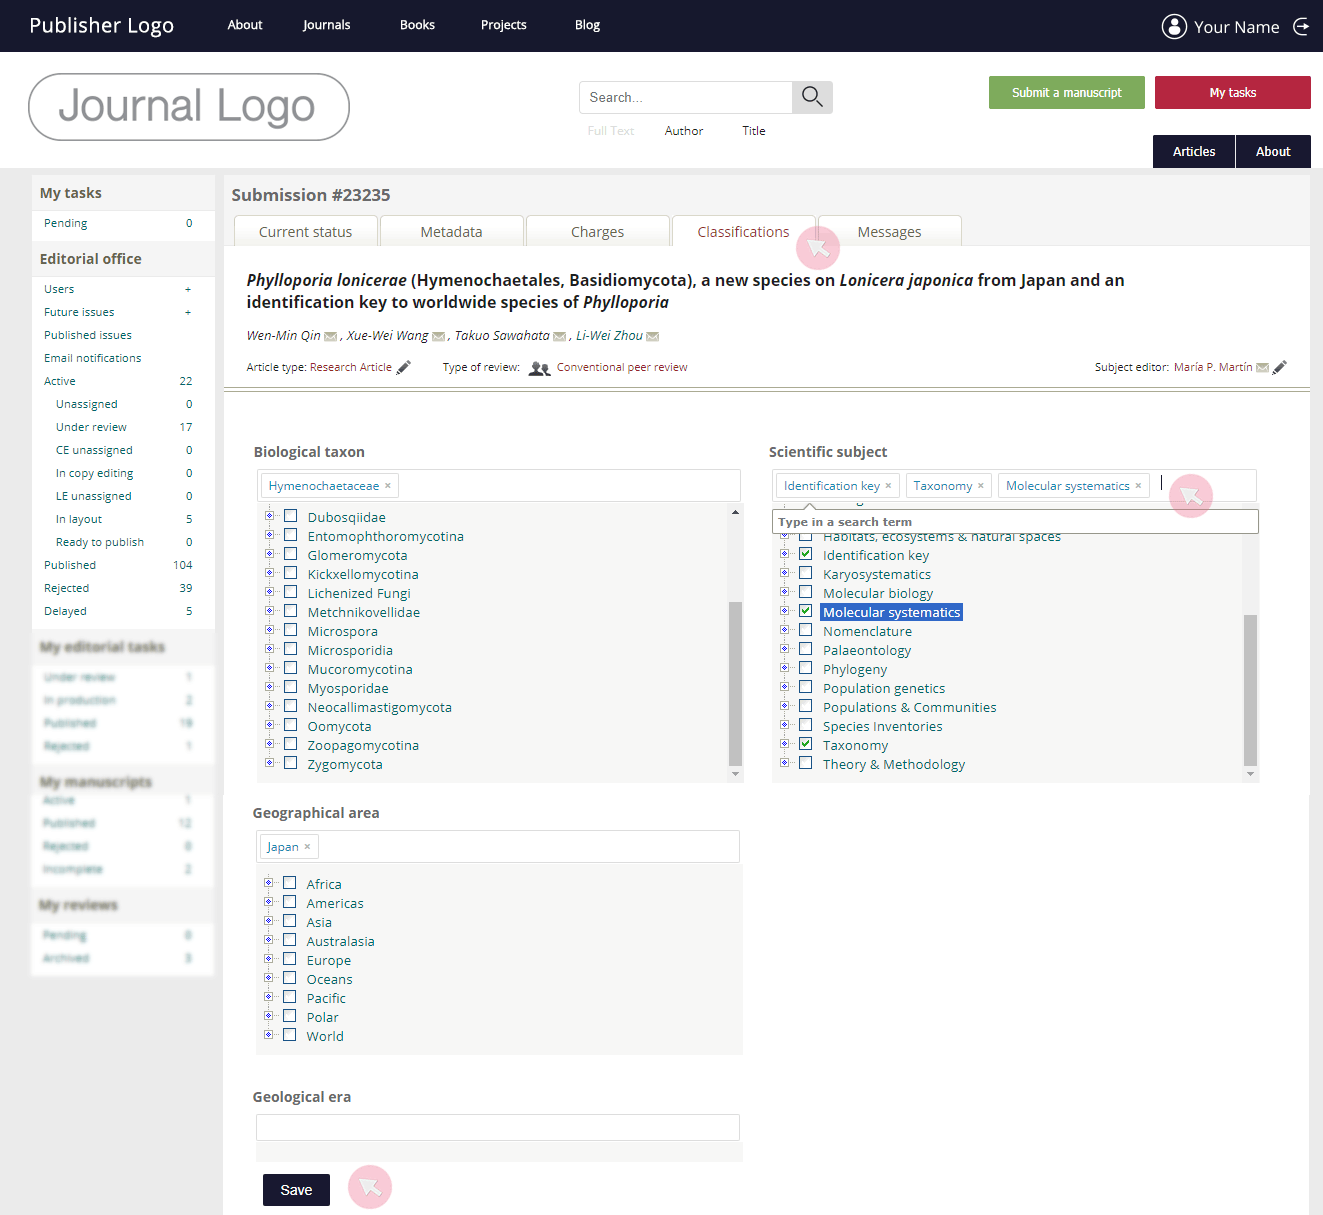
6 The Classifications tab provides various categories assigned to the manuscript by the authors upon submission. Pay particular attention to these as they serve to filter out potential SEs and/or reviewers. In case the categories are imprecise or misleading, modify the list using the check boxes. Access the sub-categories by clicking the plus (+) symbol on the left-hand side of each higher category.
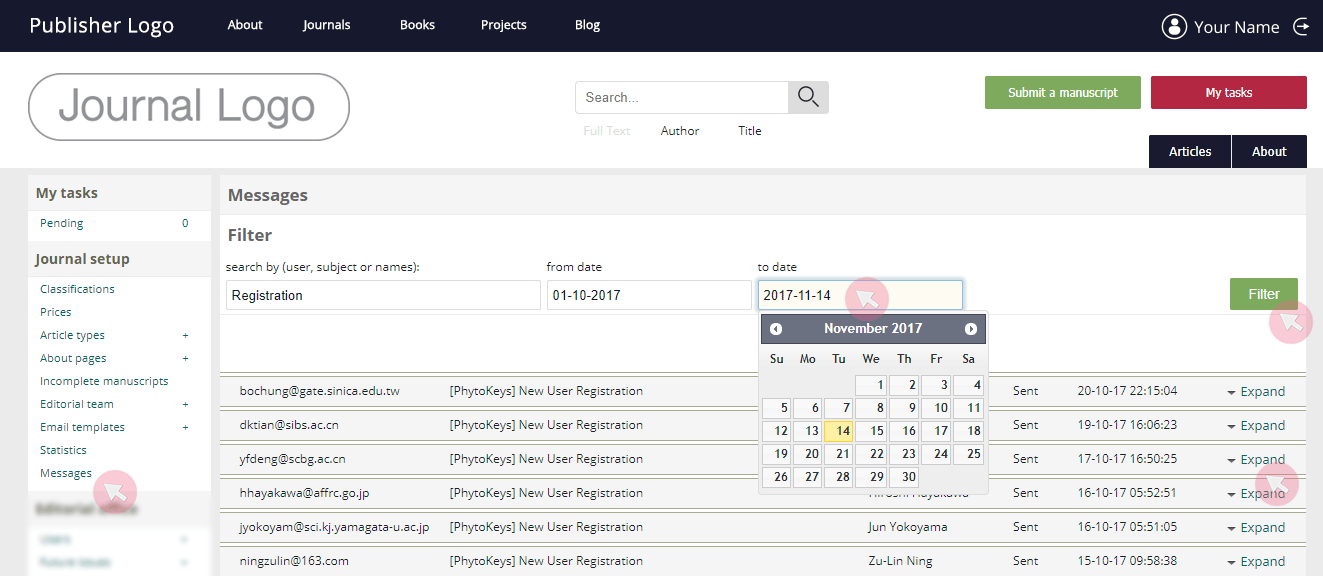
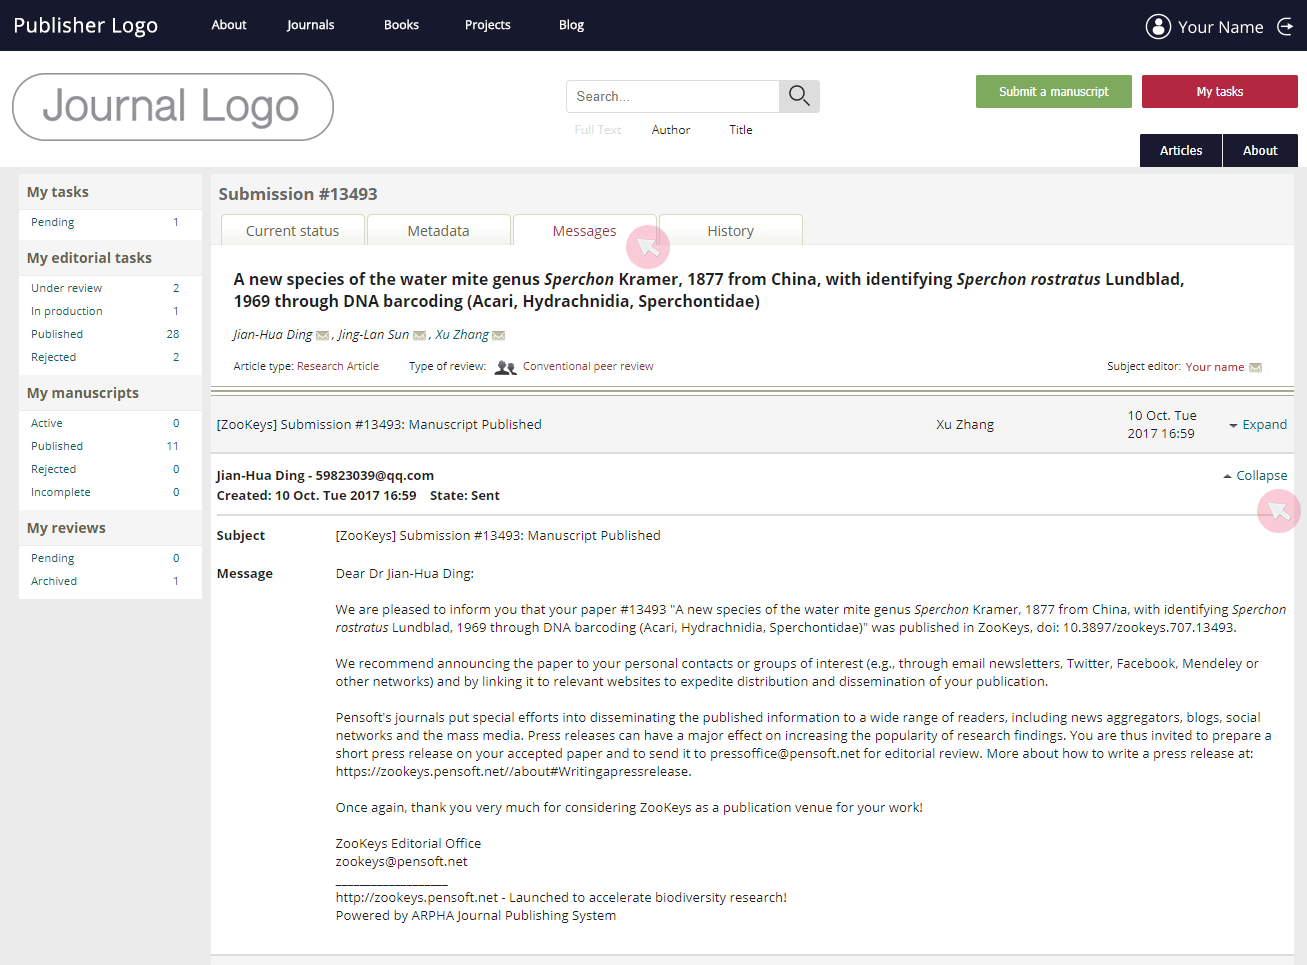
7 The Messages tab contains all messages generated by the system and emailed to the submitting author, SE(s) and reviewers. The Messages function allows you to keep track of the automatically sent reminders. To see the content of a message, click Expand.
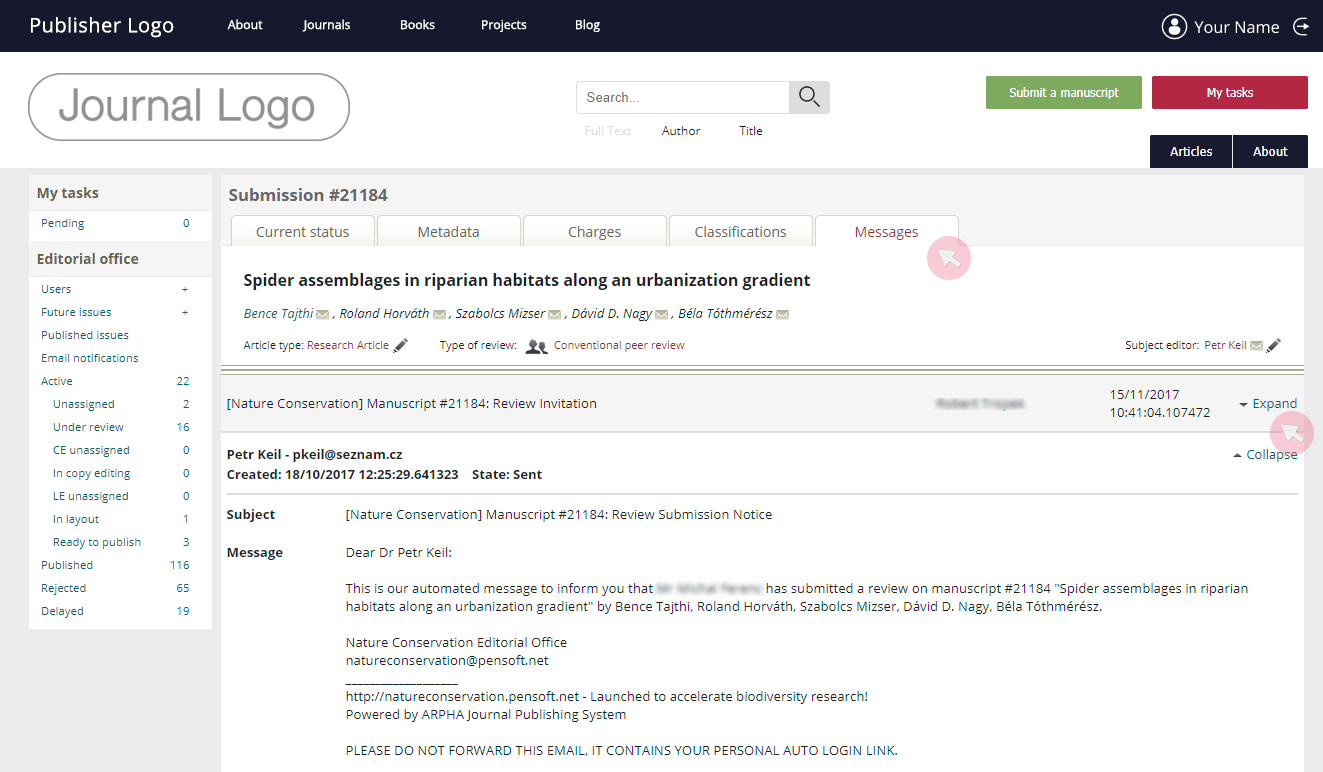
Note: By default, the system is set to send the first automated reminder on the first day a submission is overdue and the second notification - on the third. These settings can be modified according to the journal’s policies.
Check a manuscript for plagiarism prior to Subject editor assignment (optional)
A journal may opt to be integrated with the plagiarism detection tool iThenticate, in order to allow the Managing editor (E) to run a plagiarism check prior to assigning the manuscript to a Subject editor (SE).
Note: A plagiarism check cannot be run once the E assigns a SE for the manuscript.
1 Locate the manuscript from Unassigned (or Active) in the Editorial office menu. Access the submission by clicking on its title.
2 Go to the Current status tab to find the iThenticate report button. Use it to generate a plagiarism report. Note that it may take up to several minutes for iThenticate to deliver the result.
3 Once the percentage (%) of similarities detected by iThenticate has been calculated, it will be displayed next to the button. Click on the result to be redirected to the full report* on the iThenticate website.
*To access the full report, you will need to login to the iThenticate website with the credentials the ARPHA team has provided to you at the time of setting up the plagiarism detection feature.

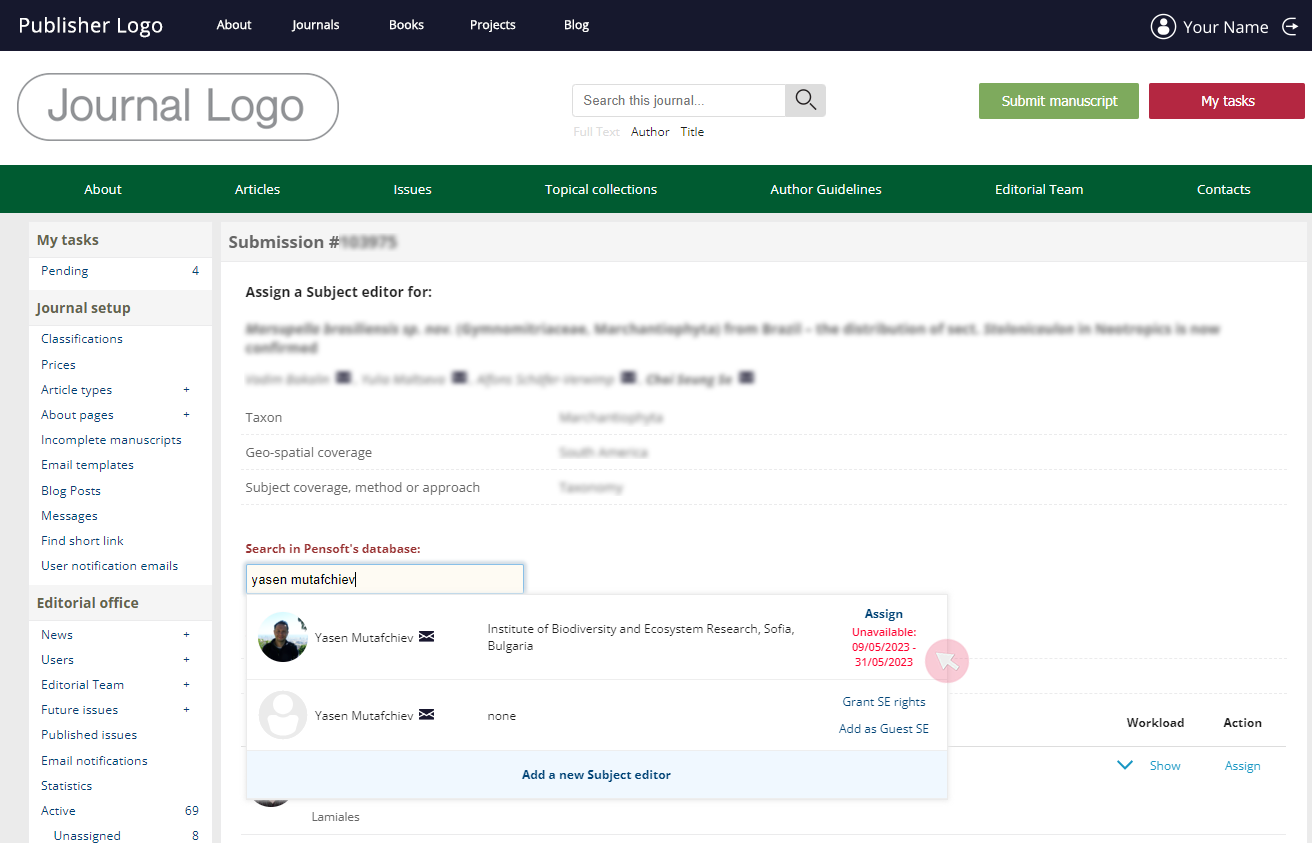
Manage Subject editor assignments
Following a successful pre-review evaluation (performed by the journal’s Editor-in-Chief, Managing editor or the Editorial office), a manuscript is ready to undergo peer review. It is the responsibility of the E to assign a SE for each manuscript.
1 To assign a SE, find the submission in either Unassigned or Active in the Editorial office menu. Click on its title to access the submission.
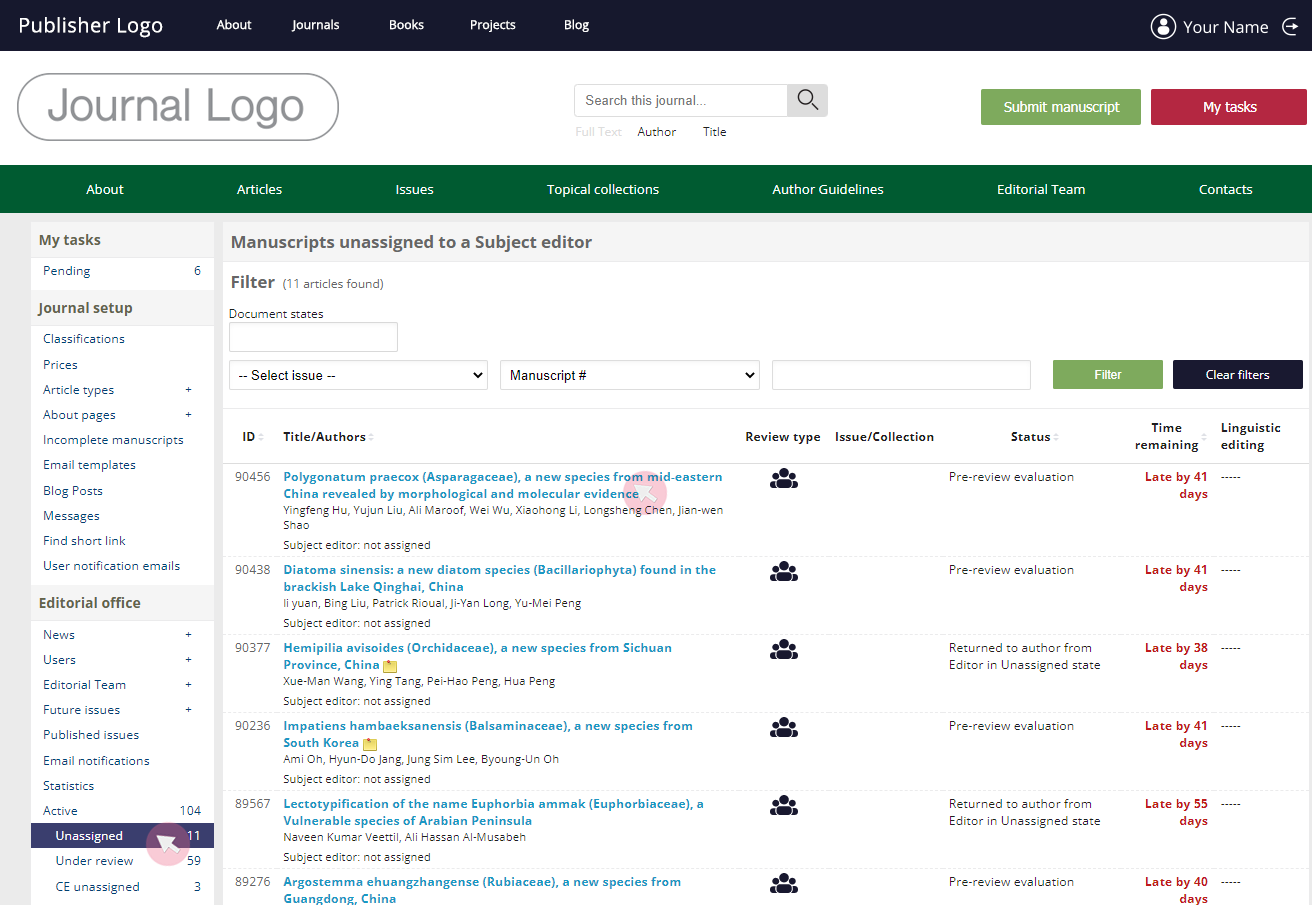
2 You can assign yourself as a SE (if the manuscript falls into your area of expertise) or select an appropriate SE from the list of editors.
3 If you have assigned yourself as a SE, you will now be able to find the manuscript in the My editorial tasks menu.
4 To select a SE, you can use the list of suitable SEs and assign the suggested editor by clicking Assign. The list is configured based on the classifications assigned to the manuscript (e.g. geo-spatial coverage, subject coverage). You can also use the search box to find a particular user by typing in his/her name or email address.
You are strongly recommended to first check/correct the classifications assigned to the manuscript (using the Classifications tab as explained in Manage submissions and monitor their progress above) to ensure the system suggests the most suitable users.
In case the person you wish to assign as a SE appears in the list, yet does not have the necessary user rights for the particular journal, you can either grant him/her with SE user rights, or invite him/her as a one-time Guest SE. Note that if you choose the first option, you will need to update his/her SE expertise (see Assign user rights), whereas if you select the latter, the user will not be listed as a SE in the ARPHA system.
If the user is not registered in the ARPHA system, scroll to the bottom and click Add a new Subject editor.
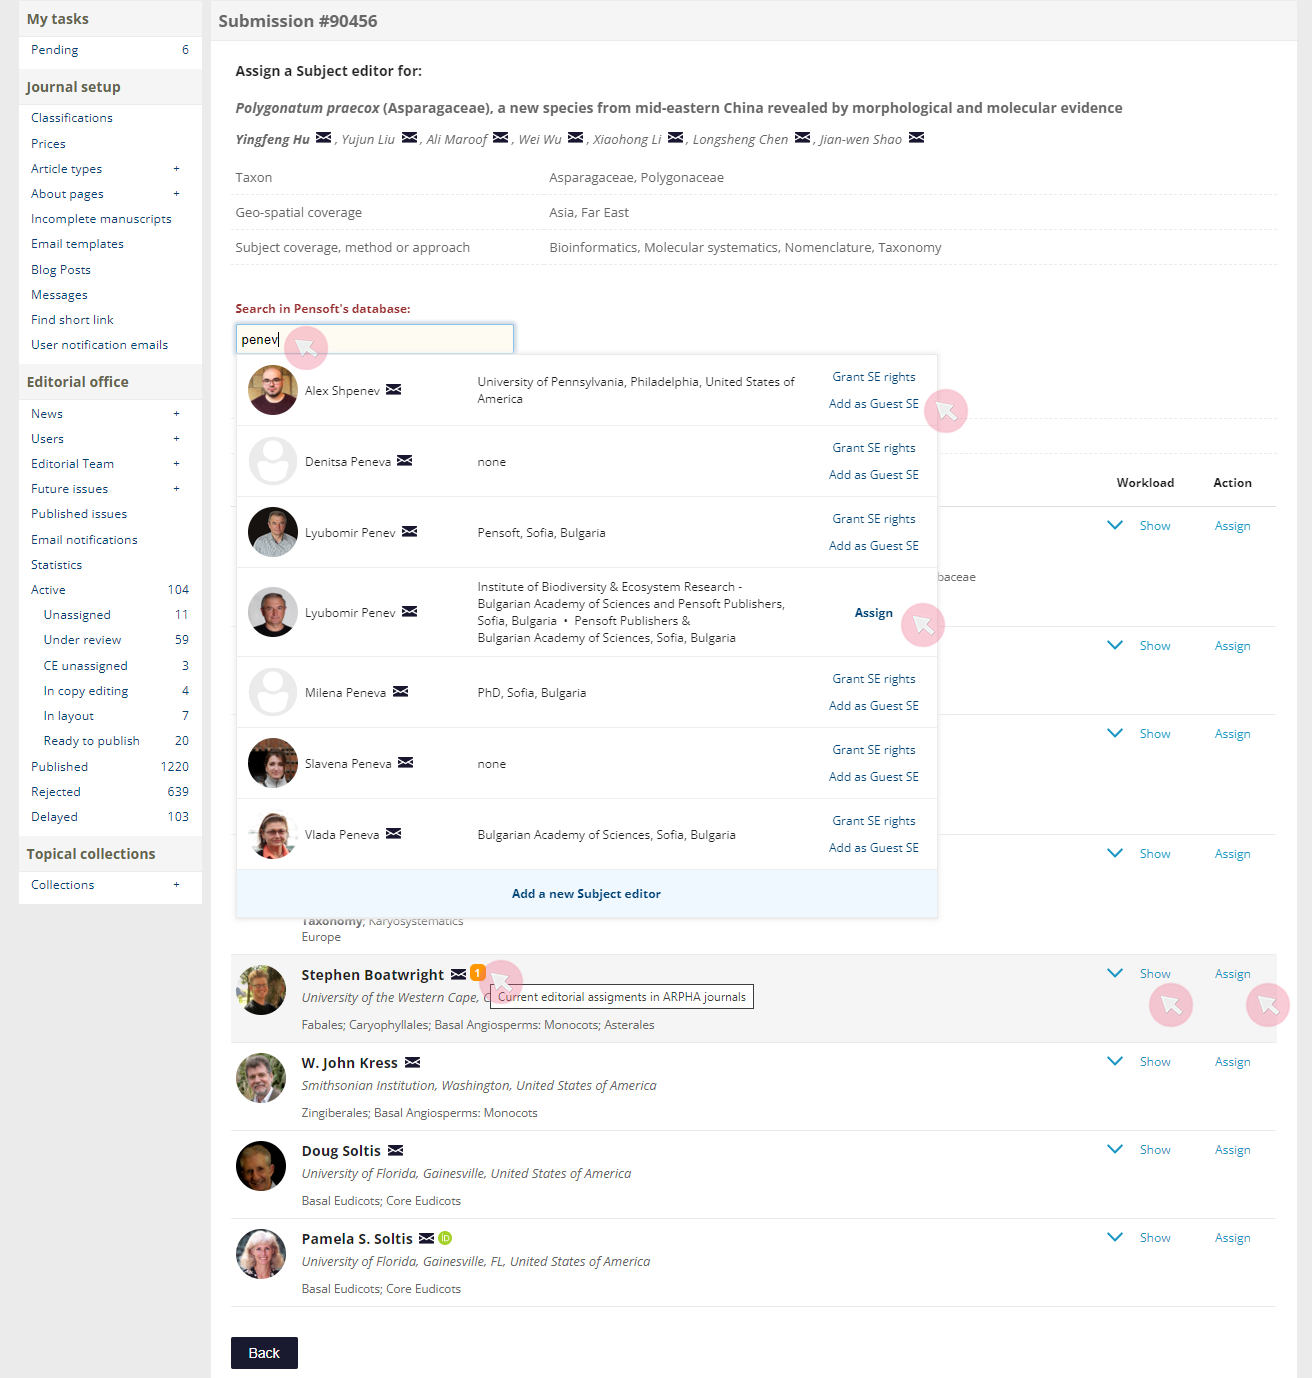
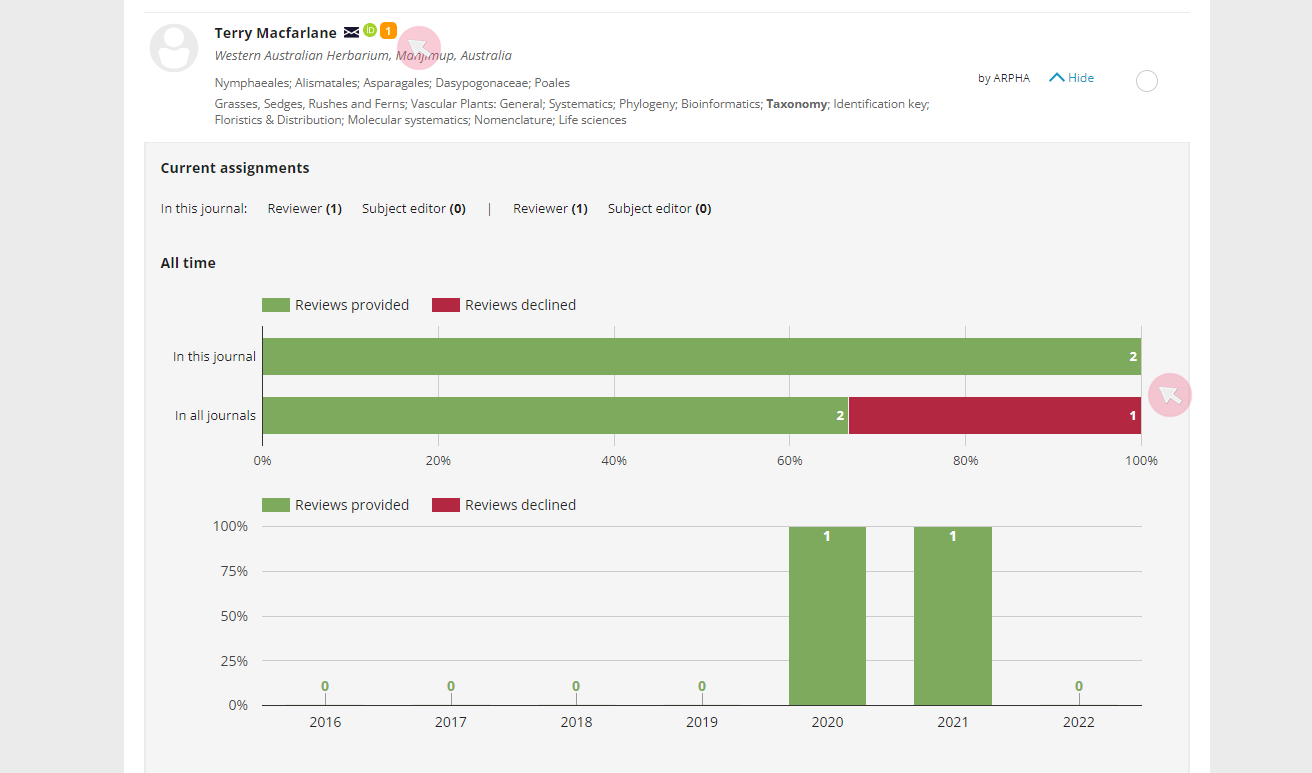
Tip: Note the number visible next to some user names. It indicates the editorial assignments the user is currently working on in the ARPHA system. To see the user’s current workload and his/her all-time record, click Show.
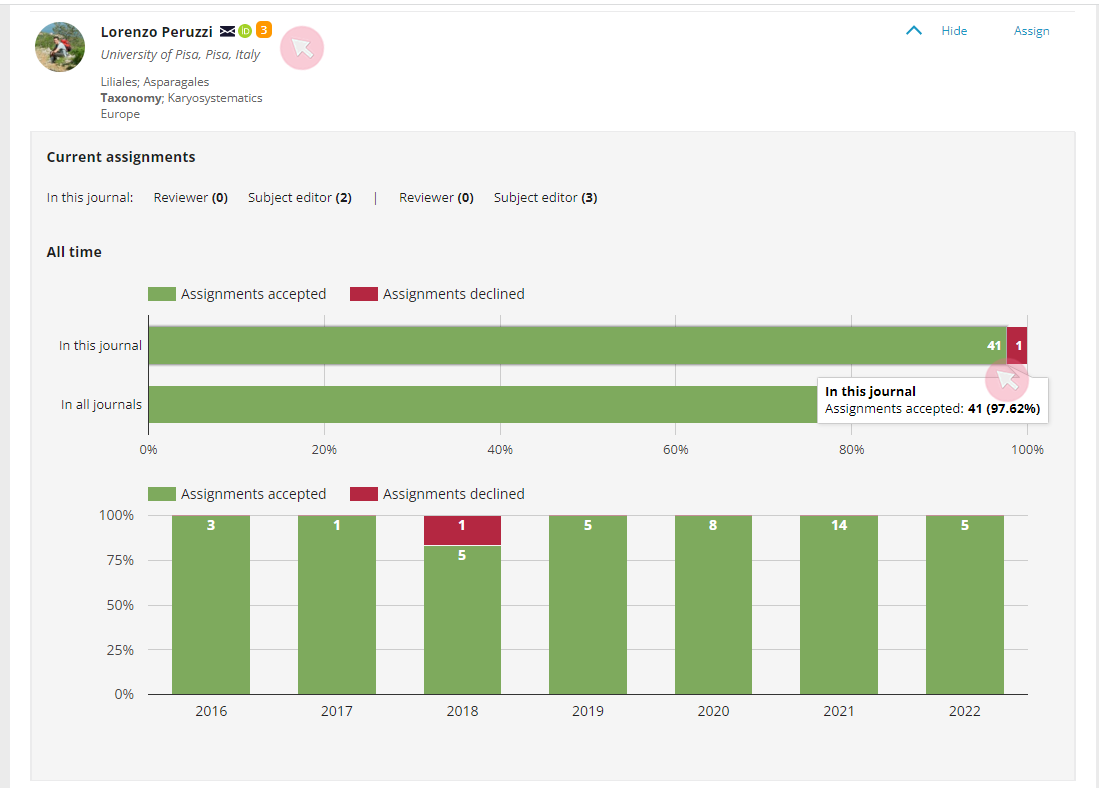
In the newly expanded field, you will find statistics about the user’s current and previous tasks at the journal, and also at all ARPHA-hosted journals.
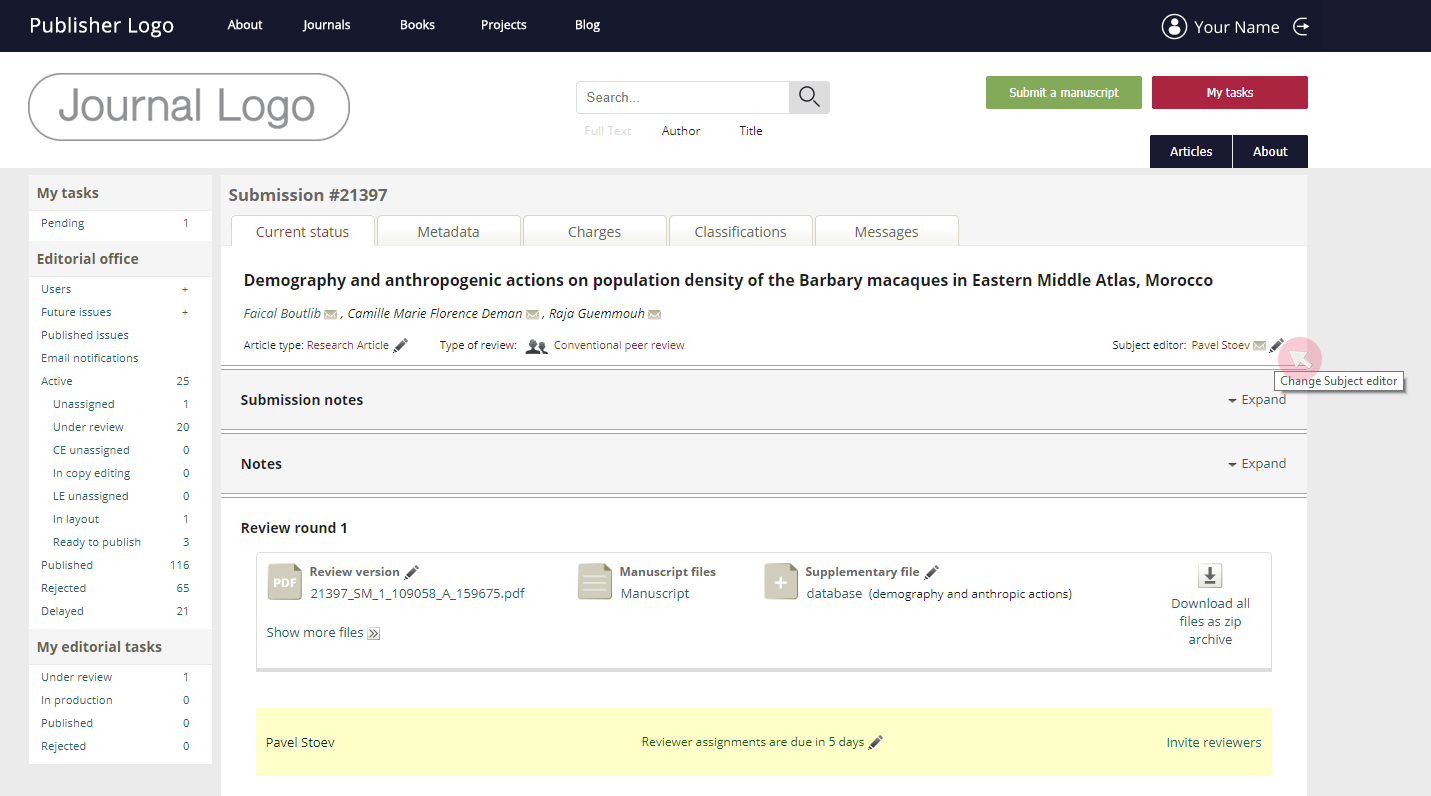
5 To change a SE of a submission while it is under review, find the manuscript in either Active or Under review and access its submission. Use the
Manage Copy editor assignments
After a manuscript is accepted for publication, it can proceed to copy editing (if necessary). It is the responsibility of the E to assign a Copy editor (CE) for each manuscript.
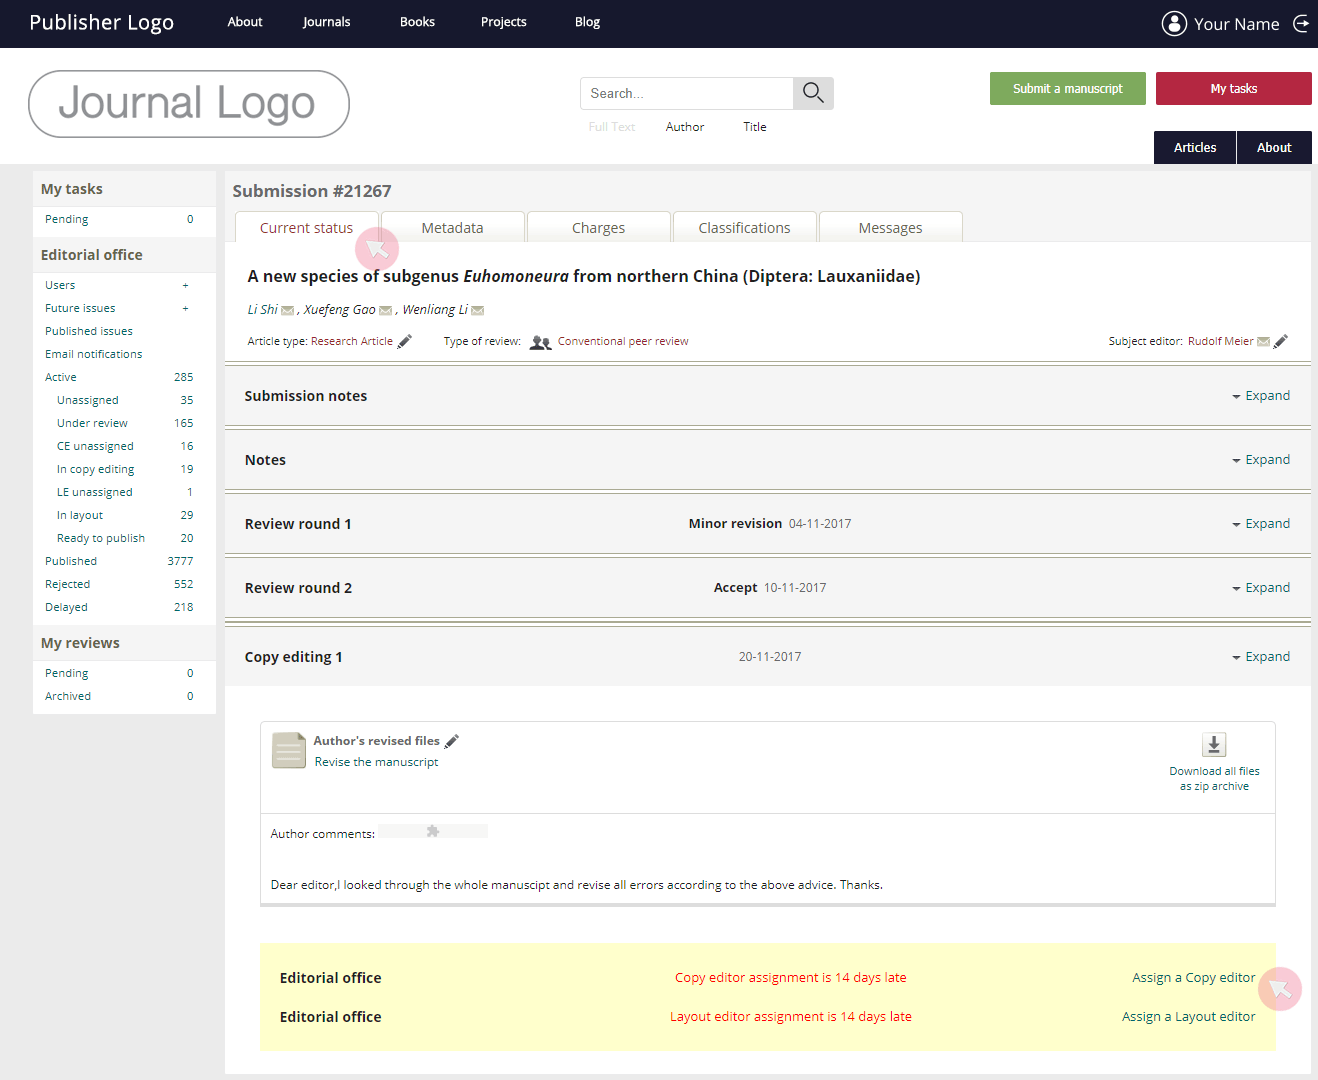
1 To assign a CE, find the submission in either CE Unassigned or Active in the Editorial office menu. Click on its title to access the submission.
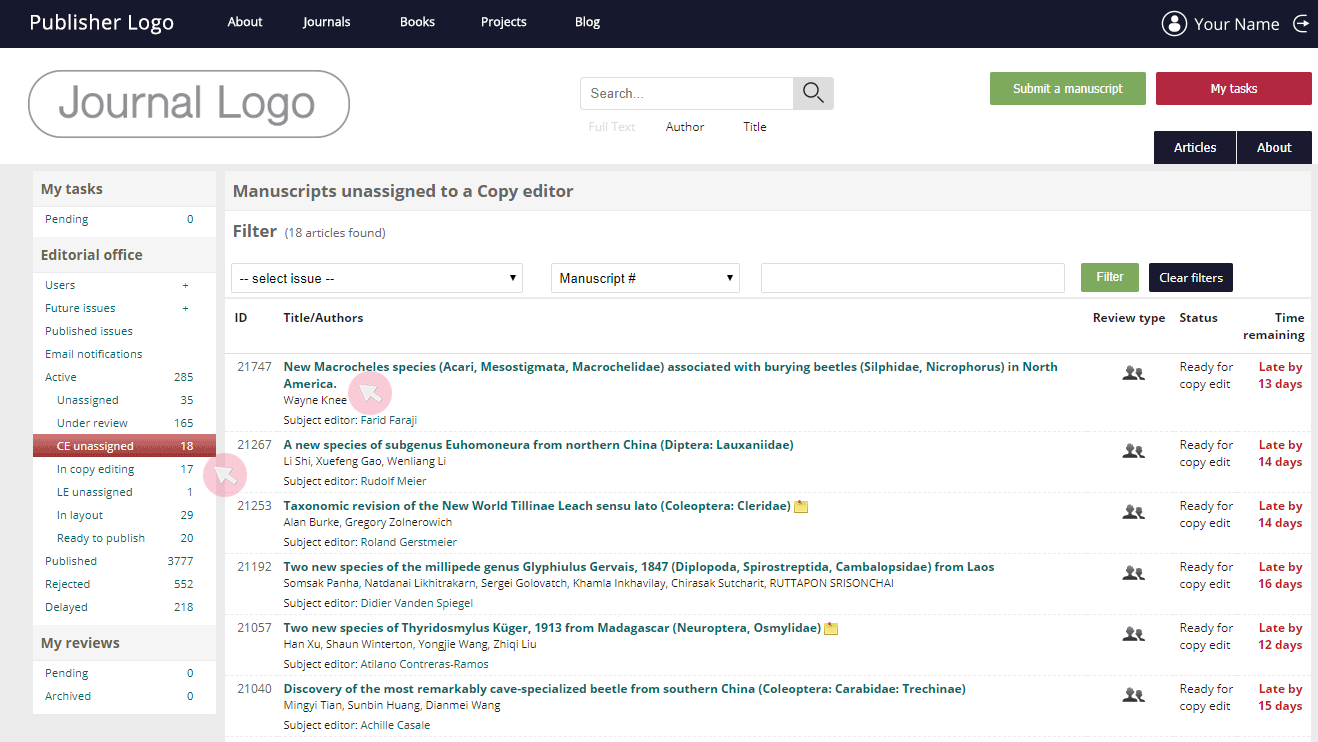
2 In the Current status tab, scroll down and use the clickable Assign a Copy editor to access the list of registered users with CE rights.
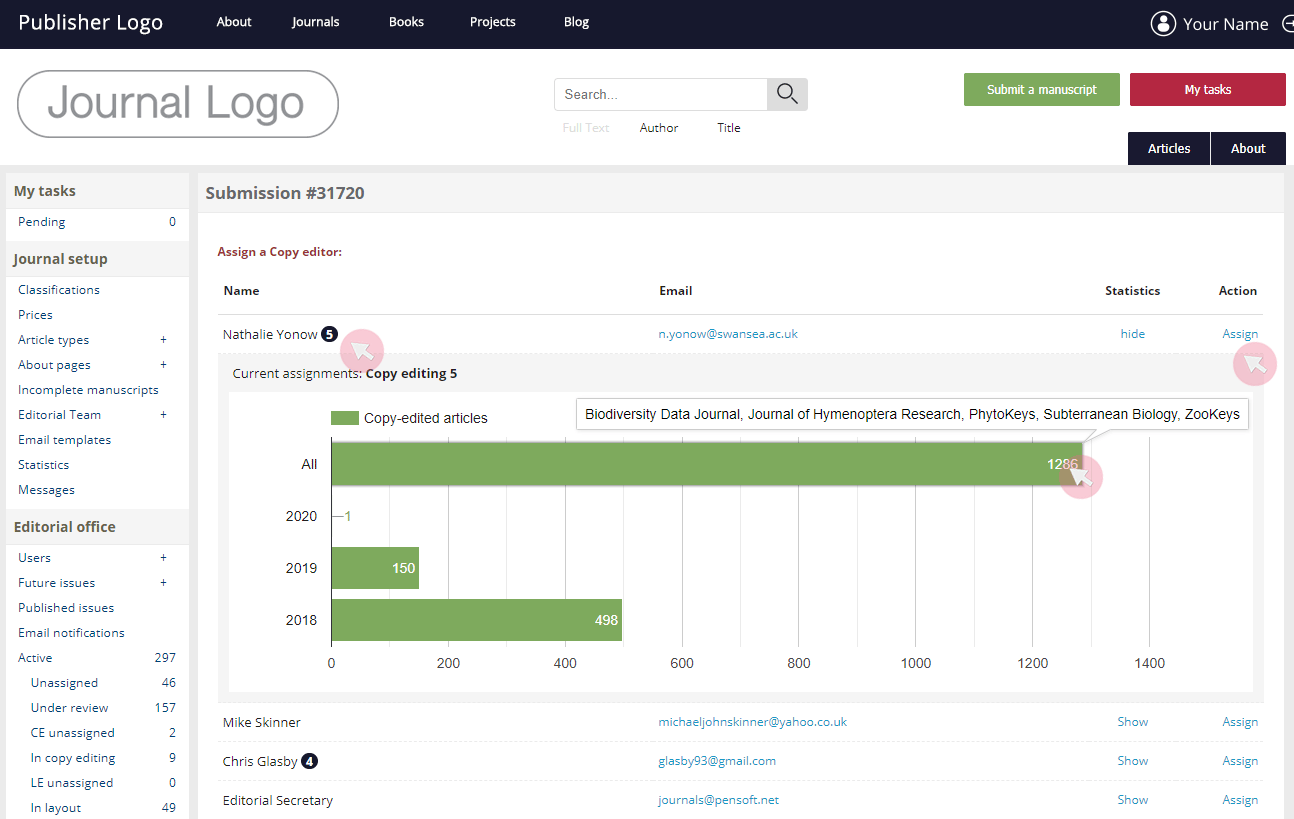
3 To select a CE, use the list provided to select a CE and click Assign across the user’s name.
Tip: Note the number next to the user’s name. It indicates the assignments he/she is currently working on in the ARPHA system. Click Show in the Statistics column to see his/her all-time record. Hover over a specific bar to see the records per journal.
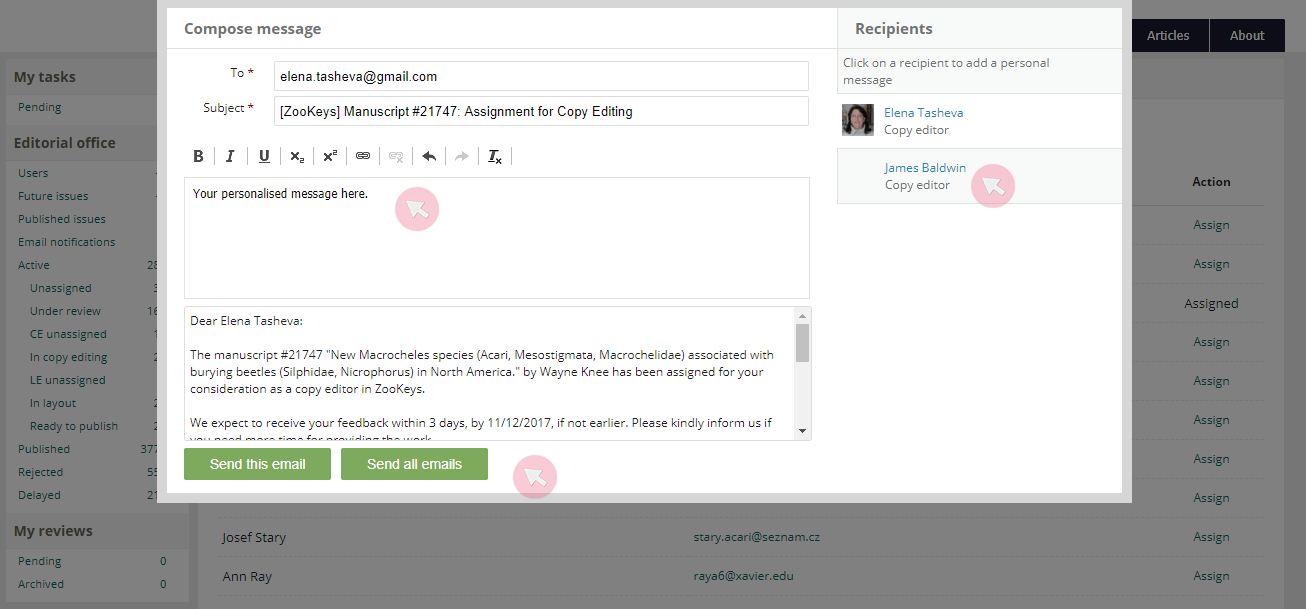
4 Once you assign a CE, a pop-up window will appear to let you add a personalised message to the automated email notification.

5 To change a CE, find the manuscript in In copy editing or Active. In the Current status tab, scroll down and click Change Copy editor to access the list of registered users with CE rights.

Note: A pop-up window will appear to let you add a personalised message to the automated email notification meant for each user. Click on the user’s name on the right-hand side to navigate to the message generated for him/her.
Manage Layout editor assignments
After a manuscript is accepted for publication and undergone copy editing (if applicable), it is ready to proceed to the production (layout) stage. It is the responsibility of the E to assign a Layout editor (LE) for each manuscript.
1 To assign a LE, find the submission in either LE Unassigned or Active in the Editorial office menu. Click on its title to access the submission.
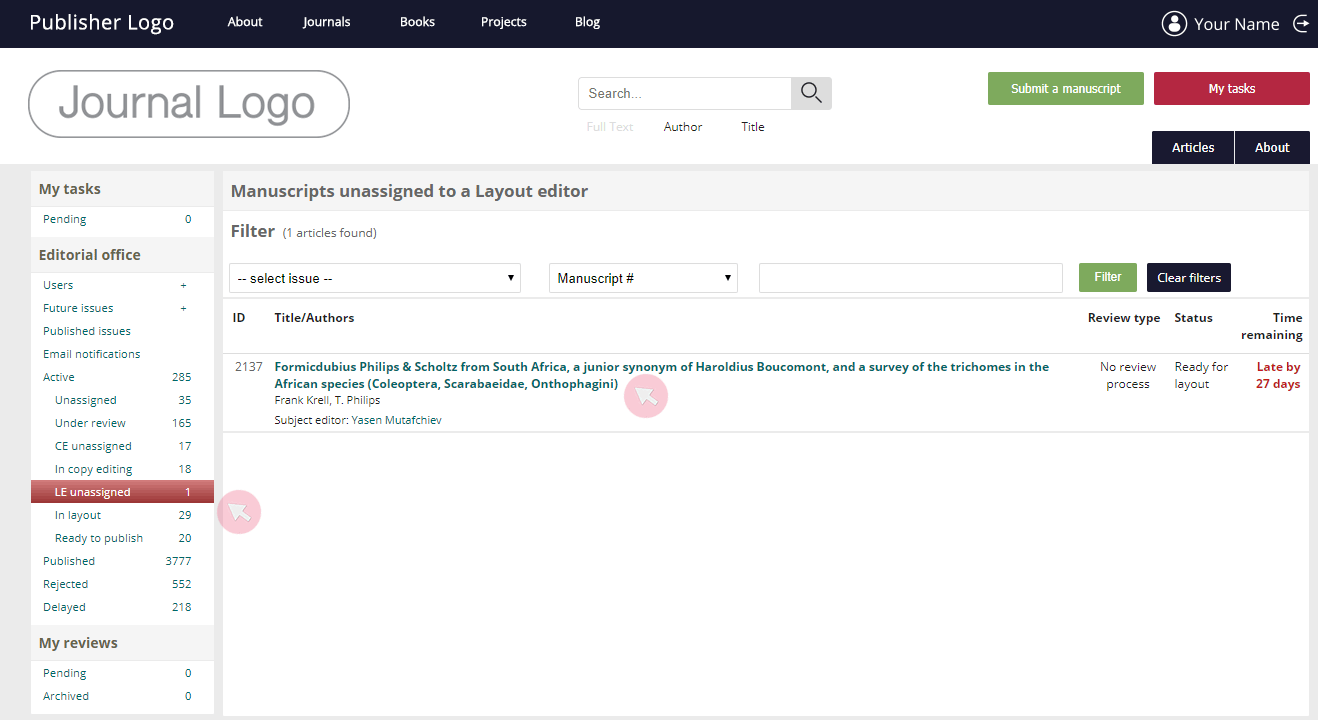
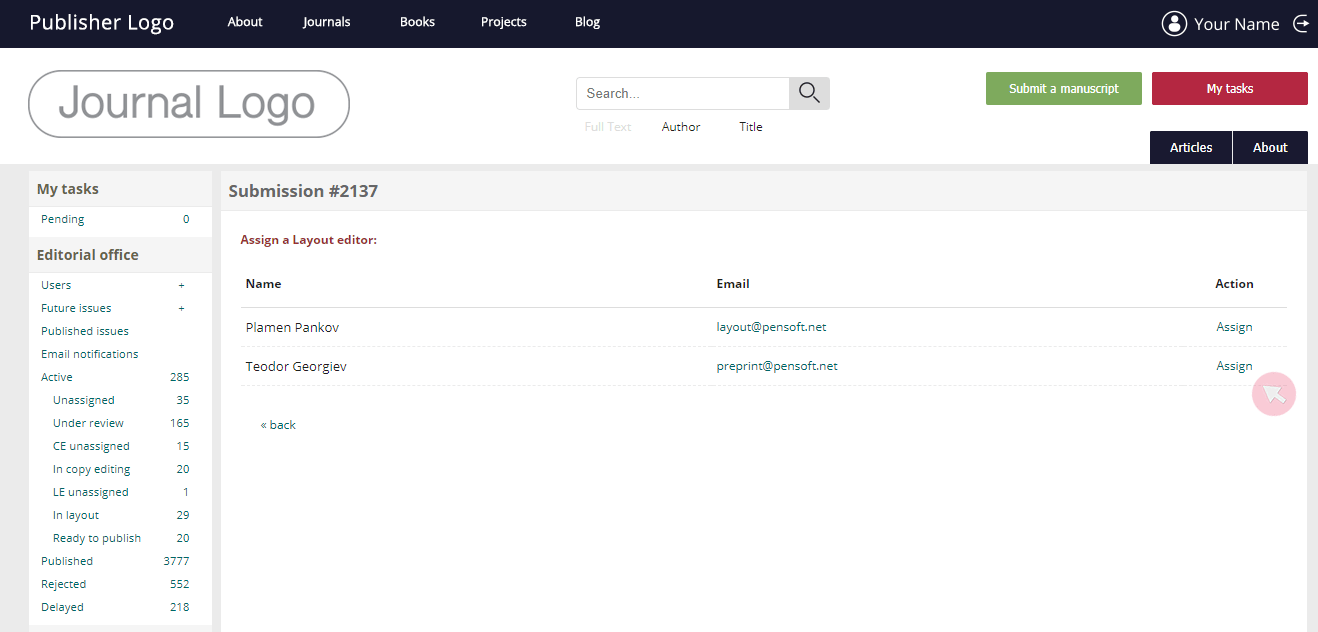
2 In the Current status tab, scroll down and use the clickable Assign a Layout editor to access the list of registered users with LE rights.

3 Click on Assign across a user’s name to assign him/her as a LE of the manuscript. A pop-up window will appear to let you add a personalised message to the automated email notification.
4 To change a LE, find the manuscript in In layout or Active. In the Current status tab, scroll down and click Change Layout editor to access the list of registered users with LE rights.

Note: A pop-up window will appear to let you add a personalised message to the automated email notification meant for each user. Click on the user’s name on the right-hand side to navigate to the message generated for him/her.

Return a manuscript for corrections prior to peer review
In case the Editor finds it necessary, he/she can return a manuscript to the author for corrections prior to peer review. Ordinarily, the reason would be minor technical issues, e.g. noncompliant image format or missing metadata.
1 Find the submission in Unassigned or Active from the Editorial office menu. Click on the submission’s title to access it and go to the Current status tab.
Note: A manuscript returned for corrections remains accessible from the Active tab, but will not appear in the Unassigned category until the author re-submits a revised version.
2 Use the field to explain your reasons for returning the manuscript.
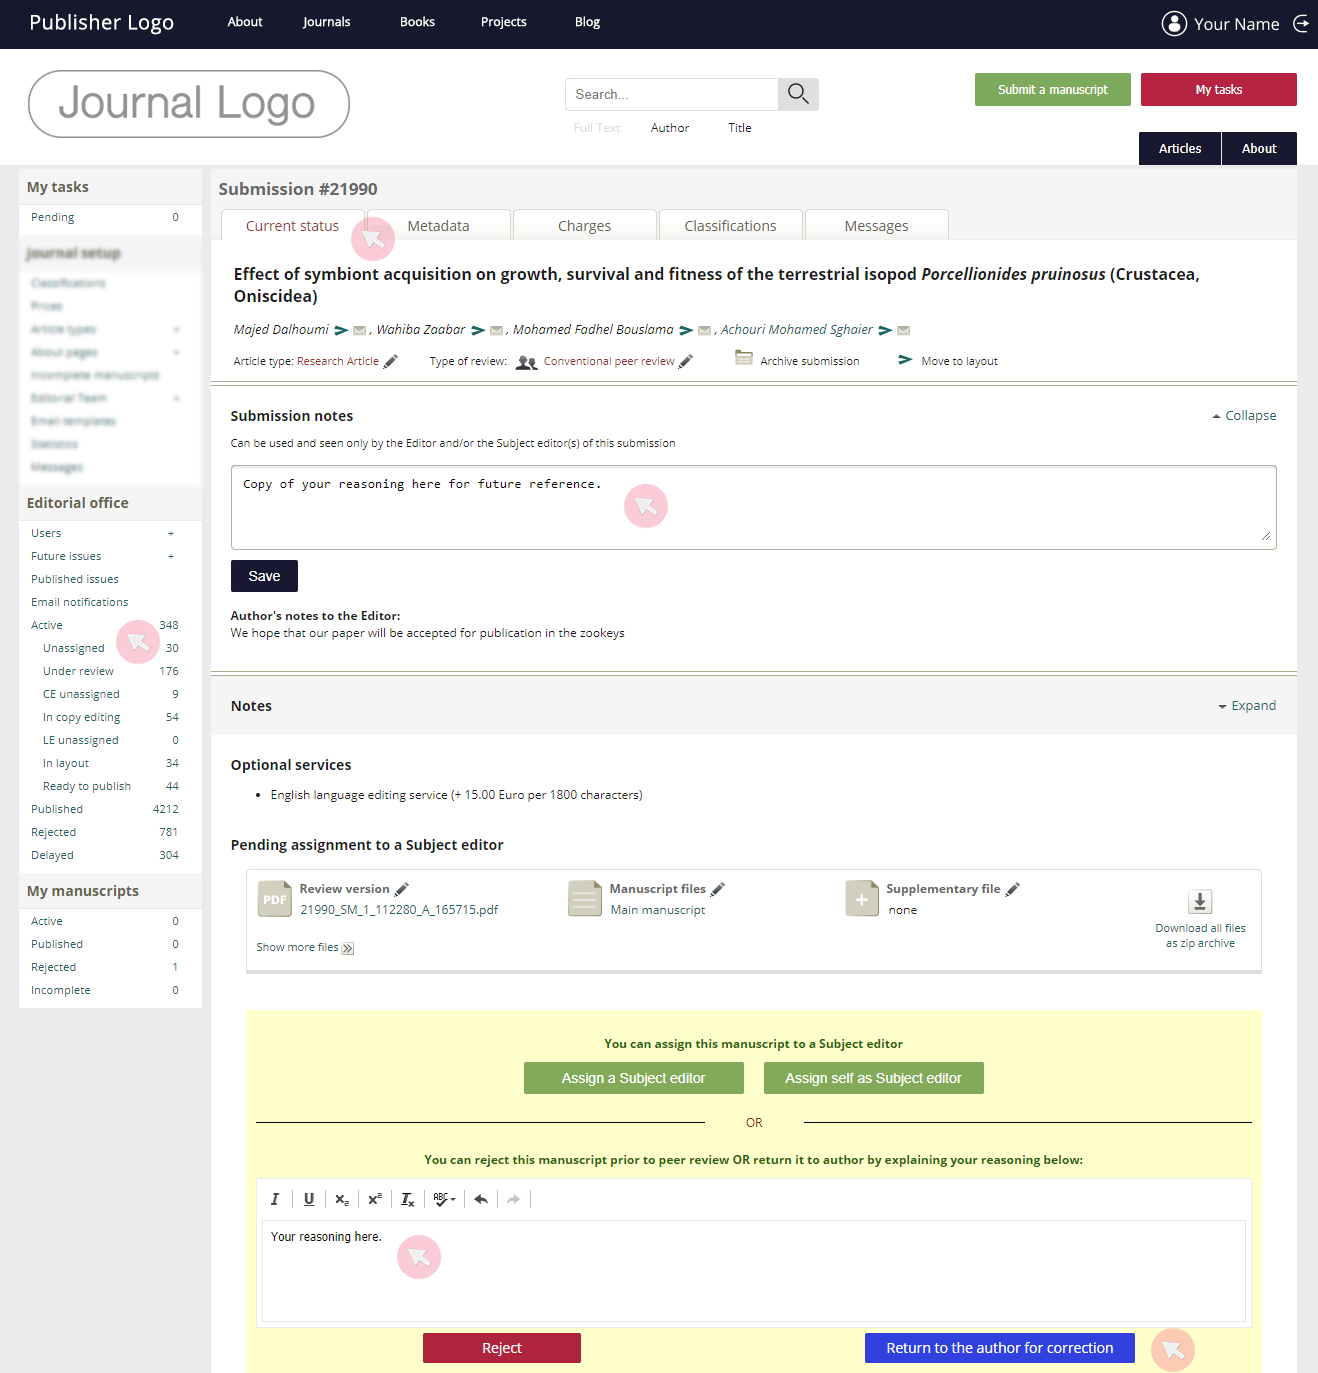
Note 1: The Return to the author for correction button will become active only after you have entered your text.
Note 2: You will not be able to access your text once the manuscript has been re-submitted. We strongly recommend that you copy your reasoning either in the email which the system will generate once you click the Return to the author for correction button, or copy it in Submission notes.
3 ARPHA will generate an email notification to inform the authors about your decision. You can add a personal message.
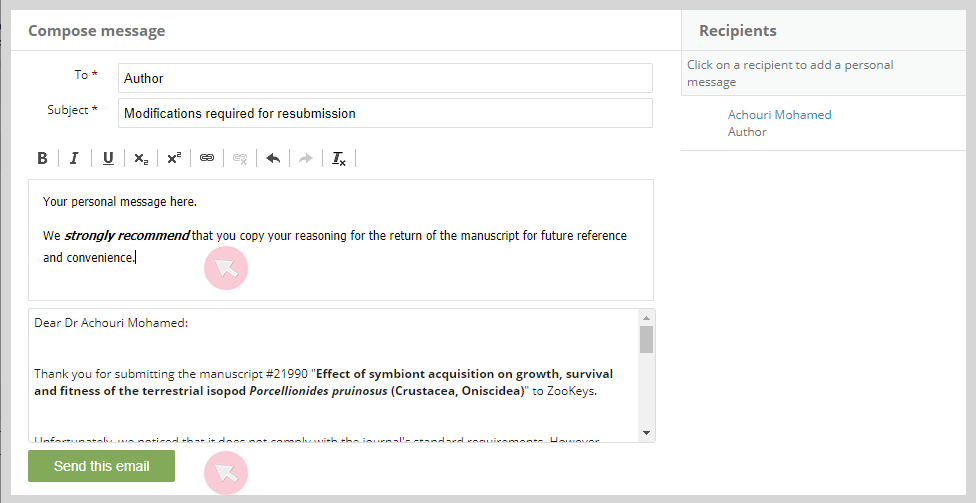
Tip: Copy your reasoning about the return of the manuscript here for future reference. You will be then able to access your text via the Messages tab in the manuscript submission once the article is re-submitted.
Reject a manuscript prior to peer review
The Editor has the right to reject a manuscript prior to peer review if he/she finds it either of insufficient scientific / linguistic quality and/or non-conformity with the journal's scope and guidelines.
1 Find the submission in either Unassigned or Active from the Editorial office menu. Click on the submission’s title to access it and go to the Current status tab.
2 Use the text field to explain your reasons prior to rejecting the manuscript via either of the buttons at the bottom of the page.
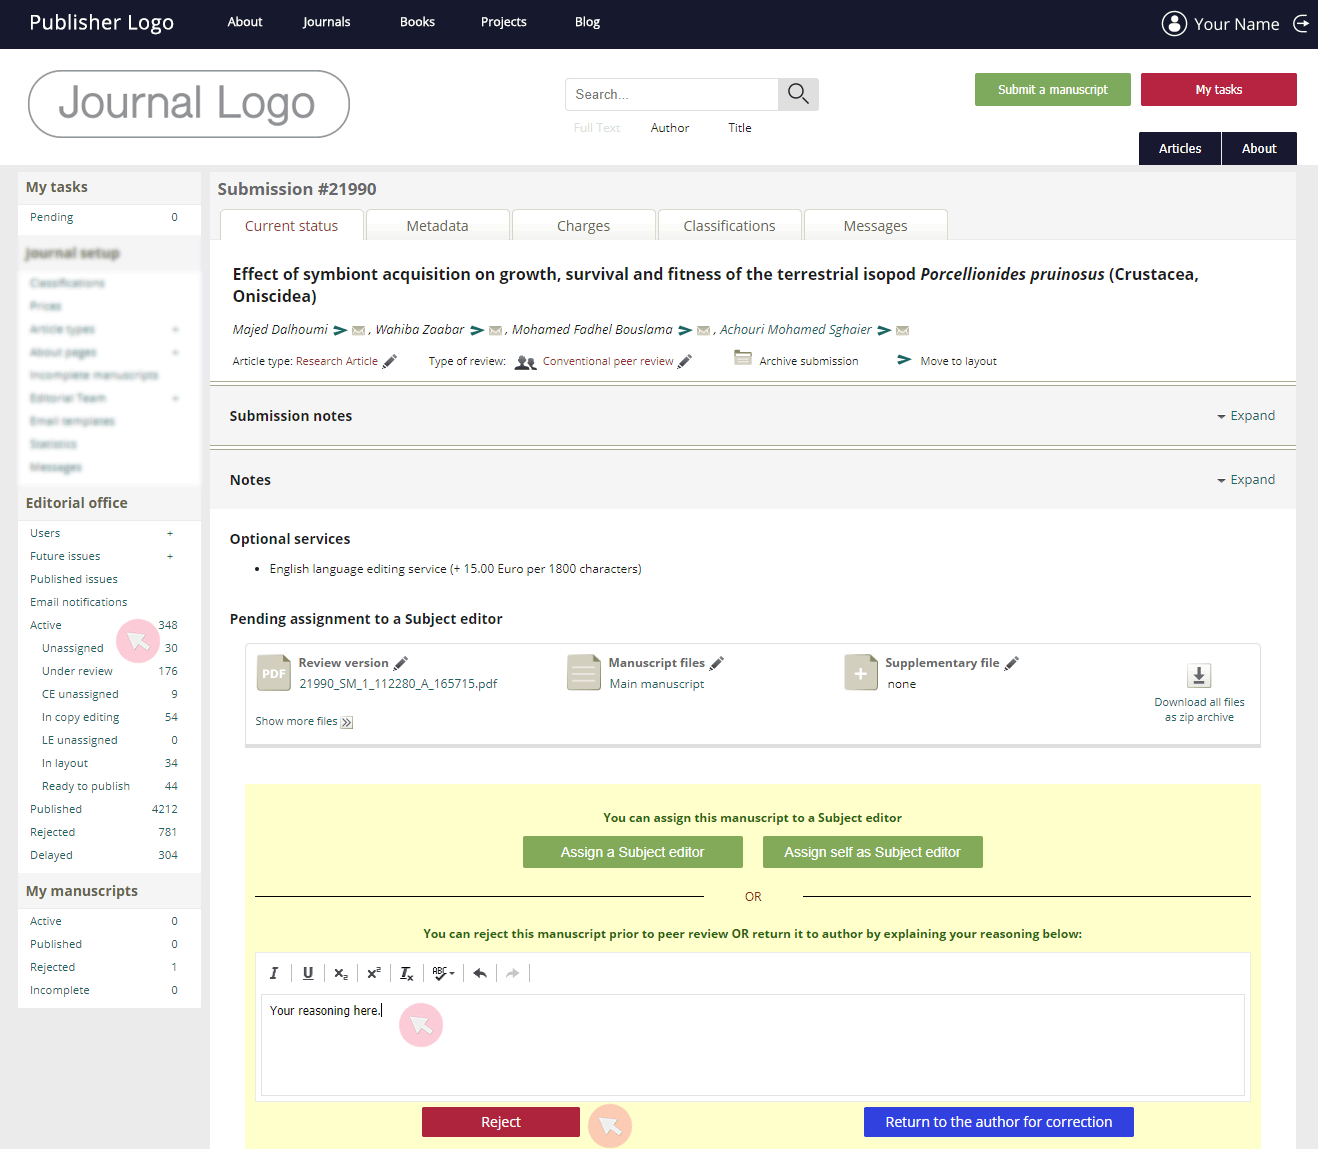
Note: Both buttons will become active only after you have explained the reasons for rejection in the text field above the buttons.
3 The system will generate a notification to the authors, informing them about your decision. They will be able to access the manuscript and see the rejection notice.
Verify a Subject editor’s decision (optional)
A journal can opt for this feature, so that the final decision on the acceptance or rejection of a manuscript in the journal lies with the Editor-in-Chief (E-i-C). This feature works as follows:
1 The SE provides a final recommendation on either the acceptance or rejection of a manuscript.
2 The SE’s recommendation is automatically emailed to the E-i-C.
3 The E-i-C can either confirm the acceptance/rejection or request further minor/major revision from the authors.
4 The SE receives an automated email notification about the E-i-C’s decision.
5 Should the manuscript be sent back to the author for revision, the revised version will be returned to the SE and will undergo the same procedure until the paper is either accepted or rejected for publication by the E-i-C.
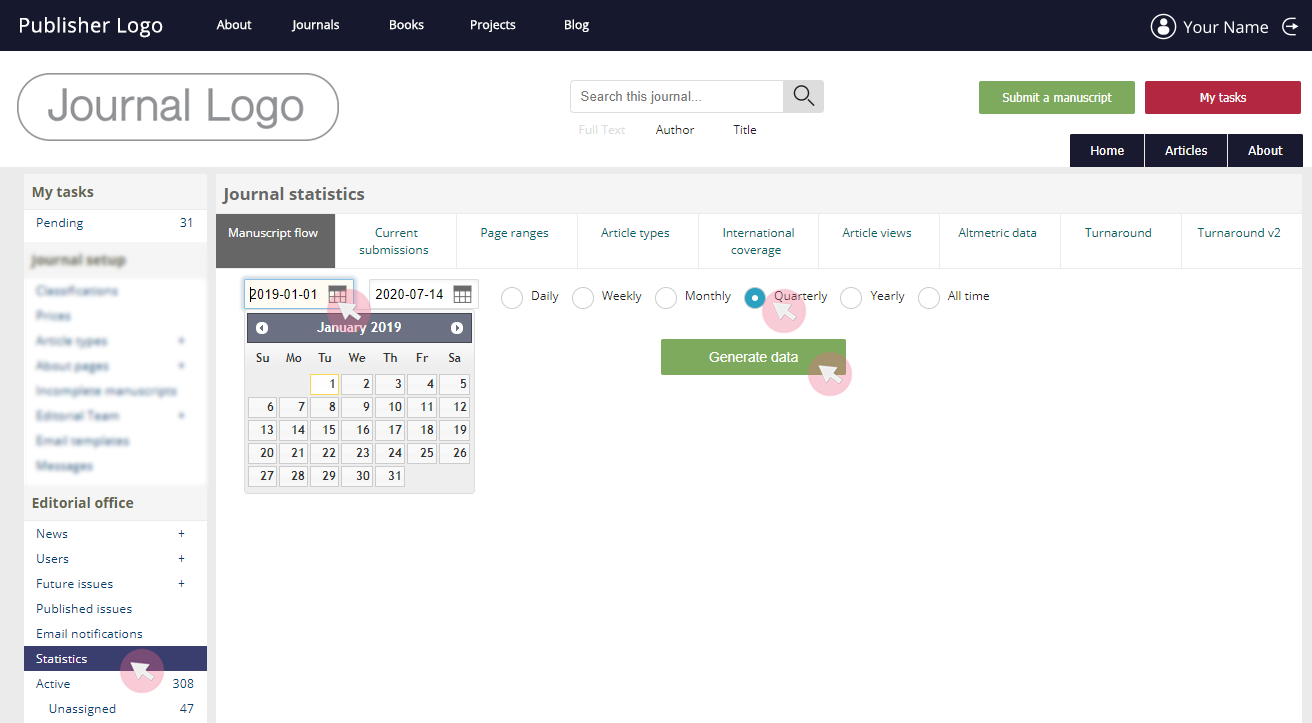
Access journal statistics
Use Statistics from the Editorial office menu to access various statistics data (e.g. the count of submitted manuscripts, published articles and submitting authors over a defined period of time).
1 Use the date icon to select the period of interest. Choose whether you want to compare the data from that period by day, week etc. Retrieve the data with the Generate data button.
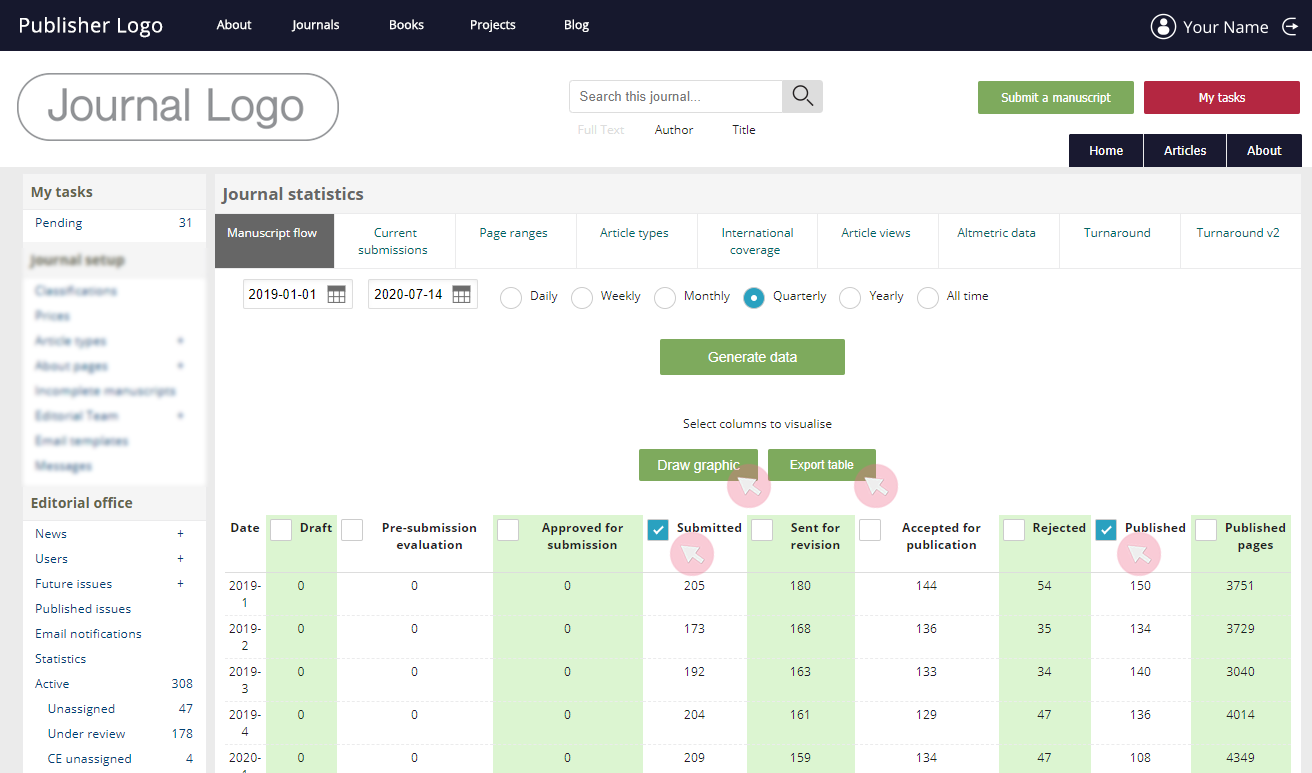
2 When generated, the statistics will be displayed in columns. Create a graphic of either all or selected data by checking the corresponding boxes and clicking Draw graphic.
You can also export the data in a file (.csv) using the Export table button.
3 Use the Export graphic button to save the graphic as an image (.png) on your device. To change the parameters displayed, (un)check the corresponding columns below and click Redraw graphic.
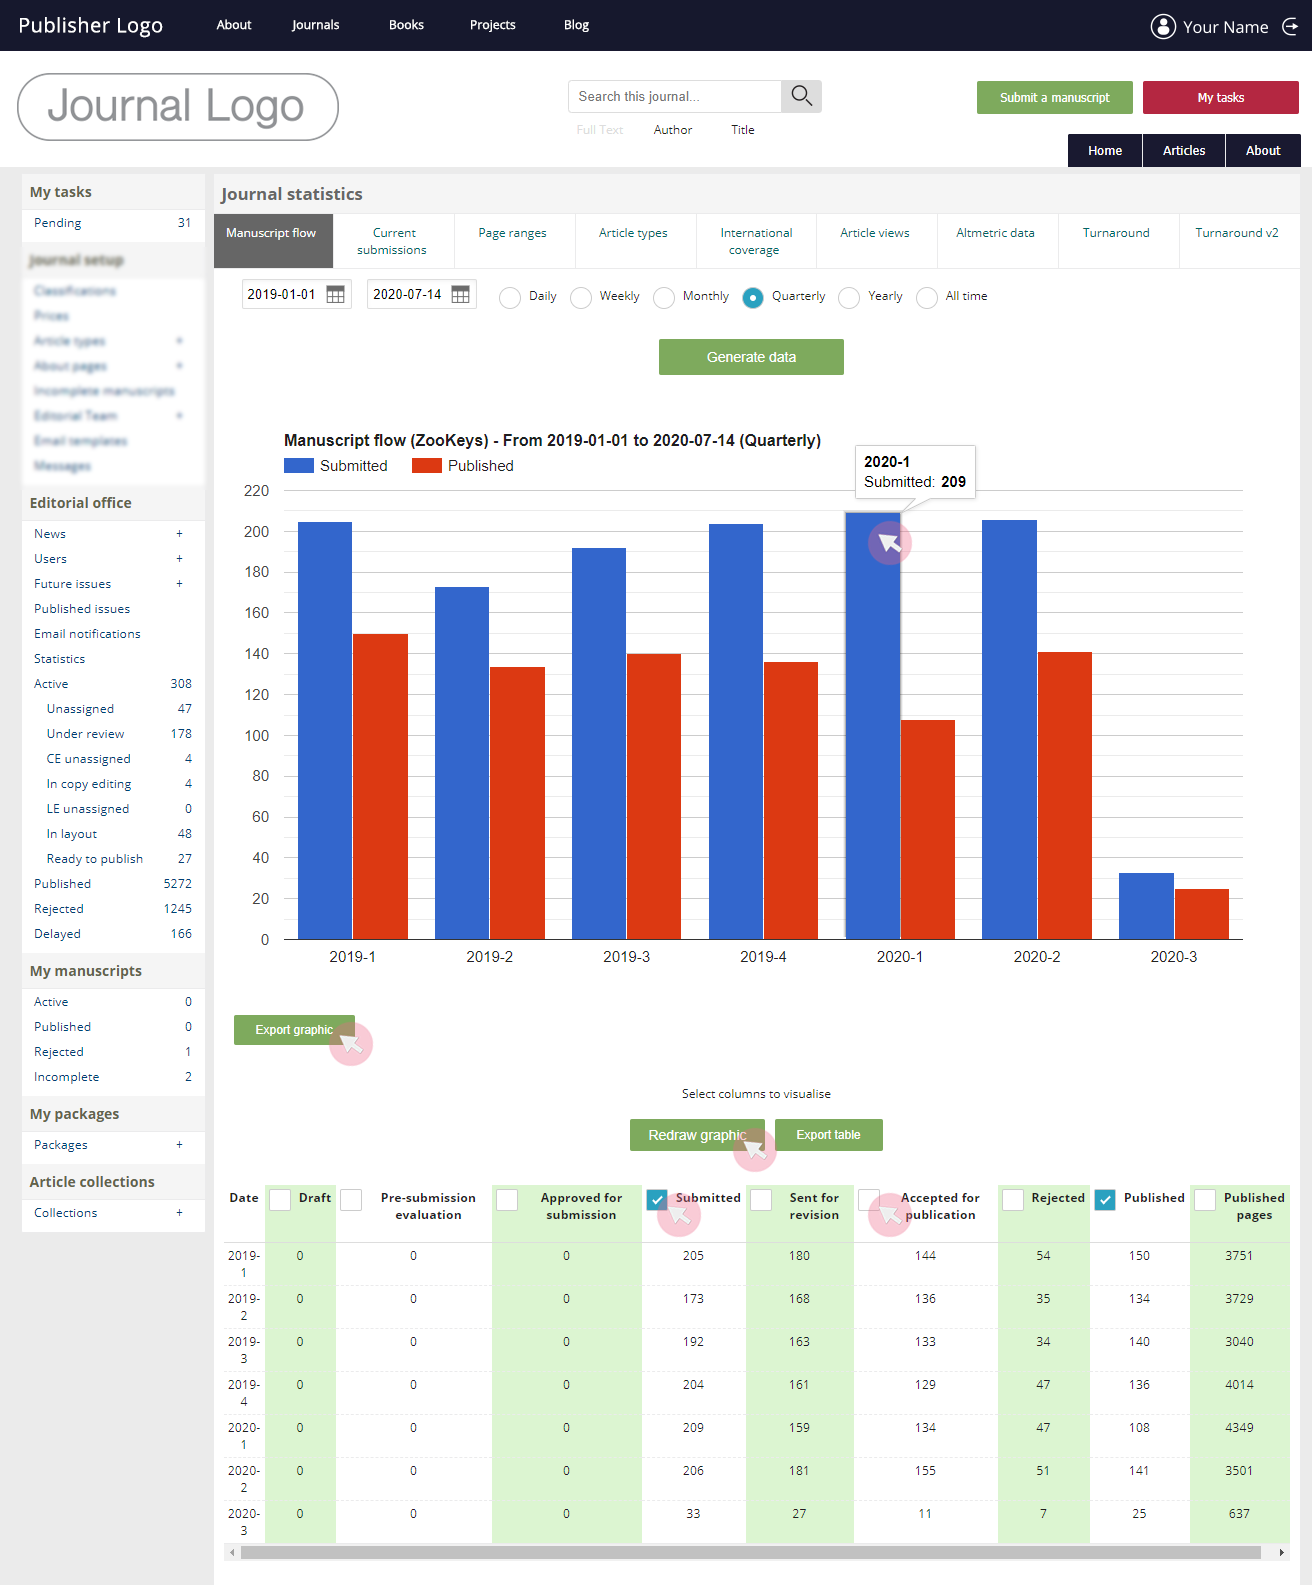
Tip: Hover over a bar to see the exact count represented.
4 In the same manner, use the available tabs to find various statistics concerning the journal:
- Manuscript flow: number of submitted / accepted / rejected / published manuscripts for the selected period.
- Current submission: number of submitted / under review / in copy editing / in layout / awaiting publication / published manuscripts in the system at the moment of the query.
- Page ranges: number of articles published over the selected time period by their length in pages.
- Article types: number of articles published over the selected time period by article type.
- International coverage: number of articles published over the selected time period by their lead author's country.
- Article views: number of views for the selected period for all articles in the journal by format (HTML, PDF and XML) or in total.
- Altmetric data: number of online mentions made in the selected period for all articles in the journal by source (e.g. mainstream media, blogs, Wikipedia, Twitter, Facebook and other).
- Turnaround: average time for the manuscripts from the selected period by processing stage: from submission to publication (in days).
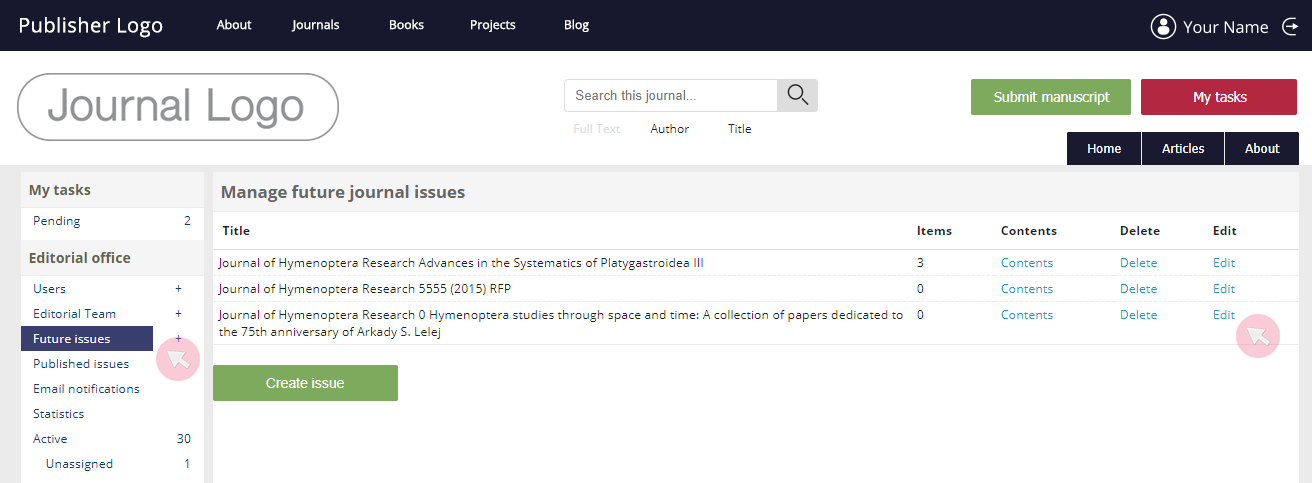
Manage journal issues
1 Use the Future issues / Published issues tabs from the Editorial office menu to access journal issues.
2 Use the plus (+) symbol from the tab to create a new journal issue.
Note: Tick Special issue to make the issue available to authors who may wish to assign their manuscript(s) to the journal issue.
3 Find the action links on the right-hand side (Contents, Delete and Edit).
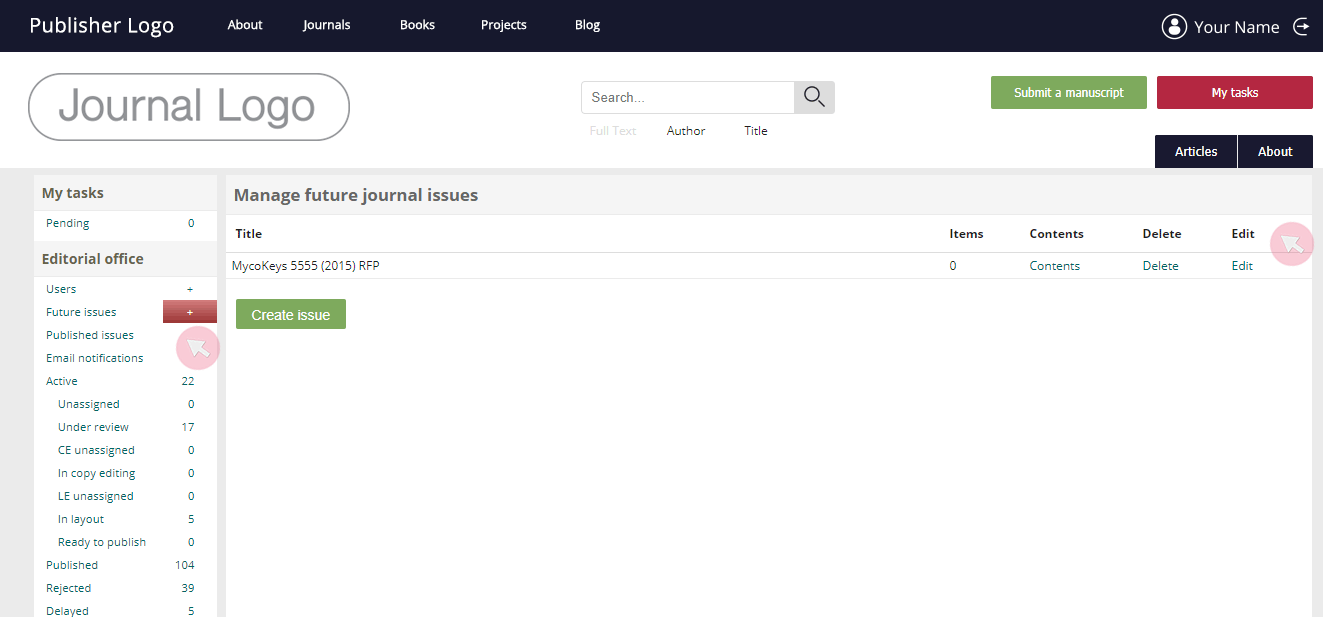
To move them up and down the order within the issue, use the arrows in the Order column.
To discard a manuscript from an issue, click the corresponding link in the Remove column. Note that this will not delete the submission from the journal and it can be placed in another issue.
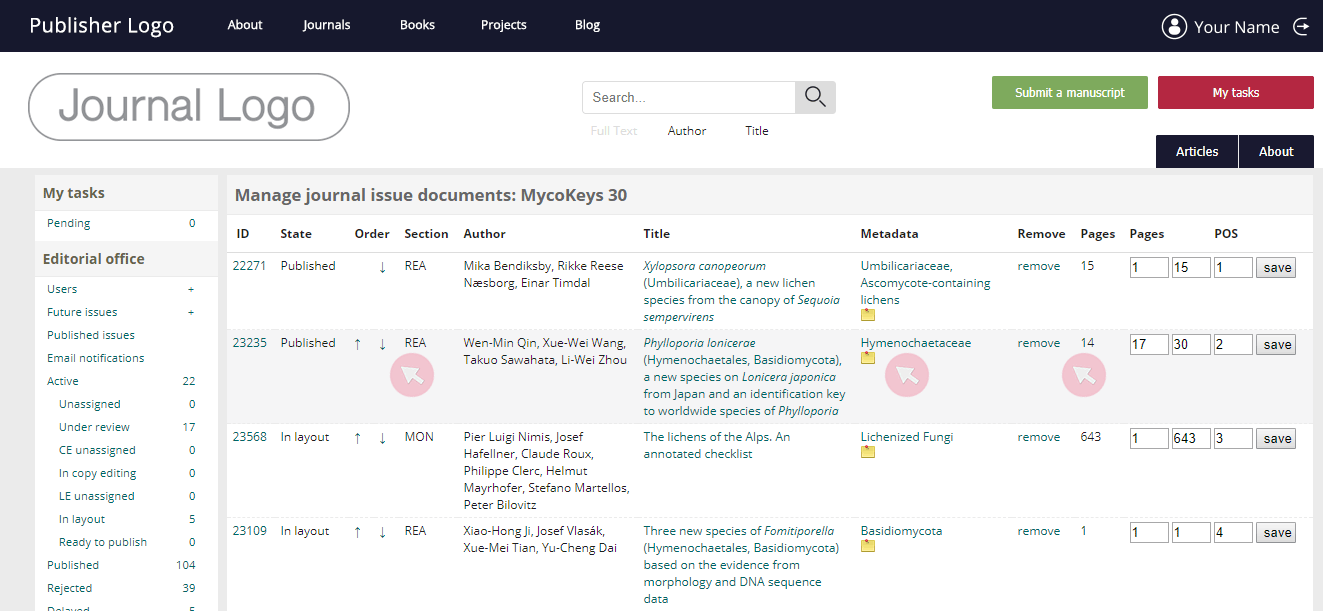
Note: If you (re)move a manuscript, the page numbers visible on the right-hand side will not change automatically. You are strongly advised to avoid editing published issues.
Click on the corresponding symbol in the Metadata column to update the categories assigned to the submission. Use Save to keep your edits.
5 Use Delete to discard the whole journal issue.
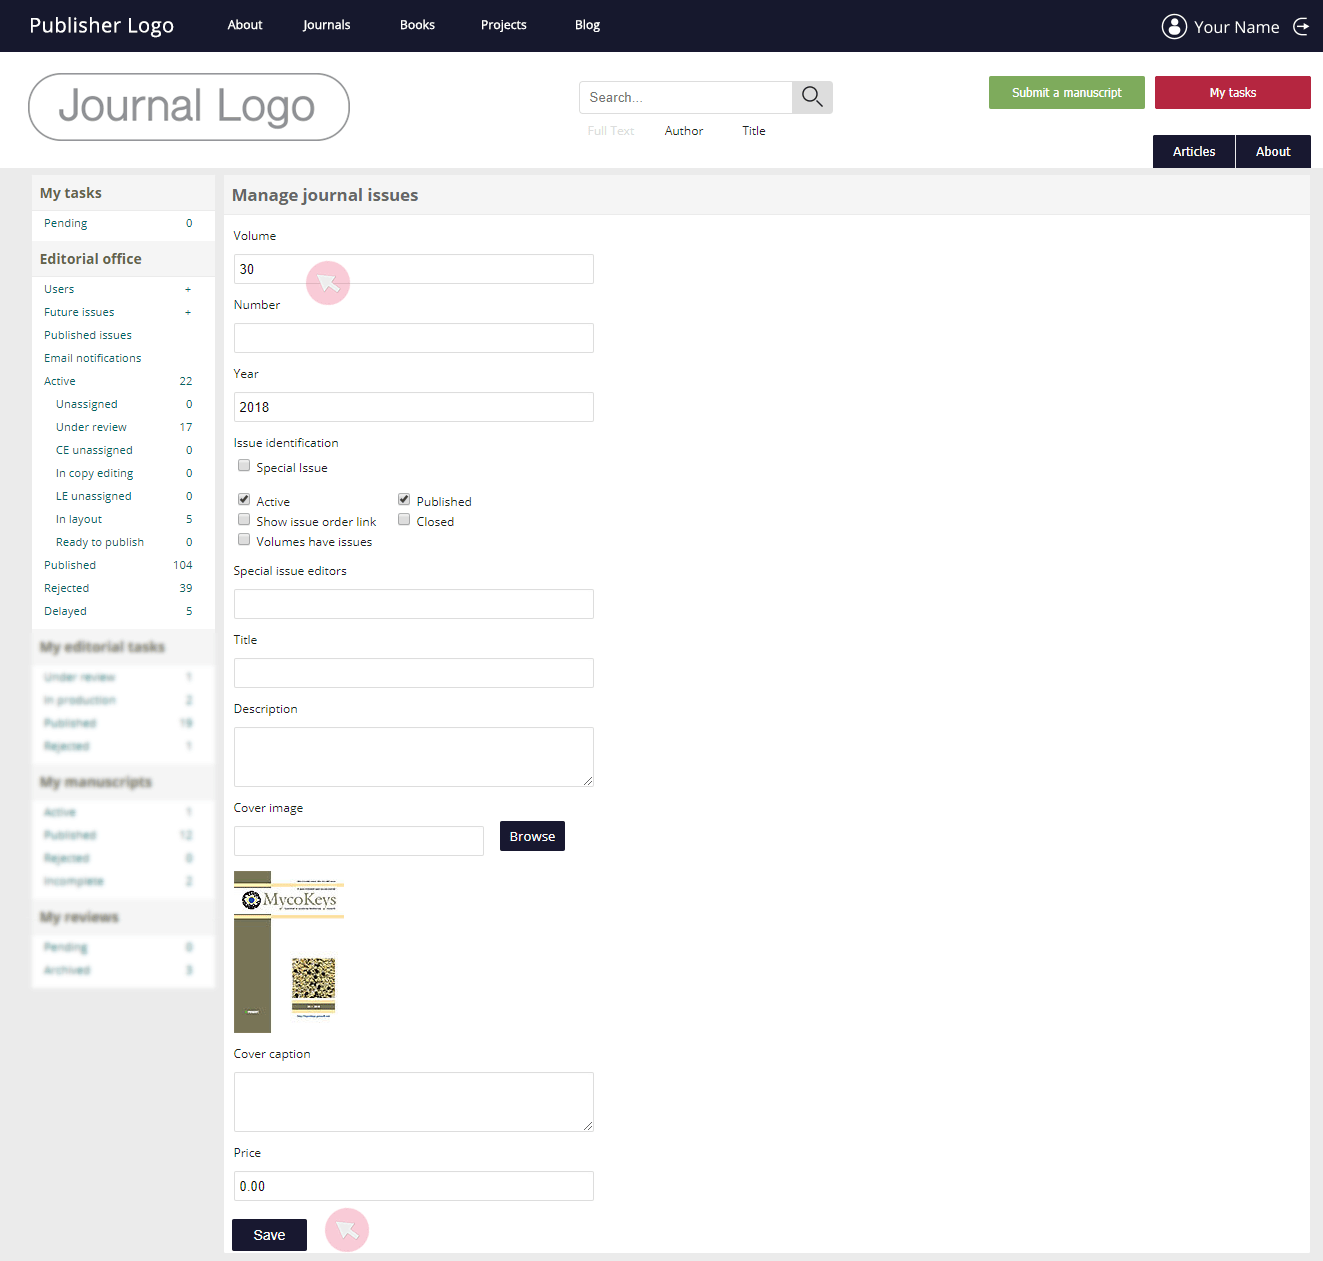
6 Use Edit to update the issue’s details, such as volume number, cover image etc. Click Save to keep your edits.
Manage Special issues / Topical collections
Whenever someone pitches a Special issue (SI) / Topical collection (TC), you will receive the proposal via email with details about the collection and its guest editors. You will be able to either approve or decline the proposal.
Once you approve a SI / TC, manuscripts assigned to it by the submitting author and approved by the Editorial office for submission to the journal, will be proceeding straight to the collection’s guest editors who will be responsible for the peer review and the acceptance / rejection of the manuscript.
Tip: Find whether a particular manuscript is assigned to a SI / TC in the Metadata tab of the submission.
Note: In some journals, the acceptance of a manuscript might be subject to approval from the Editor-in-Chief (see Verify a Subject editor’s decision in the Managing Editor and Editor-in-Chief chapter).
1 To access the article collection and open it for submissions, go to Future issues in the Editorial office menu, accessible from My tasks.
2 Review the collection details and update them, if needed.
- Make sure that all people added in the free text fields as Special Issue Editors are registered users in the ARPHA system and their names, as indicated in the Special issue proposal info at the top, match those in the corresponding fields below. If they are not registered users, create accounts for them (see the Create new user accounts page in this manual). Note that their names need to be listed in the fields corresponding to their roles: the lead editor (ideally one person) is the one who has proposed the SI/TC, while the others should be listed in the box below as guest editors. To enter a name, start typing in, so that it appears as auto predictive text and click on it to add it in the field.
- Check whether the submission and publication deadlines are entered correctly and are realistic;
- In the Issue identification space, check whether the type of the issue is correct (Special issue or Topical article collection); the article collection and its details are visible on the journal website (the Show in "Special issues" on the journal homepage box is ticked); and the collection is marked as Active, meaning that it is open for submissions;
- Check the title, description and other details to see if they need any edits.
3 Click Save to confirm your edits and open the collection for submissions.
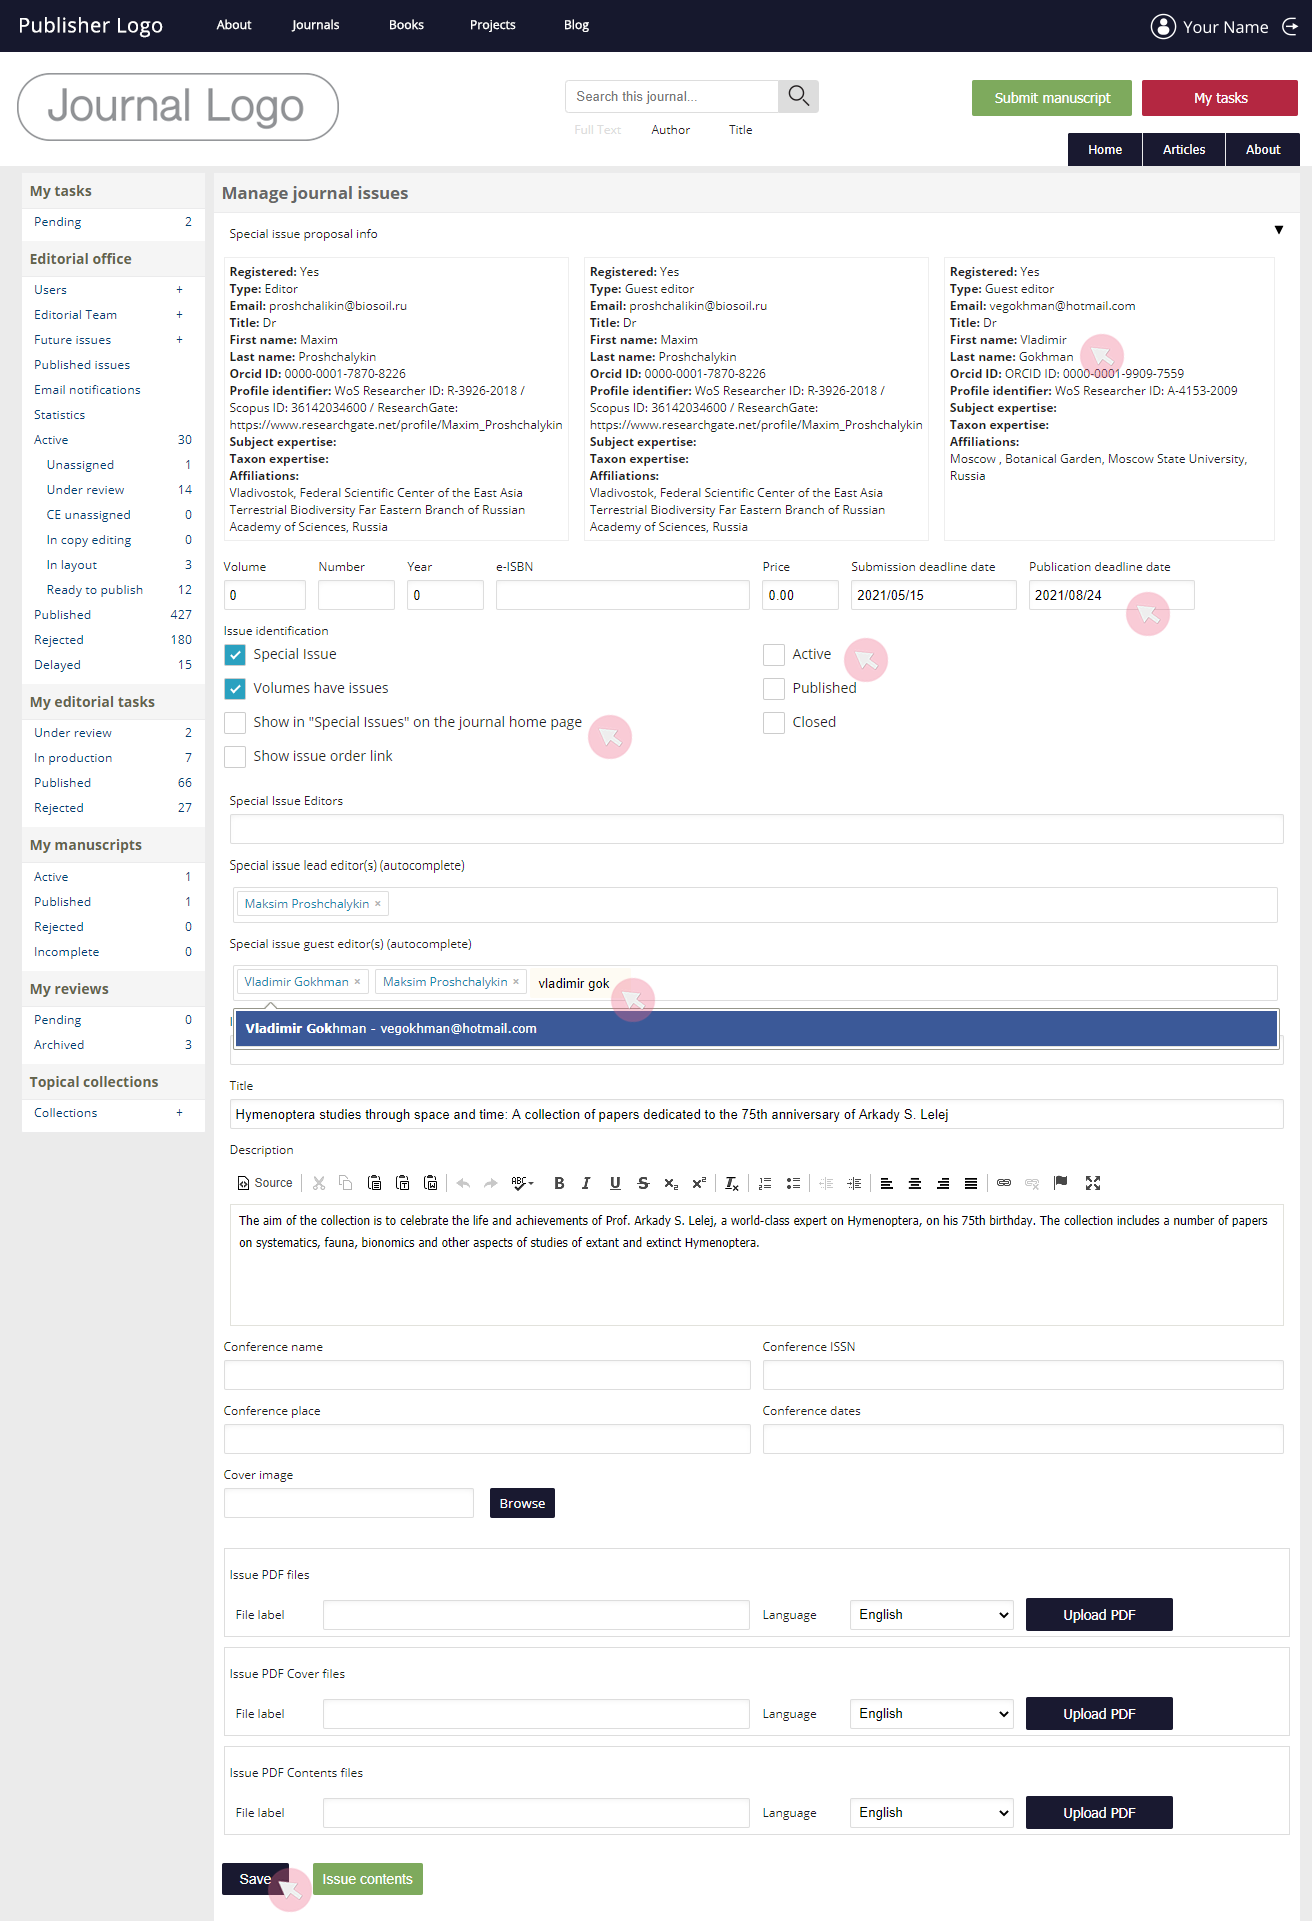
Tip: To keep your edits and the SI / TC as a draft, in order to finish it later, click Save, but do not check the Active and Show in "Special issues" on the journal homepage boxes. Once you check these boxes, the collection will be opened for submission and its details will be displayed on the journal’s website.
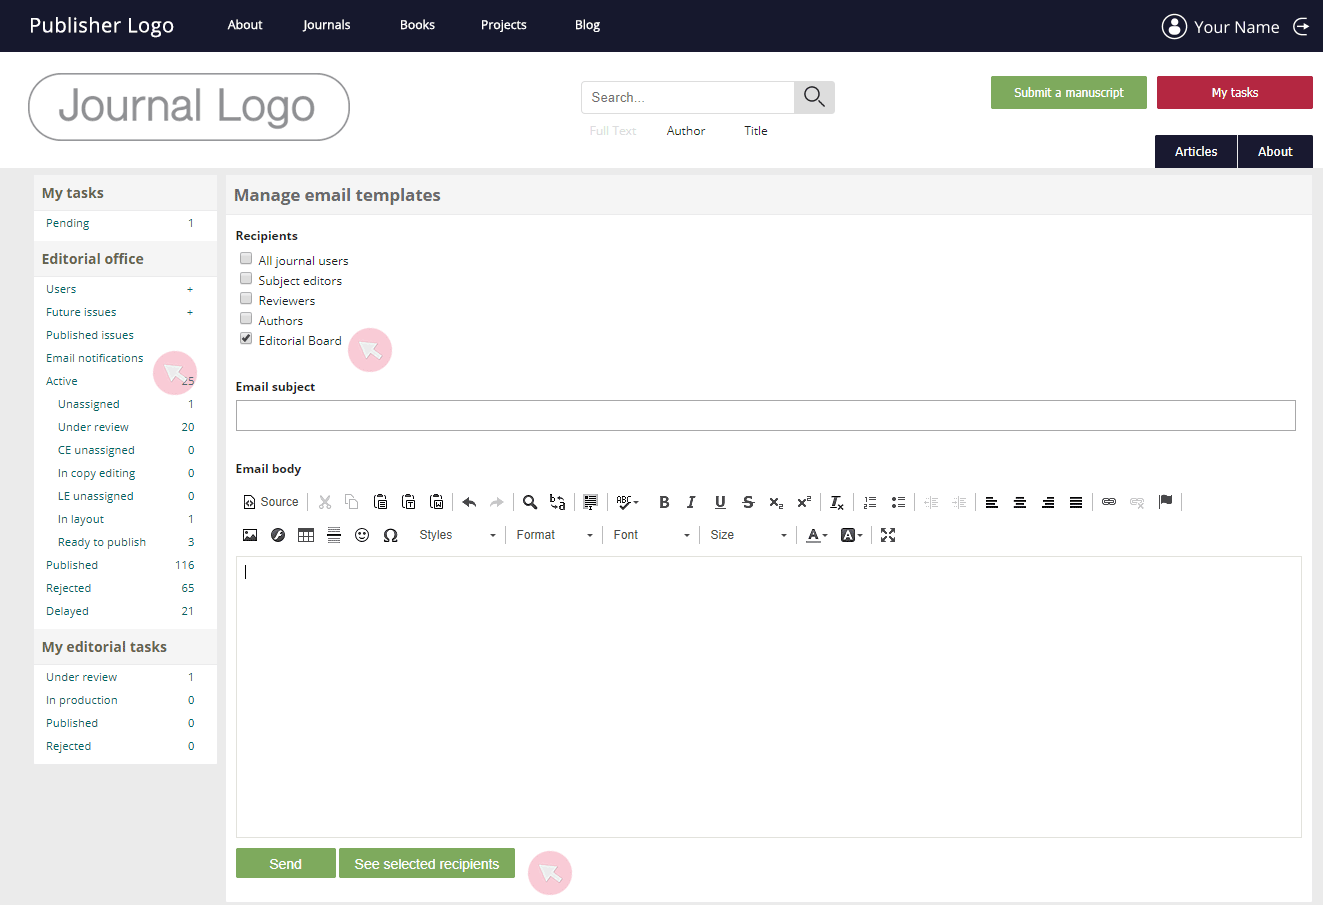
Send emails to user groups
1 Use Email notification from the Editorial office menu to send an email to one or more group(s) of users (e.g. all journal users, SEs, editorial board).
2 Use the text fields available to enter the email text and subject line.
3 Click See selected recipients to access the full list of users who are to receive your email and click Send when ready.
Note: If you are have the user rights of an Editor-in-Chief or a Managing editor (E) at multiple journals hosted on ARPHA Platform, make sure to leave at least one hour between group email notificiations at different journals. Messages sent from multiple journals within a short time window may cause a glitch in the server and lead to undesirable multiplication of emails.
Note: You cannot add or remove recipients from a group.
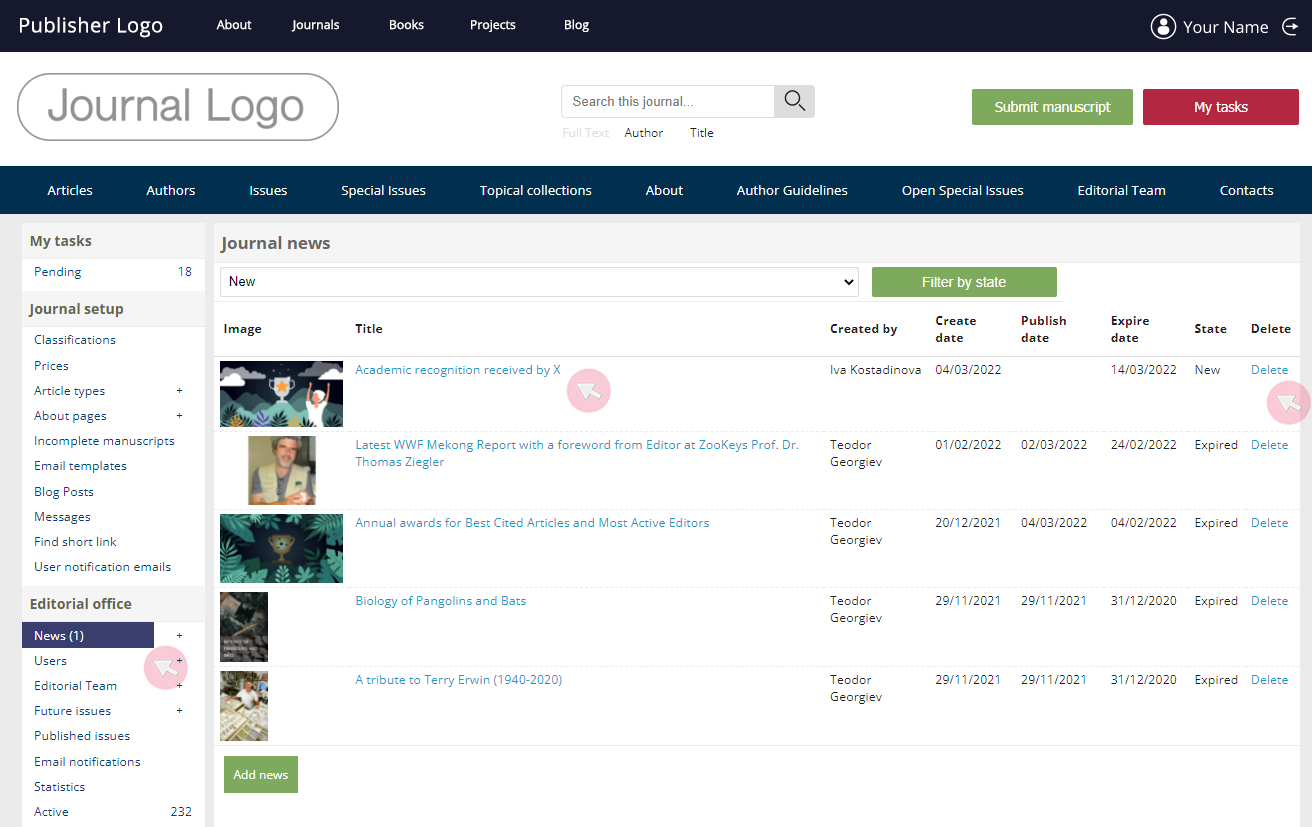
Moderate news item submissions
ARPHA-hosted journals may opt to use the Post your news feature on their websites to allow users to submit news items that - subject to moderation - are published on the journal’s homepage within a designated News section.
From there, the news items are automatically featured in the journal’s newsletter. The aim of those news items is to further strengthen and engage the journal’s community.
The moderator is normally either the Managing Editor / Editor-in-Chief (E) or a person appointed by the E. The moderator receives news items submitted by the journal’s users and decides whether they merit publication. News items featured at the journal are expected to be relevant and engaging to the journal’s community of readers, authors, reviewers and editors and comply with a list of standard criteria.
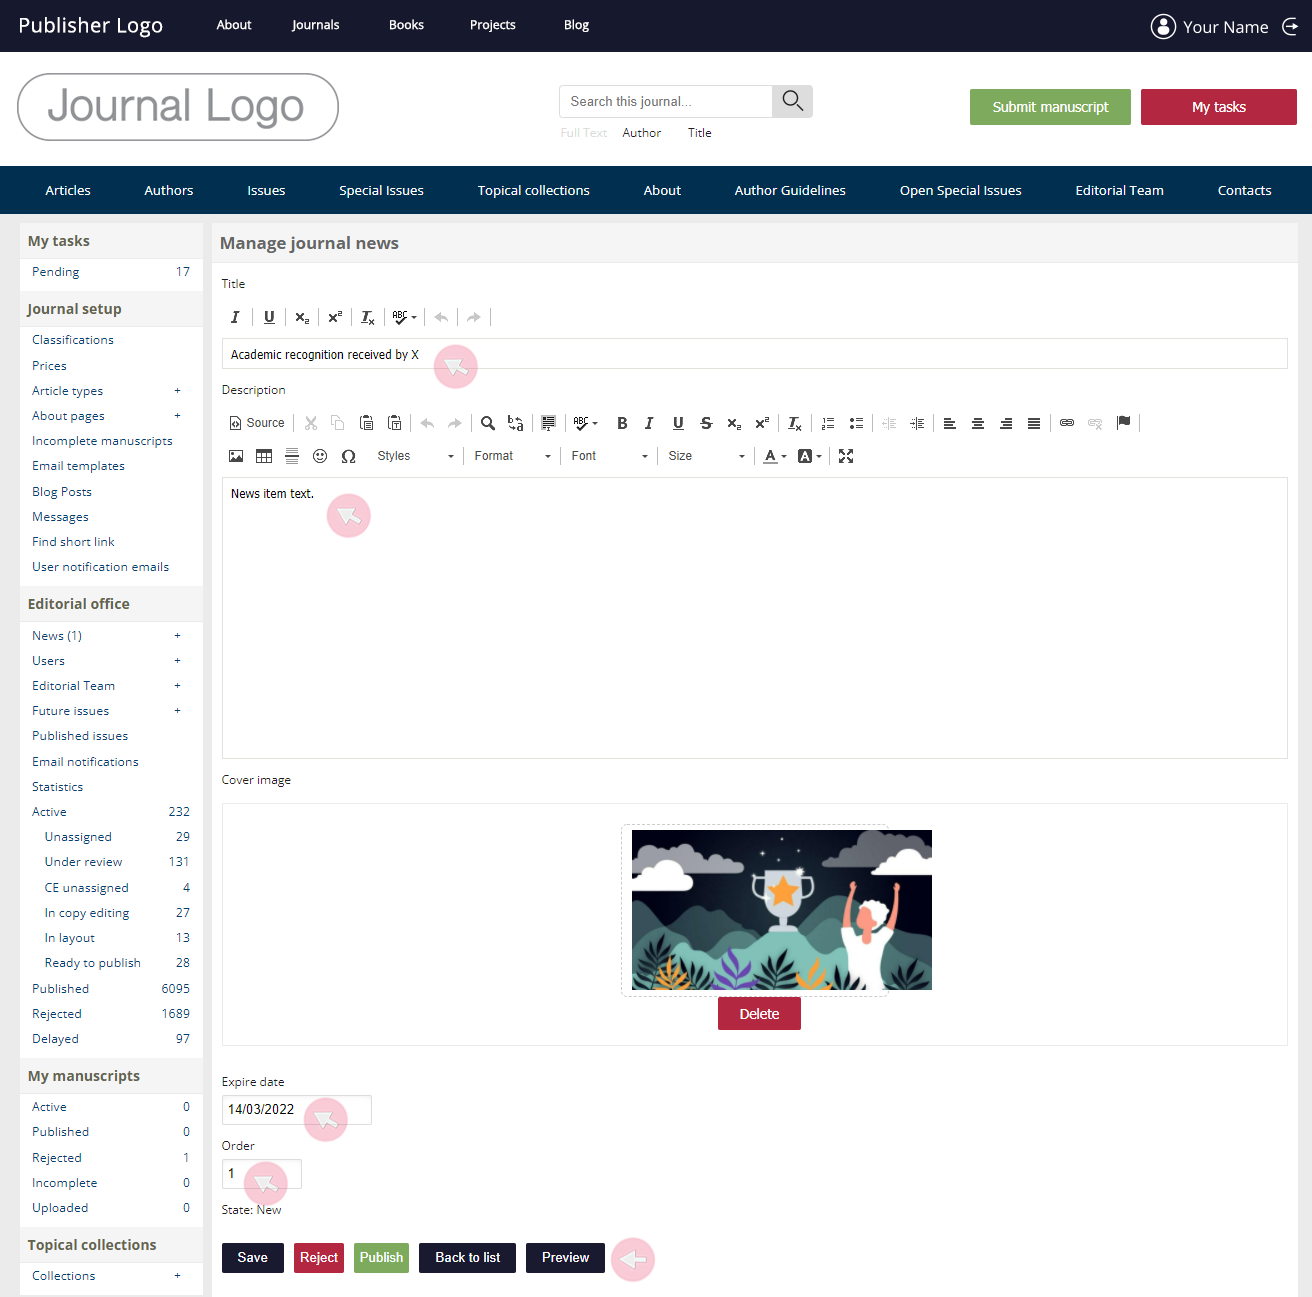
The screenshot below illustrates the form the users complete to submit their news item.
1 As long as you have been designated as a moderator for the news items at the journal, you will be notified by email every time a user makes a submission. In the email, you will be able to see details about the submission, i.e. the name of the user, the title of the news item and the selected news category.
Note: To appoint a person as a moderator, contact the journal’s Editorial office (journals@pensoft.net).
2 To access the news item submission, either follow the link from the email or access it from the News tab in the Editorial office menu. The number in the tab displays how many items are currently pending moderation.
3 You will see a list of all past news items, including those that have expired or been deactivated, but not deleted from the system. Click on the title of the news item to access its content. Use the Delete command to permanently remove the news item.
4 You may review and even edit the news item. Moderators are encouraged to slightly edit the news item, in order to improve its comprehensibility and format.
5 Scroll down the page to set up the expiry date for the news item using the calendar feature. This is when it will automatically disappear from the journal’s website.
Note: If the news item is not deleted, an external link could still be used to display the news item.
6 Type in a number in the Order field to rearrange the sequence of news items as they appear on the journal’s website.
7 Use the buttons at the bottom of your screen to either Publish or Reject the news item. You may also Preview the news item to see how it would look if published; Save it to keep your edits before taking your final rejection; or click Back to list to return to the previous page without saving any changes that you might have made.
Add badges to publications
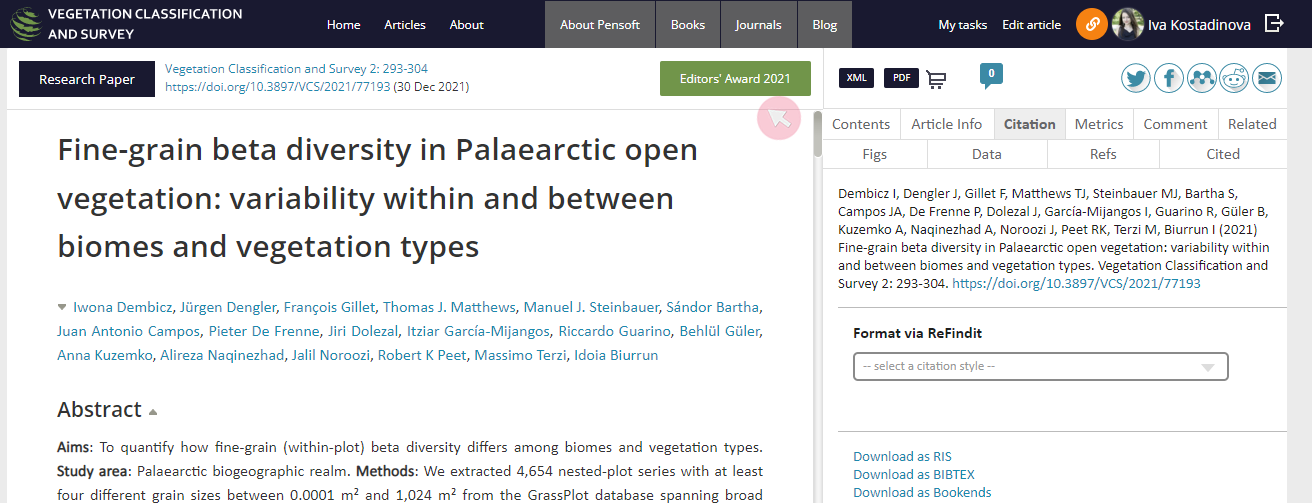
The Editor (E) can add customised badges to selected publications, in order to mark a paper, for example, that has received an award.
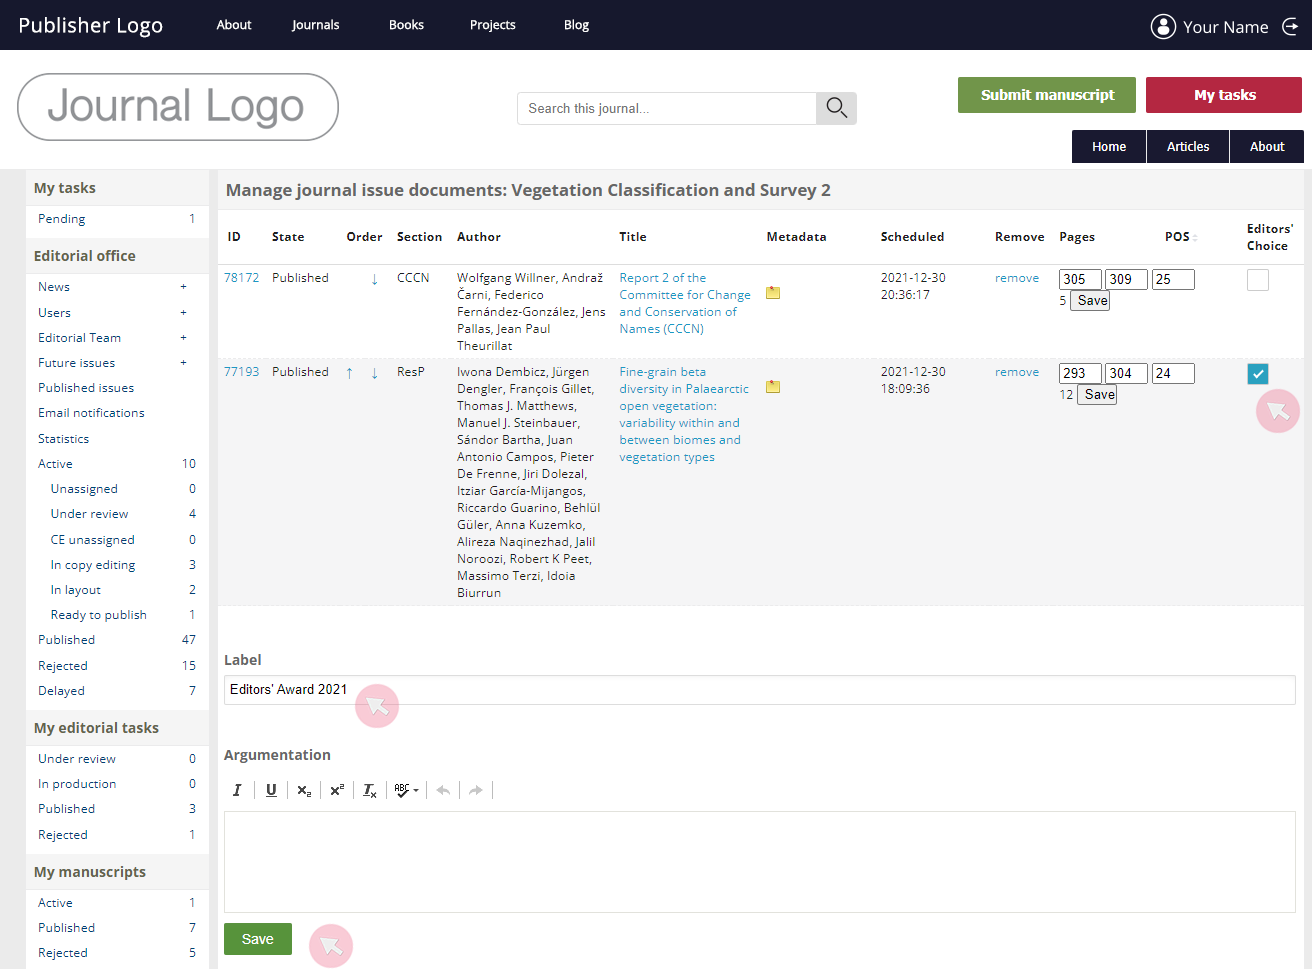
1 From the Editorial office menu, go to Published issues to select the issue, where the paper appears.
2 Click on Contents.

3 Scroll down to find the publication and check the box to the right. A drop-down field with two text boxes will appear under the selected publication.
4 Use Label to edit the name of the badge as you wish for it to appear on both the article’s webpage and in the articles list.
5 In Argumentation, you may type a short text that will be displayed as a reader hovers over the badge. If the text box is left empty, nothing happens on hover.
6 Click Save to implement your changes.
Role
The SE in ARPHA manages the peer review process of a manuscript assigned to him/her, invites reviewers, monitors the peer review progress, sends reminders, checks and comments on the revised manuscript version(s) and makes an editorial decision.*
*Journals can opt for an alternative editorial process where the final decision on the acceptance or rejection of a manuscript lies with the Editor-in-Chief (E-i-C). In this case, the SE still provides his/her final decision, but it needs to be verified by the E-i-C.
Rights
- Access the submission files of assigned manuscripts
- Edit metadata of assigned manuscripts
- Invite and assign reviewers
- Manage review invitations
- Reject manuscripts prior to peer review
- Monitor submission progress and re-schedule due dates
- Access sent automated notifications
- Make an editorial decision
- Rate a review
- Communicate with the authors and the reviewers
- Receive feedback from reviewers regarding revised manuscripts after the editorial decision (optional)
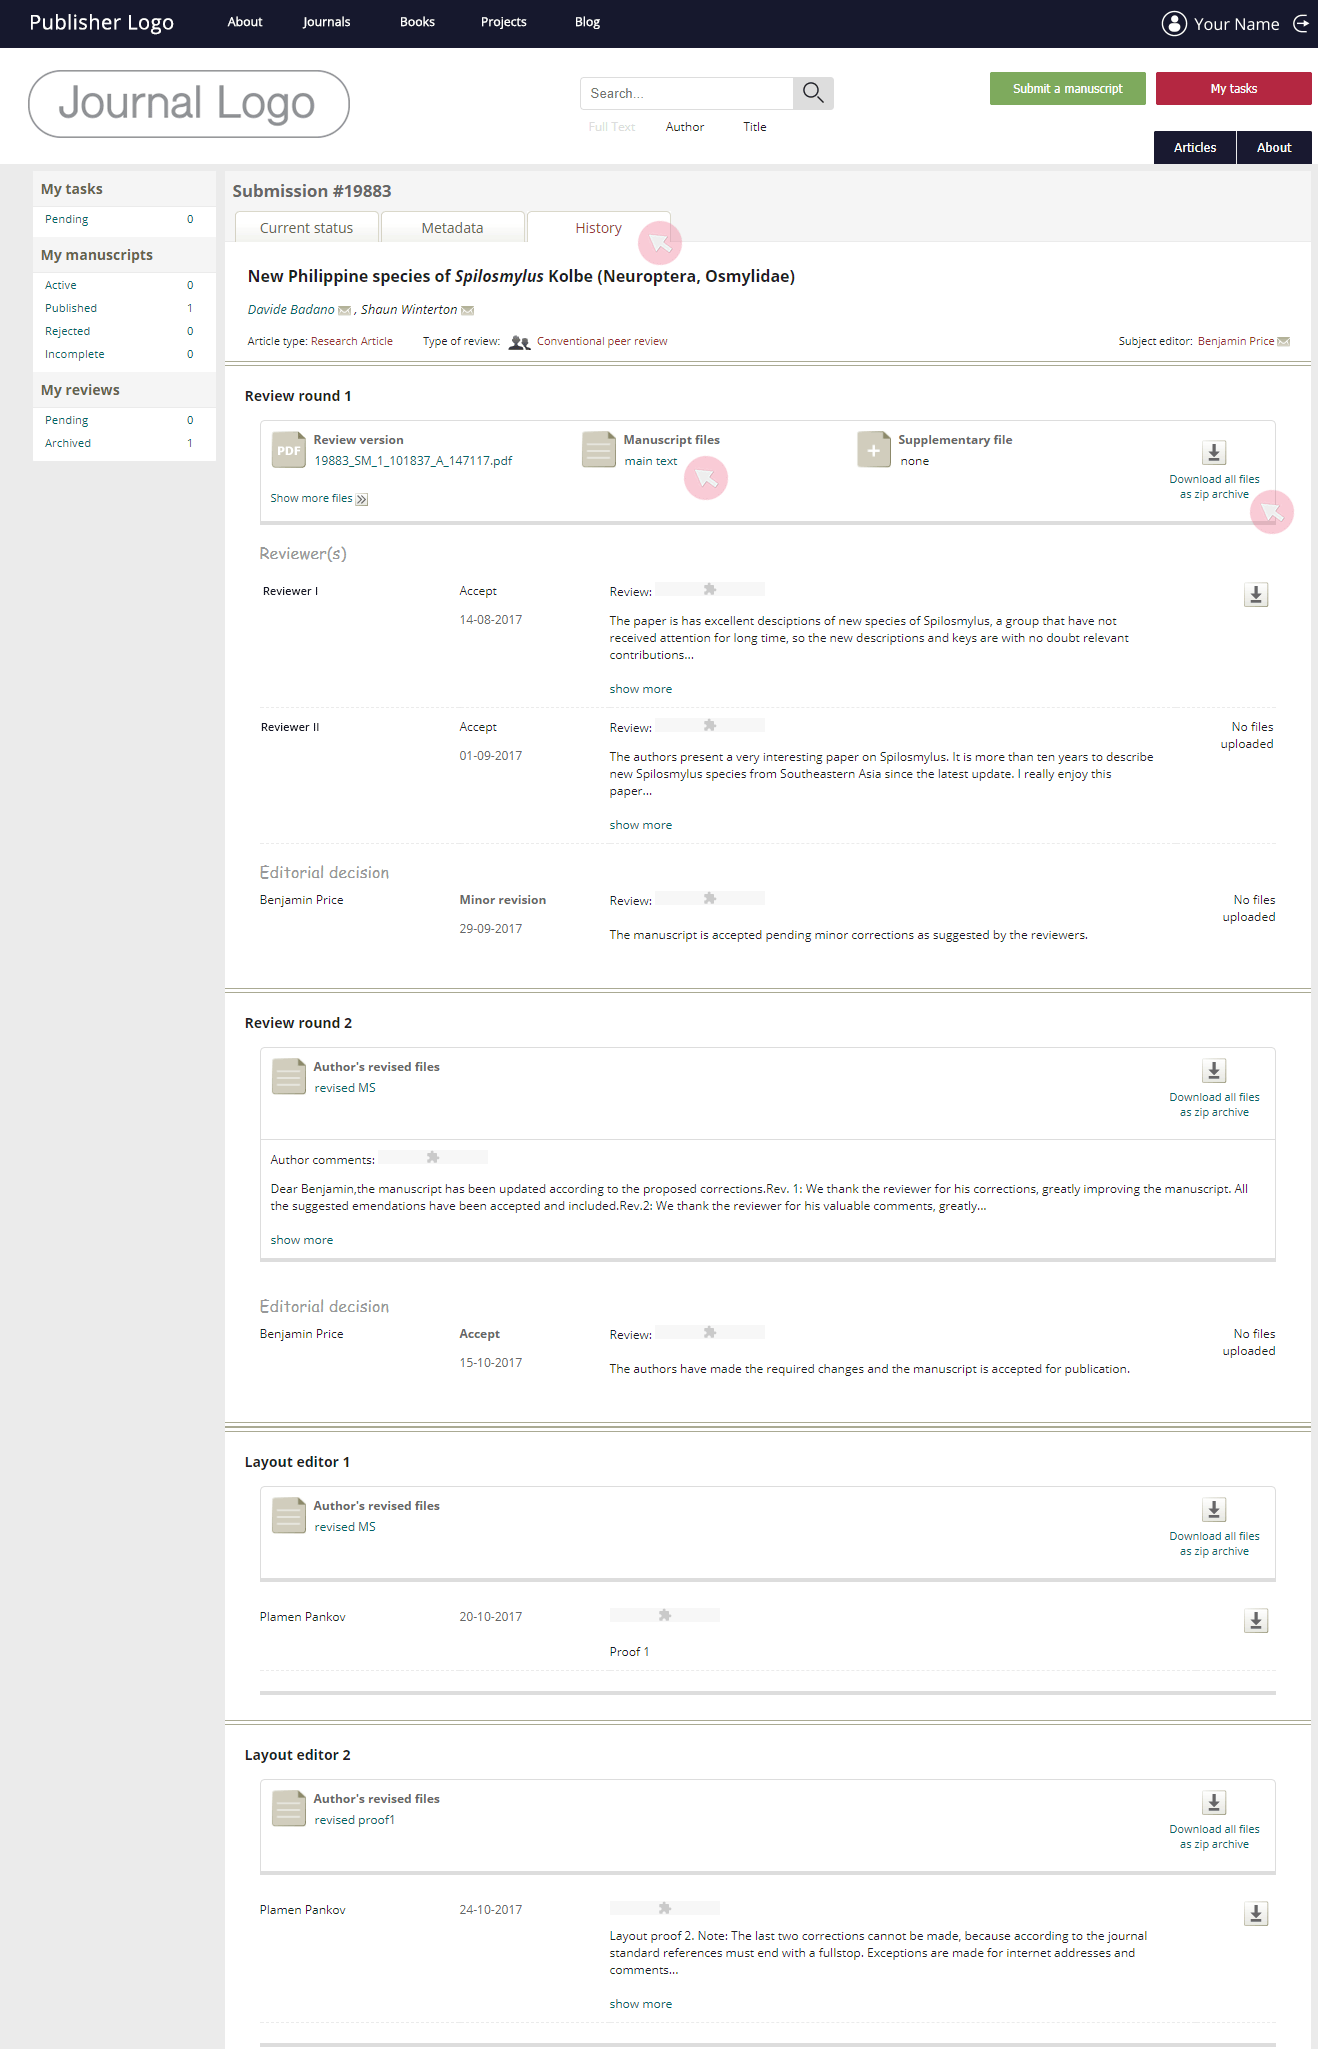
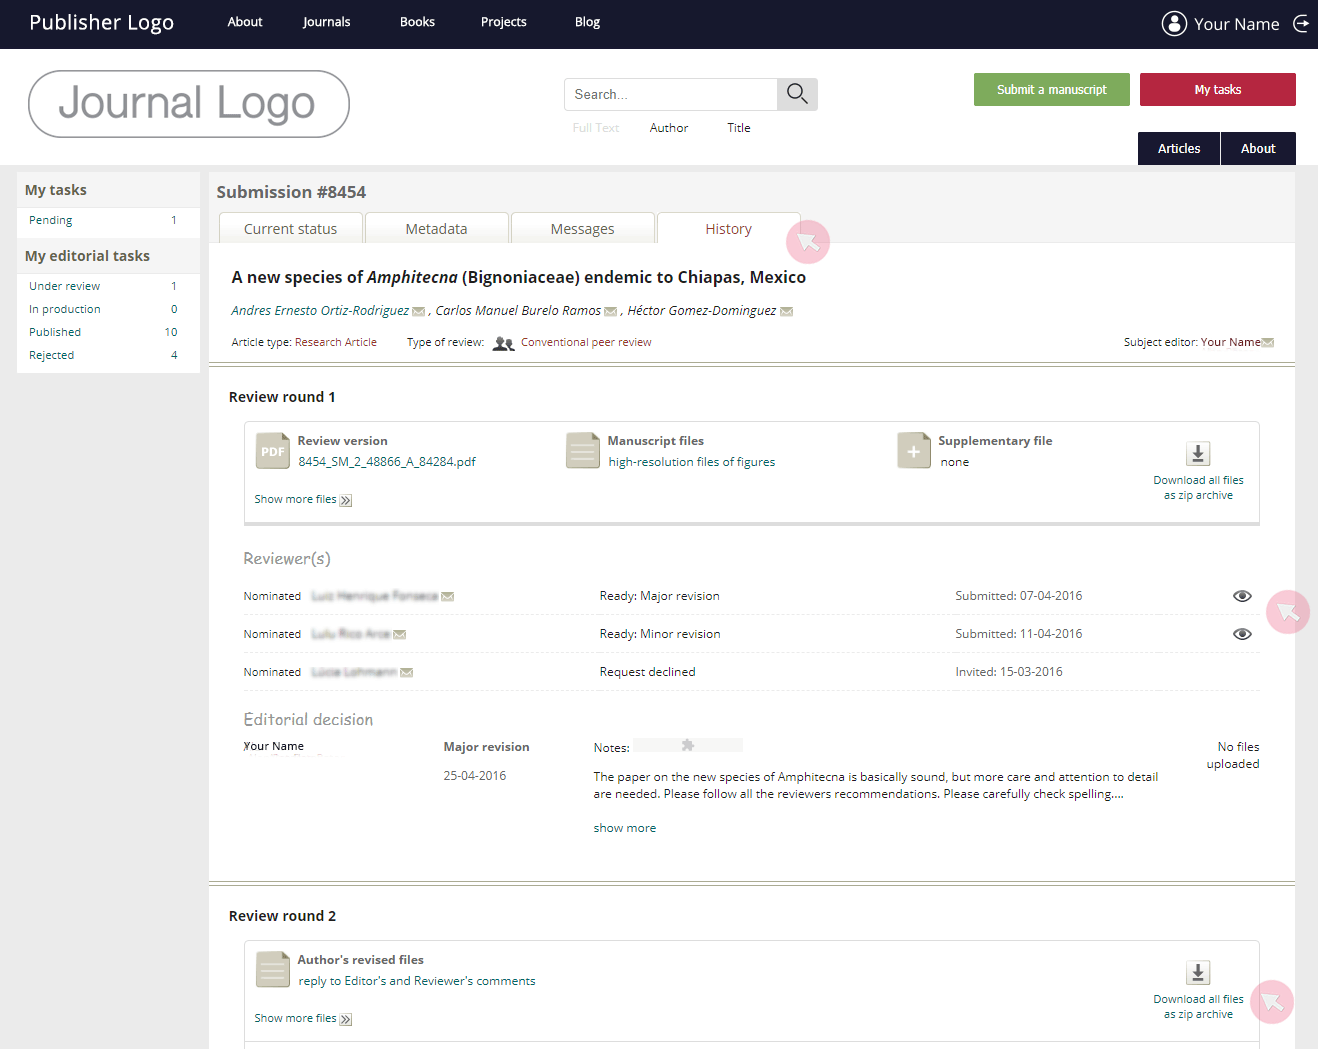
Access the submission files of assigned manuscripts
1 Access the manuscript assigned to you along with all submission files via the automatic login link in the notification email.
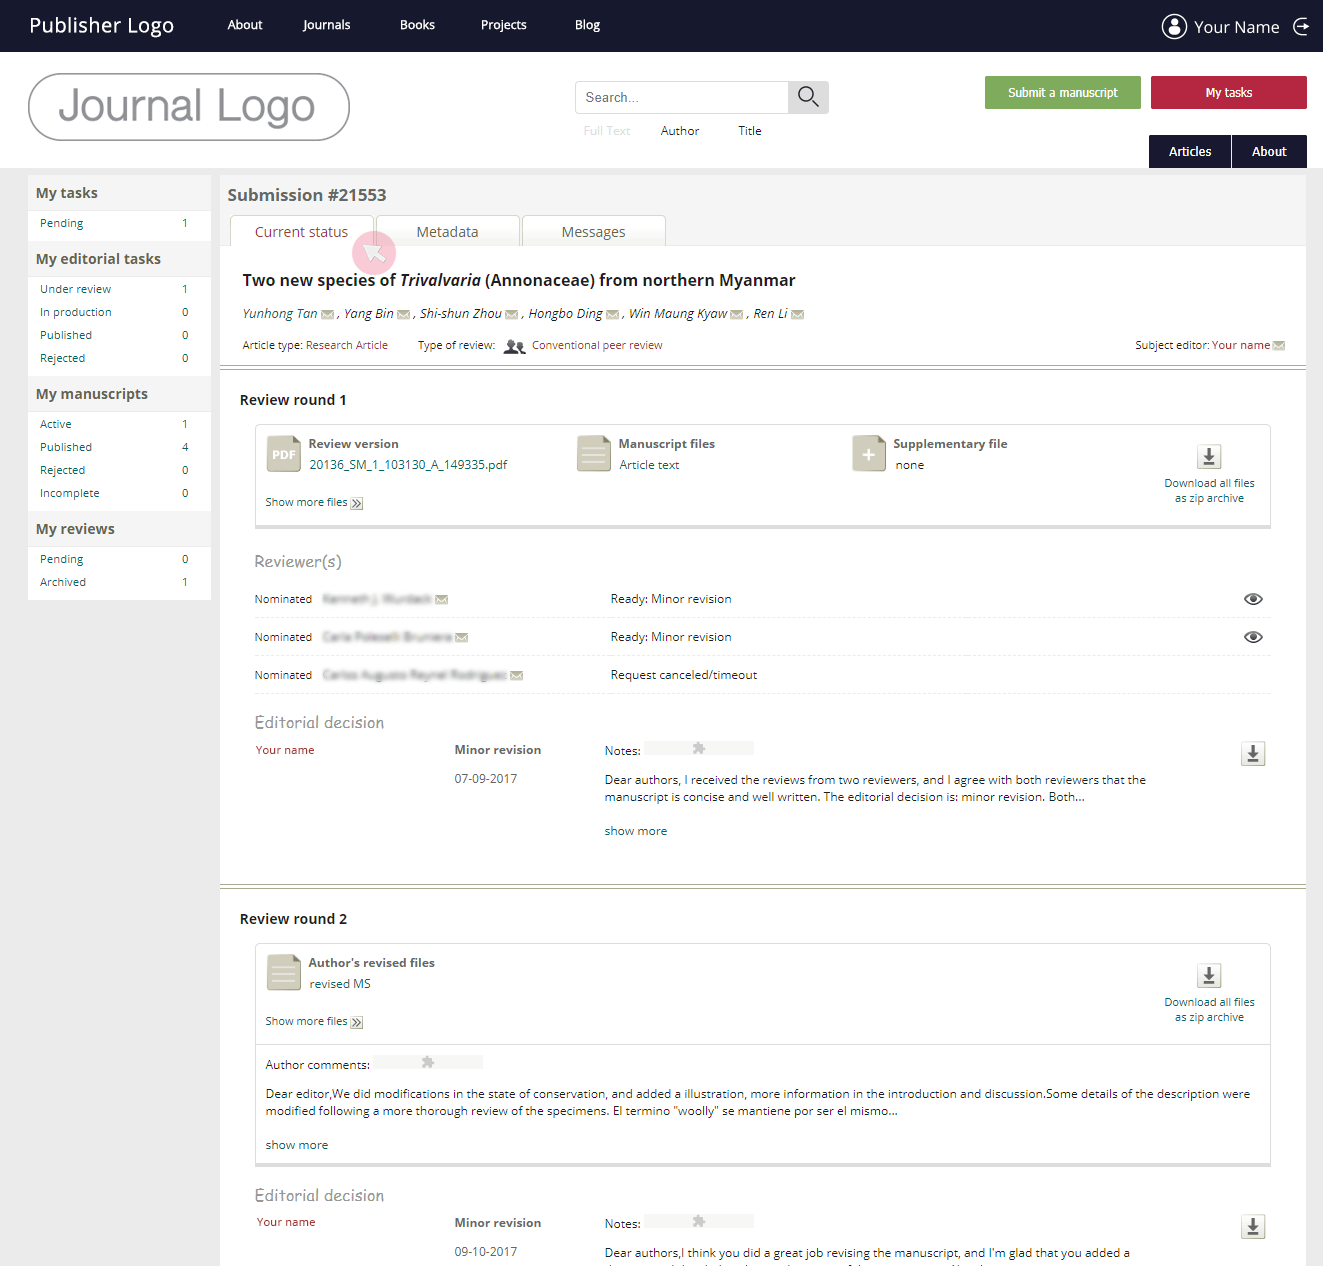
2 Alternatively, log in to your account at the journal’s website and access your dashboard (My tasks). Find your assigned manuscripts in Under review in the My editorial tasks menu. Once you make an editorial decision, the manuscript will be relocated to In production. Click on the manuscript’s title to access it.
3 Use the Current status tab to access the files uploaded by the author, as well as his/her notes to the Editor and selected optional services, if any. Download all submission files as a .zip file via the button on the right-hand side. To download files one by one, click on the name of the file.
4 The History tab contains archive of the past review rounds (if any), including the uploaded file versions, reviews, editorial decisions and author’s replies.
Access and edit supplementary files
1 Find all supplementary files in the Suppl. files tab. The number in the brackets indicates how many supplementary files have been uploaded.
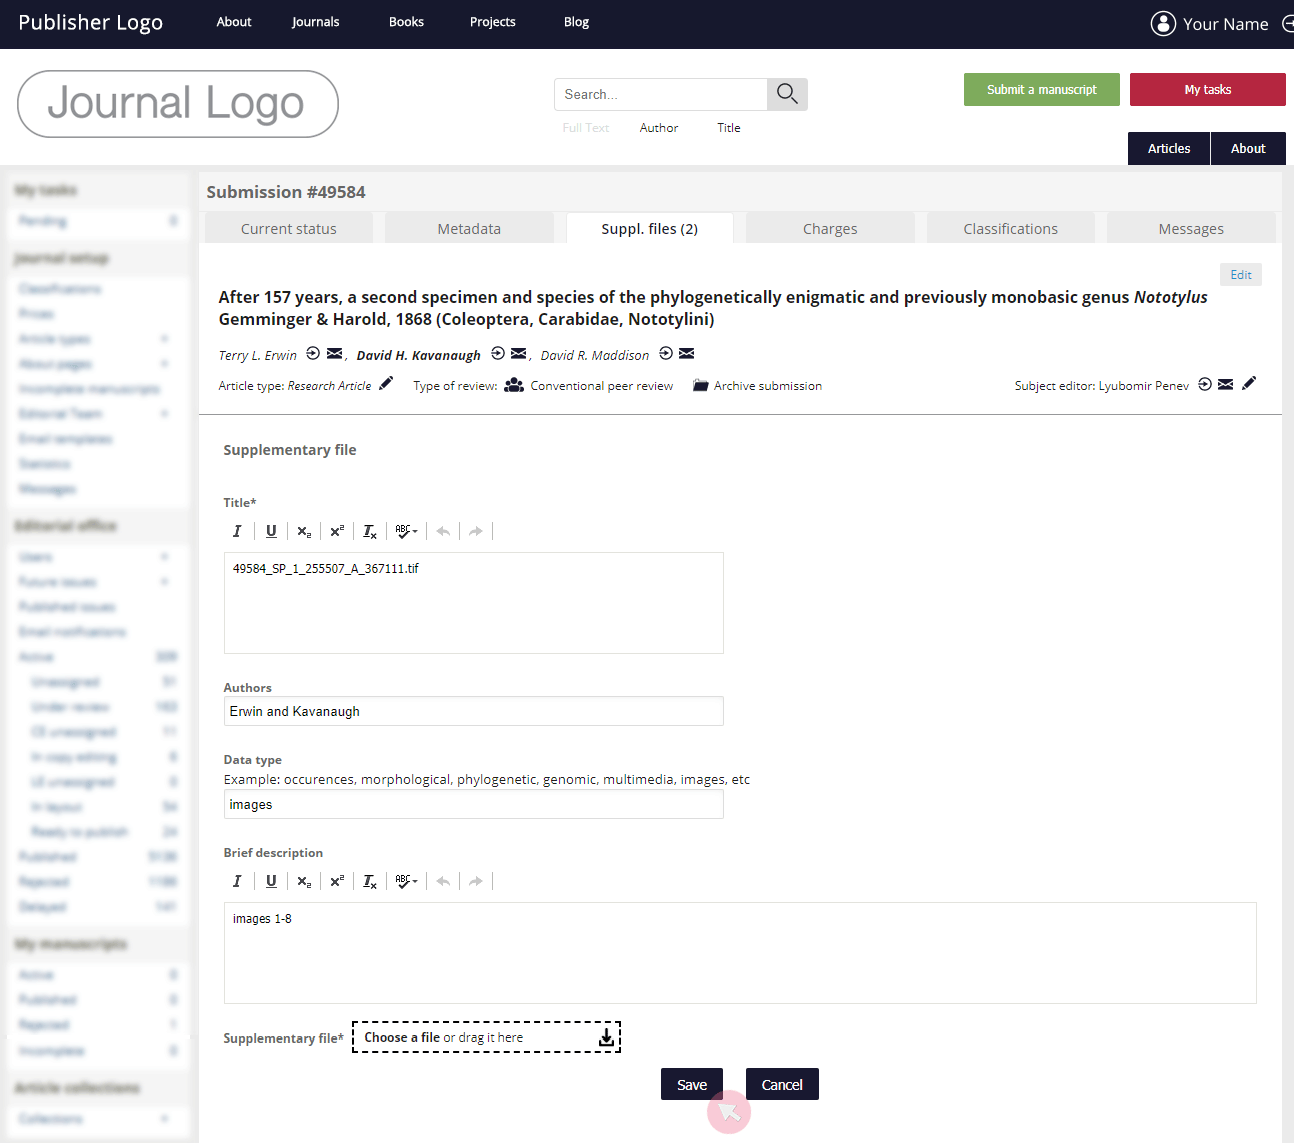
2 To add a new supplementary file, click the Add a supplementary file button. In the Actions column, click Delete to remove the corresponding file or Edit to change its title, authors, data type, brief description or the file itself.
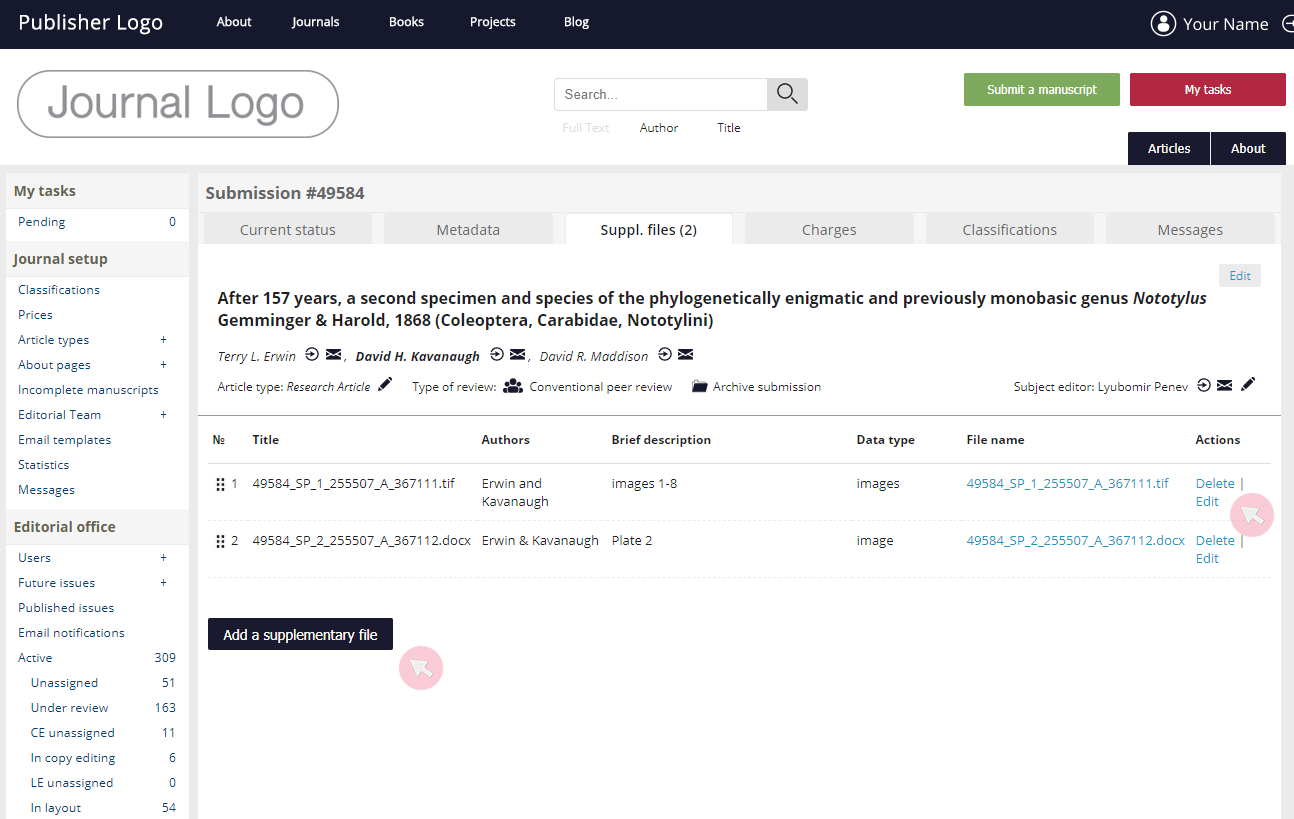
Note: When adding or editing a supplementary file, make sure to fill in all mandatory fields (marked with *) and click Save when ready.
Edit metadata of assigned manuscripts
1 Access the manuscript from Under review in the My editorial tasks menu. Access a submission by clicking on its title.
2 Go to the Metadata tab and use the Edit within each section in case of incorrectly submitted metadata:
- change the article title;
- add/remove authors*;
- re-order authors;
- change the Corresponding author and/or the Submitting author;
- edit the abstract/keywords;
- edit assigned classifications;
- edit the Supporting agencies / Authors contribution / Conflict of interest sections;
- re-assign the paper to a different journal issue.
*As you type in a user’s name/email in the search field, a list of ARPHA-registered users matching the term will appear. If the user you are searching for is present in the database, click Add to list. If not, use the Add a new author button located at the bottom of the list to create a new user and mark him/her as a co-author of the manuscript.
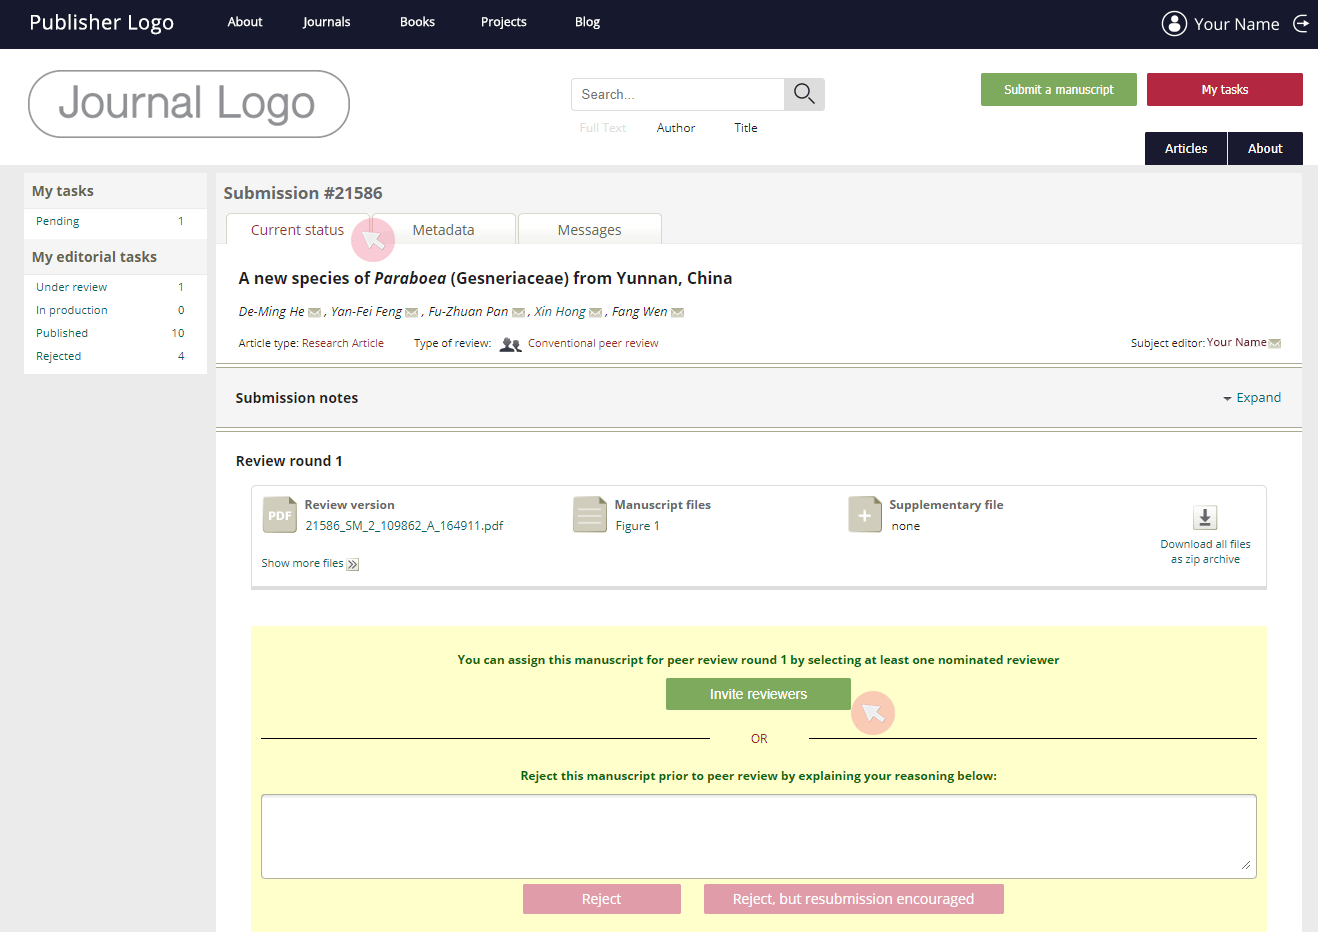
Invite reviewers
1 Find the manuscript in Under review from the My editorial task menu and access it by clicking on its title.
2 Use the Invite reviewers button* in the Current status tab to access a list of potential reviewers from the database matching the classification categories assigned to the manuscript.
3 The potential reviewers are ordered by relevance of expertise (visible under their names where matching scientific fields appear in bold). Reviewers suggested by the author during the submission are shown first, followed by reviewers suggested by the database, based on their matching expertise.
If you wish to invite particular reviewers, you can search for them in the ARPHA database by typing a name, email address or institution before adding them to the list.
If the user is not registered in the ARPHA system, scroll to the bottom and click Add a new reviewer.
To select a reviewer from the list, use the Nominate check box on the right.
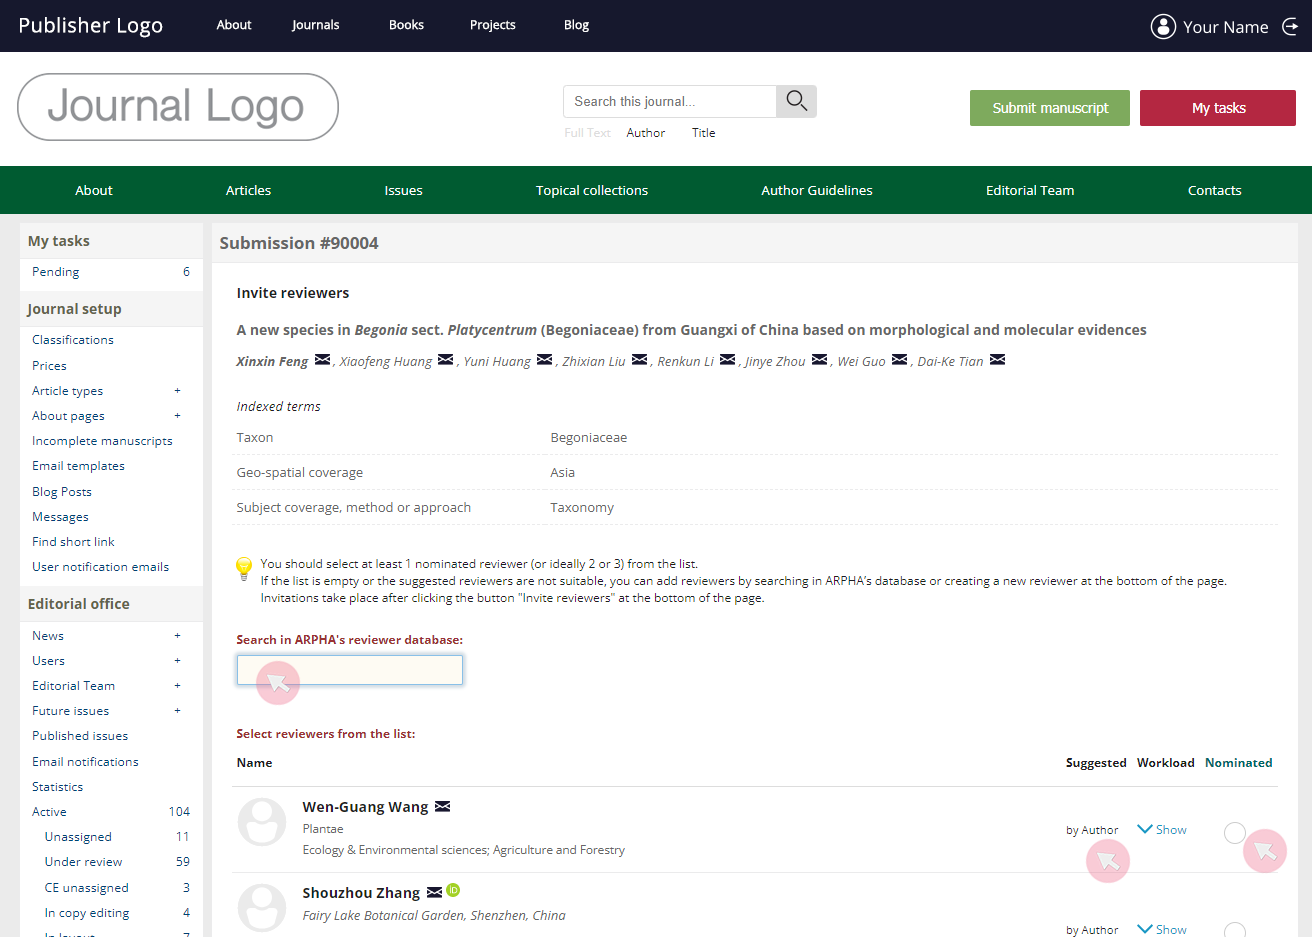
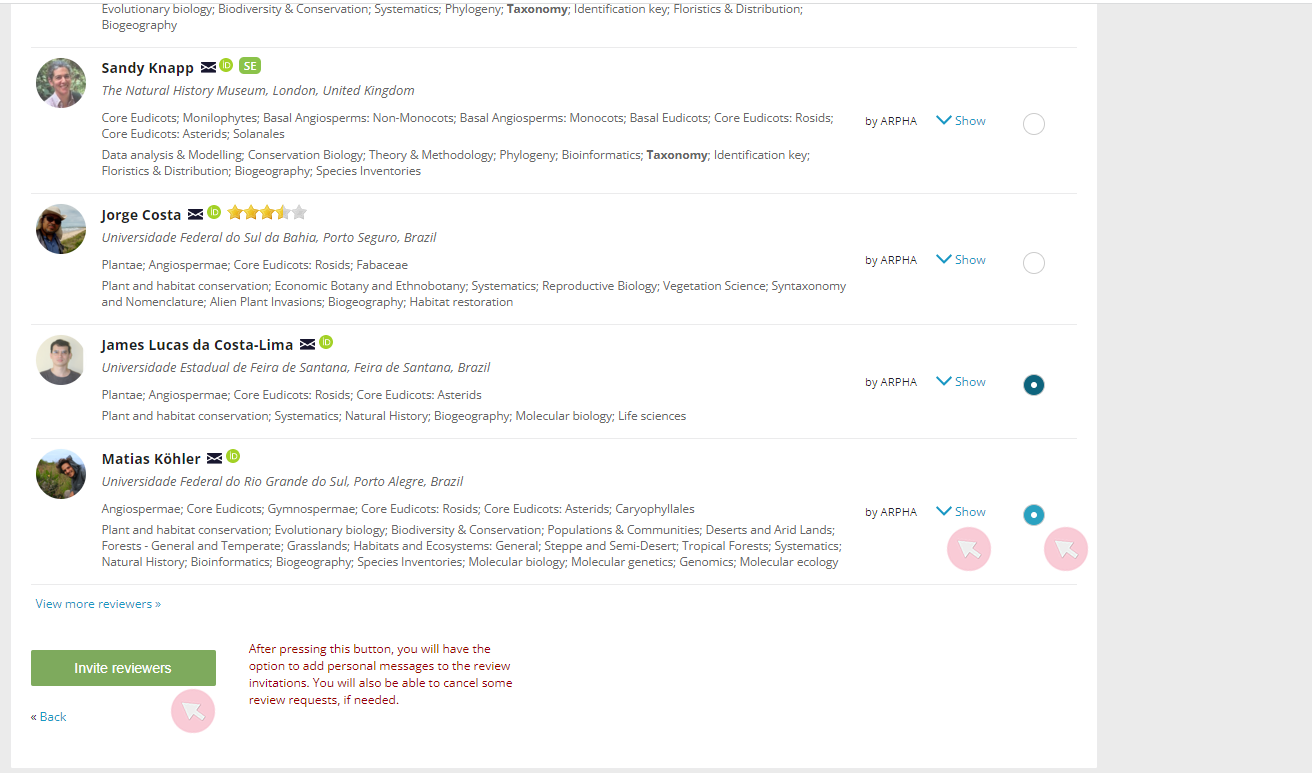
Note the number visible next to some user names. It indicates the editorial assignments the user is currently working on in the ARPHA system. To see the user’s current workload and his/her all-time record, click Show in the Workload column.
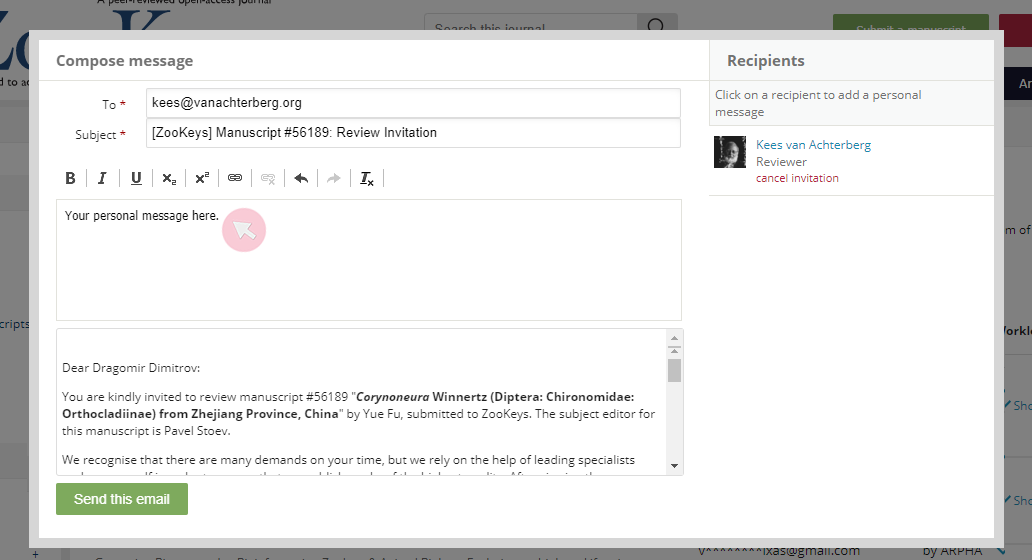
4 Once you nominate all reviewers you wish to invite and click the Invite reviewers button at the bottom of your screen, the system will generate automated emails for each nominated reviewer and require that you send them one by one. You can add a personal message to each reviewer in the space above the content.
The selected reviewers will receive an automated email with a review invitation and automatic login link to the manuscript page.
Note: A reviewer’s response is recorded in the database only if submitted via the system. We strongly recommend that if a reviewer replies directly by email, you record the acceptance, decline or approved extension in the system, so that the user does not receive unnecessary reminders.
Reject a manuscript prior to peer review
A SE has the right to reject a manuscript prior to peer review if he/she finds it of insufficient scientific / linguistic quality and/or non-conformity with the journal's scope and guidelines.
Note: Ensure that the author has not already requested linguistic services before rejecting a manuscript because of poor language.
1 Find the manuscript in Under review from the My editorial tasks menu and access it by clicking on its title.
2 Use the text field to explain your reasons prior to rejecting the manuscript via either of the buttons at the bottom of the page.
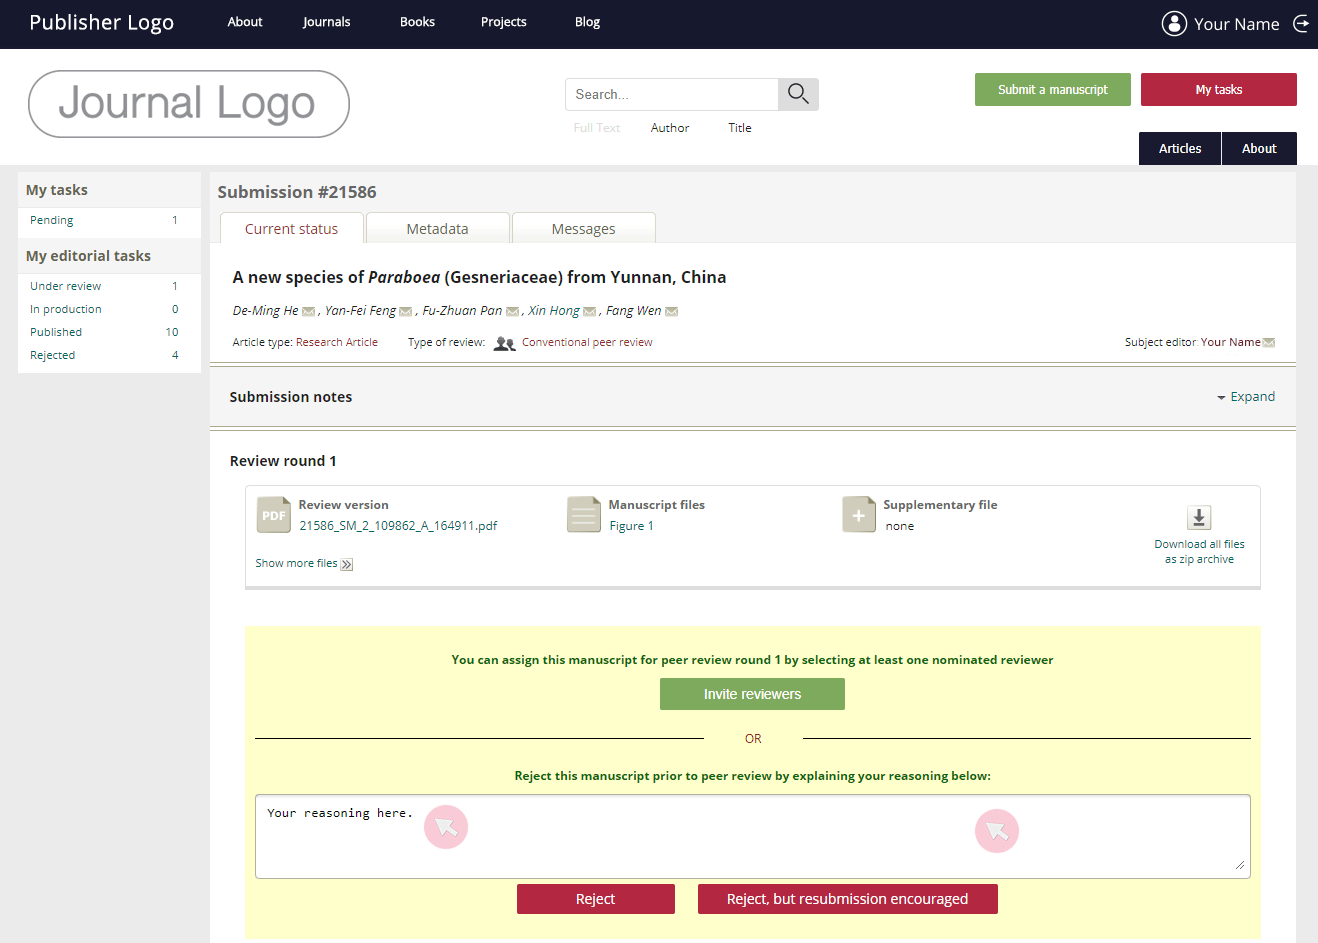
Note: Both buttons will become active only after you have explained the reasons for rejection in the text field above the buttons.
3 The system will generate a notification to the authors, informing them about your decision. They will be able to access the manuscript and the rejection notice.
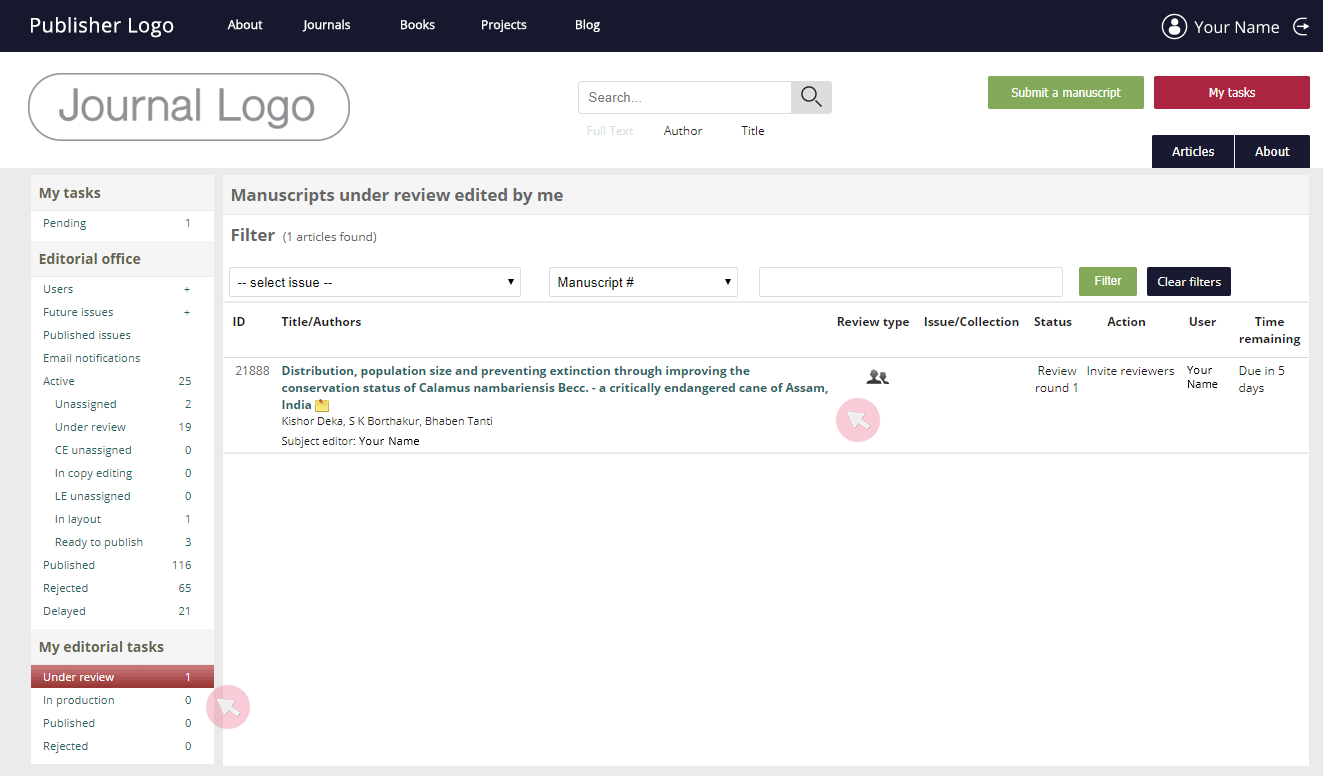
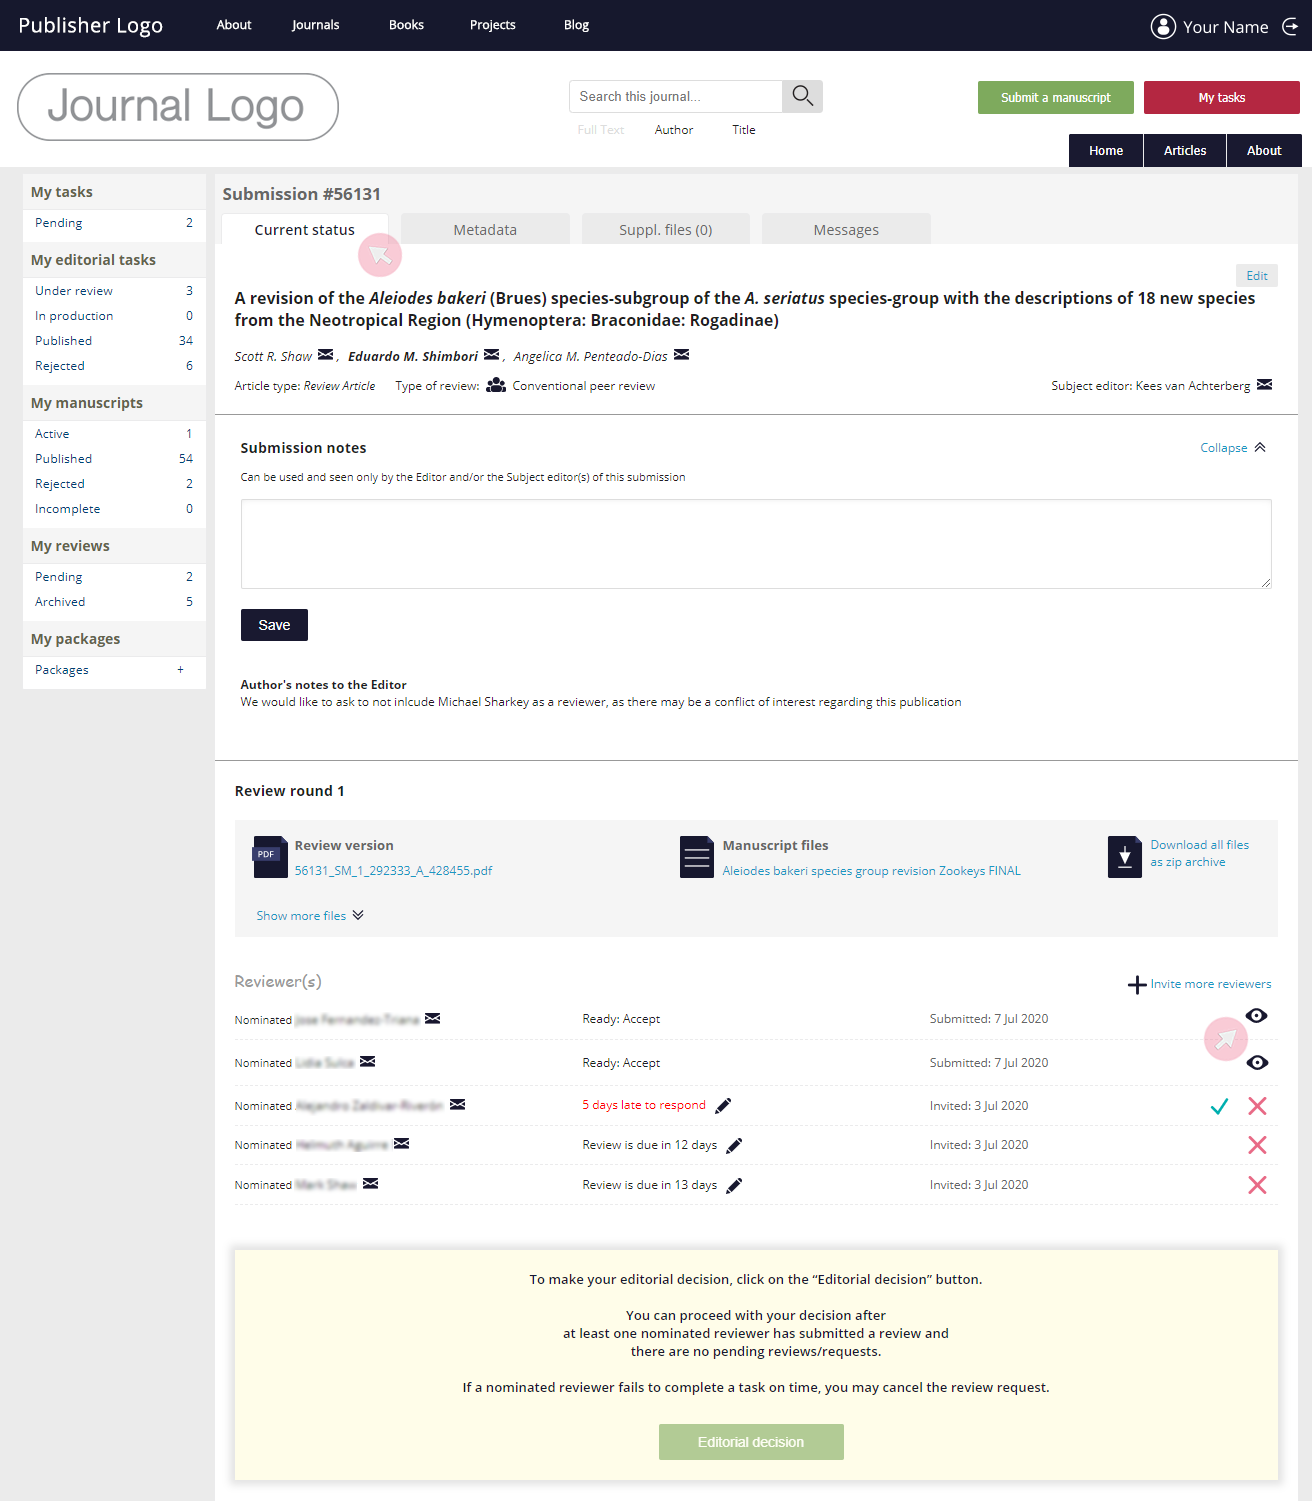
Monitor submission progress and send reminders
Note: The SE will be invited to evaluate the manuscript and make an editorial decision when all review invitations are completed either by review submission or decline. In most journals, an editorial decision can be made after the submission of at least one review.
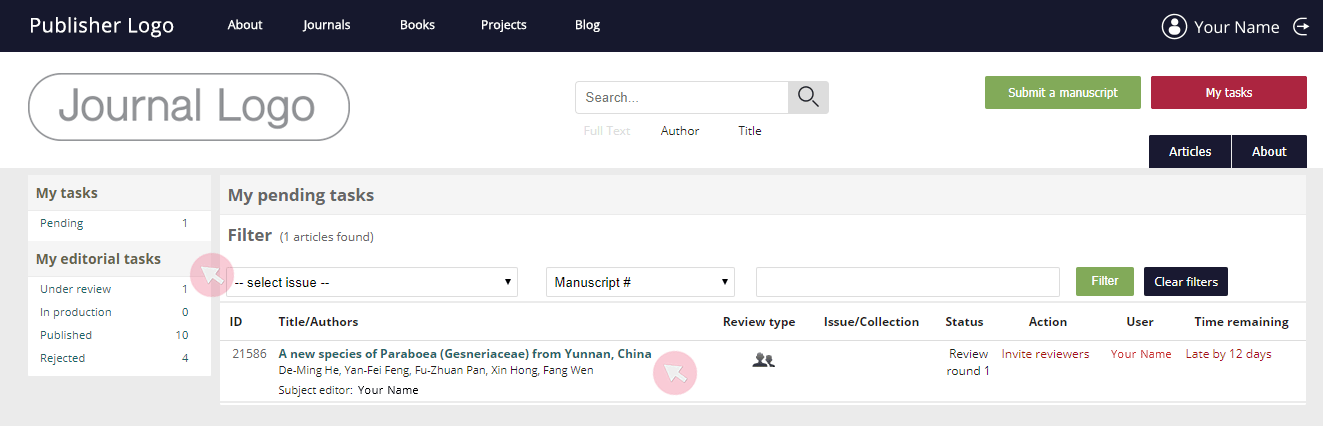
1 Find all manuscripts assigned to you in either Under review or In production from the My editorial tasks menu.
2 The Status column shows the current stage of the manuscripts. The Action column indicates the pending action(s) expected to be performed by the user shown in the adjacent User column.
3 Use Time remaining to keep track of due dates / delays. Whenever a user misses a deadline, his/her name and delay turns red to draw your attention. A reminder is sent to that user on the first and the third day past the due date.
4 Access the submission by clicking on its title.
5 To extend a deadline for a review, use the 
Note: A deadline extension does not generate an automated notification to the user whose action is expected. To inform him/her about the extension, contact him/her by using the 
*The recipient will receive the email from your email address added to your user account. To change your contact email, click on your user name visible in the upper right corner of the screen and go to Account settings (see the Managing user accounts chapter).
6 Use the clickable symbols on the right-hand side to:
- cancel a review invitation* (
);
- resend a review invitation* (
);
- accept the review invitation on behalf of the reviewer (
);
- access a submitted review (
).
*A pop-up window will appear to let you add a personalised message to the automated email notification.

7 Use the Submission notes text field to make notes regarding your communication with an author/reviewer. The notes are visible to the Subject editor, Journal manager(s) and Copy editor.
Note: You are strongly encouraged to add the date and the addressees’ names. The purpose is to keep track of the messages sent to the users outside the system, so that reminders are not duplicated.
Access sent automated notifications
Subject editors can access a list of all automated notifications sent by the system in relation to the manuscripts assigned to them.
1 Find the manuscript from the My editorial tasks menu. Access the submission by clicking on its title.
2 Go to the Messages tab to see the list of automated notifications sent to date, where the most recent ones show up first. Click on Expand to see the full text of the email.
Make an editorial decision
The Subject editor will be invited to make an editorial decision by the system in either of the cases:
- all nominated reviewers who have accepted the review request have submitted a review
- some of the accepted review invitations have been cancelled via the system for various reasons, however at least one review has been submitted.
1 Access the manuscript from Under review in the My editorial tasks menu and click on its title.
2 Go to the Current status tab to find all submission files. Access the reviews by clicking on the
3 Use the Editorial decision button to access the editorial evaluation form and submit your editorial decision.
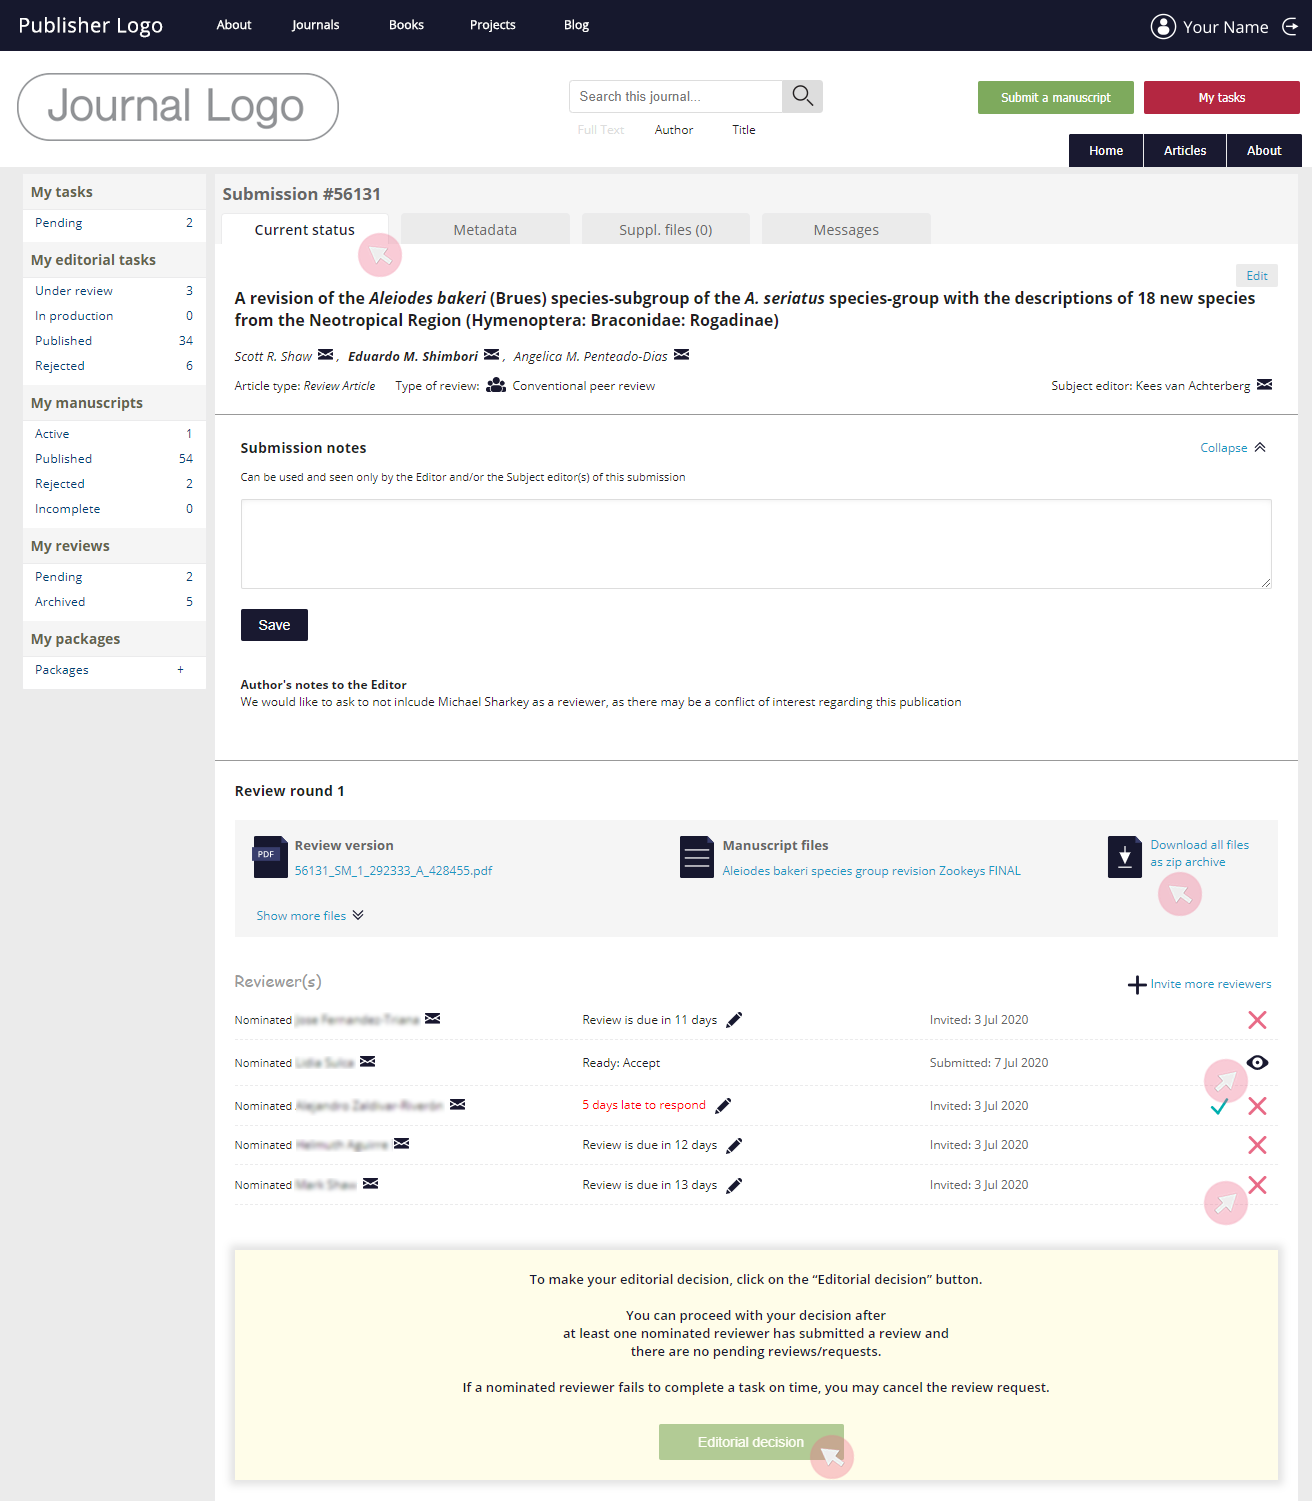
Note: You will only be able to use the button if at least one nominated reviewer has submitted a review and there are no pending reviews or review invitations. To cancel a review invitation or task, use the 
4 Make sure to complete the mandatory fields (marked with *). Type in your editorial evaluation in the text field and select a decision (i.e. Accept, Minor revision, Major revision, Reject, but resubmission encouraged or Reject).
5 To upload a version of the manuscript with your notes / corrections, type in a title (e.g. revised MS, revised Figure 1 etc.) in the File label box and then use the Upload file button to select the file from your device (optional).
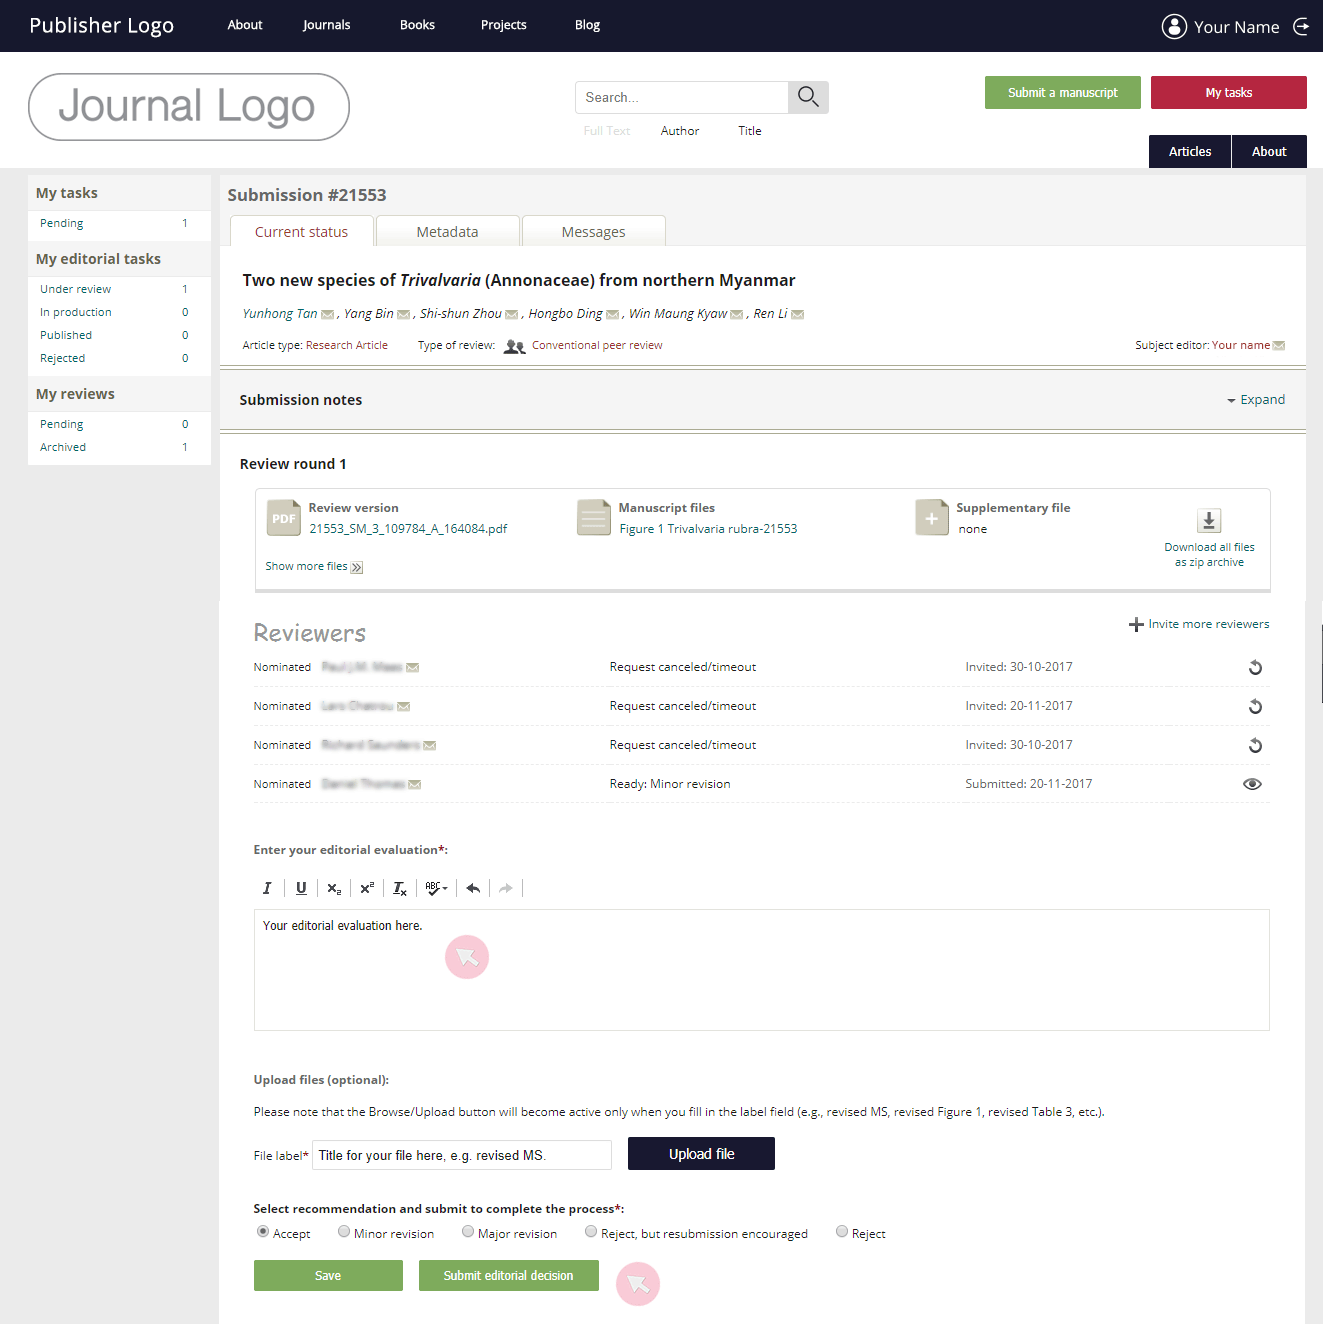
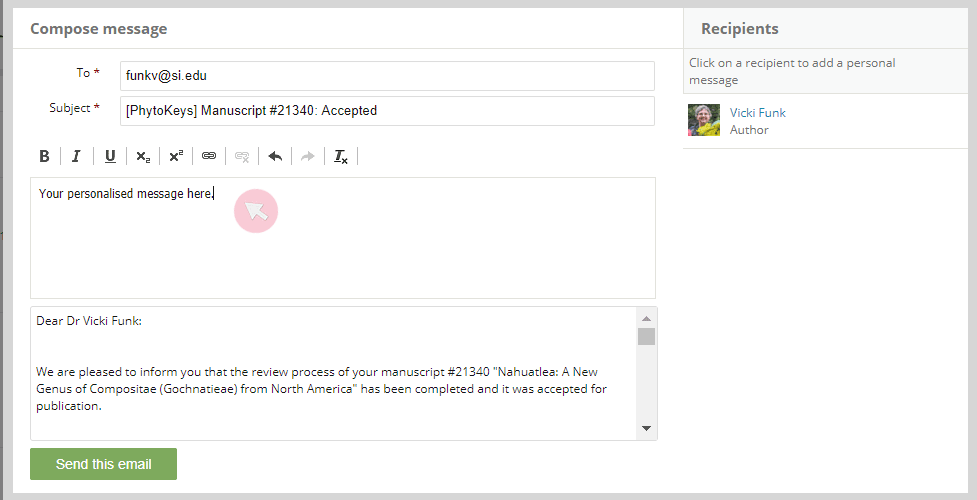
6 Use the Submit editorial decision button to submit your final decision. A pop-up window will appear to let you add a personalised message to the automated email notification. Alternatively, use the Save button to keep your evaluation as a draft.
Note: In case the journal has opted for the alternative editorial process where the final decision on the acceptance or rejection of a manuscript lies with the Editor-in-Chief, your editorial decision will be sent to the E-i-C for verification. Once the E-i-C makes a decision, you will be notified via email. The author of the manuscript will be informed about the editorial decision only after the E-i-C has provided such. You retain the role and duties of the SE of the manuscript until it is conclusively accepted or rejected.
7 SEs are strongly encouraged to access the final proof of manuscripts they have already accepted for final quality assurance check. Use the link in the Final Proof Uploaded email to access the manuscript version intended for publication. In case of any concerns, reply to that email notification.
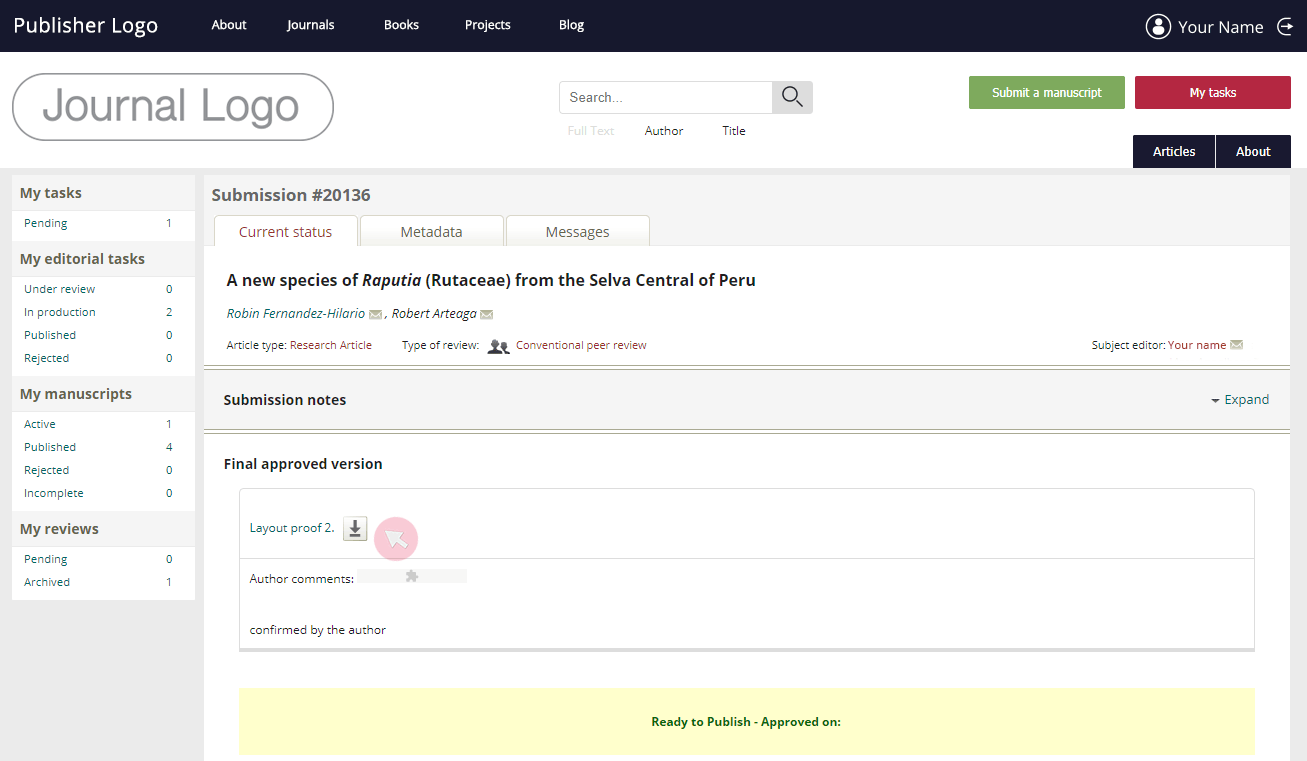
Note: SEs are not notified via email about the progress of already accepted manuscripts during the copy edit and layout stages. However, they can track the progress of a manuscript from the In production tab in the My editorial tasks menu. Go to Current status to see the latest manuscript version submitted by the author. The History tab keeps the archive of all past review / copy editing / layout iterations.
Rate a peer review
Once a review is submitted, the SE will be able to evaluate the review provided using a 5-star rating system.
An average score based on all reviews provided by a particular user will be visible to the next SE who considers assigning him/her as a reviewer.
1 Access the manuscript from Under review in the My editorial tasks menu and click on its title.
2 In the Current status tab, all reviews provided will be marked with a symbol. Click on it to see the review.
Read through the review and rate it by dragging your mouse pointer over the stars, so that they light up in yellow. Note that they can also be filled up in half. When you click, the stars will become red to indicate your evaluation is submitted.
Receive feedback from reviewers on the revised manuscripts (optional)
Journals published on the ARPHA platform can opt for the Revised version cross-check feature where reviewers are invited to access the revised manuscript as soon as the author submits such. The reviewers are informed that they are not required to take any further actions. However, they can send their further comments to the SE if they wish so. The feedback is sent to the SE via email.
Role
A Copy editor checks and corrects manuscripts for consistency and adherence to the journal’s style requirements and provides feedback to the authors / subject editors / Editorial office during copy editing. Depending on the journal policies, the Copy editor may also act as an English-language editor.
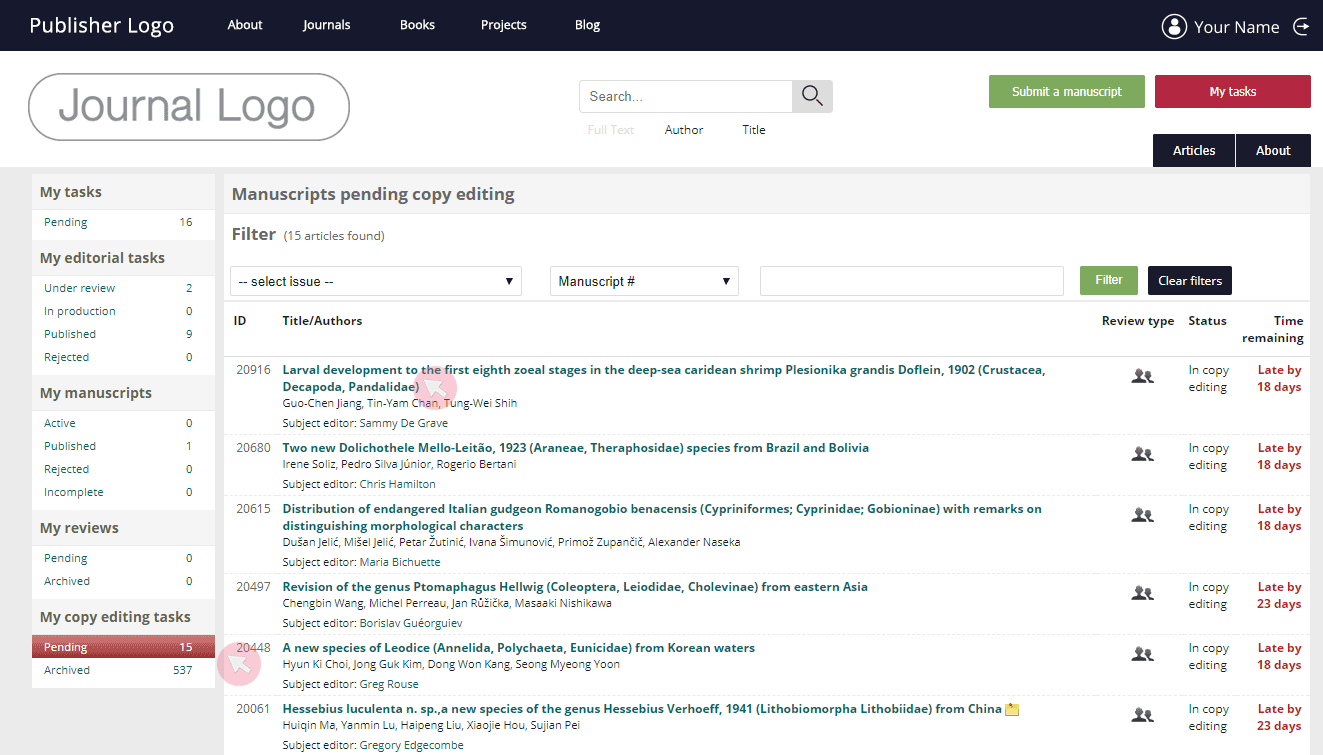
Access manuscripts assigned to Copy editor
1 Find the manuscripts assigned to you in the My copy editing tasks menu.
2 The manuscripts awaiting your copy edits are sorted in Pending. Once you submit a copy-edited version, the manuscript is relocated to Archived.
3 Check the deadline for your copy editing task for each submission in the Time remaining column.
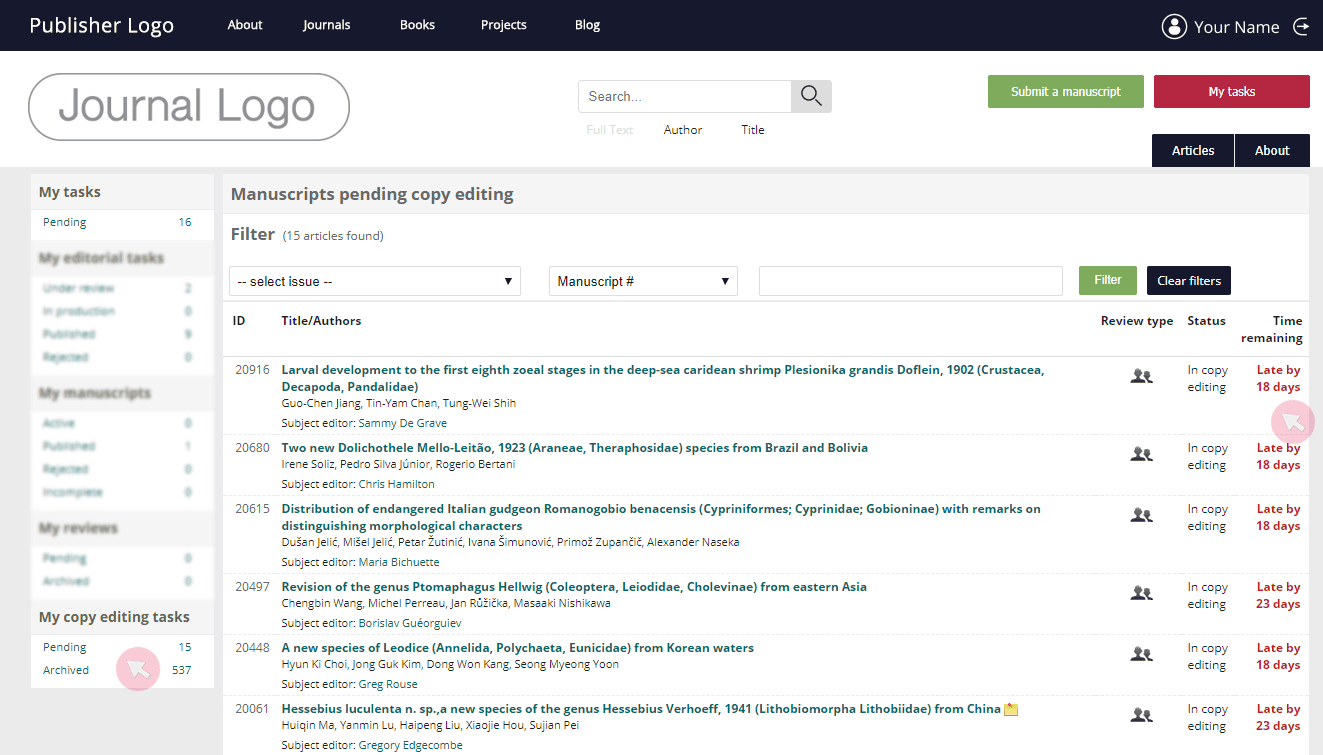
Note: The manuscripts are ordered by ID number (high to low) with the most recently submitted showing first. They are not listed by the order of their CE assignment.
Download submission files of the assigned manuscripts
1 Locate a manuscript in Pending in the My copy editing tasks menu and access it by clicking on its title.
2 Download all submission files as a .zip file via the button on the right-hand side in the Current status tab. To download files one by one, click on the name of the file.
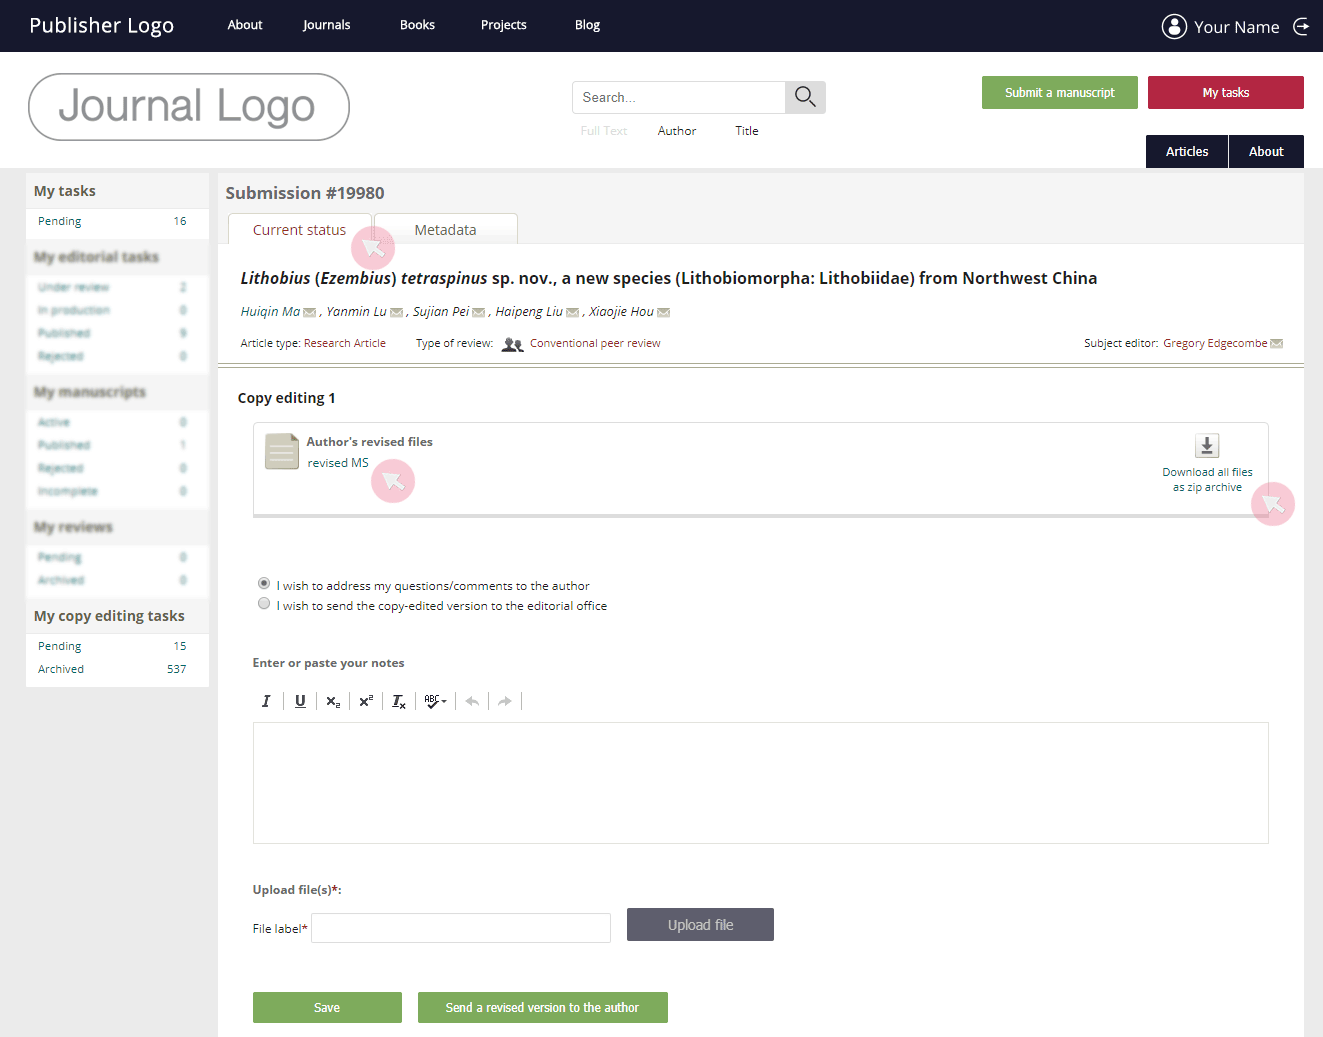
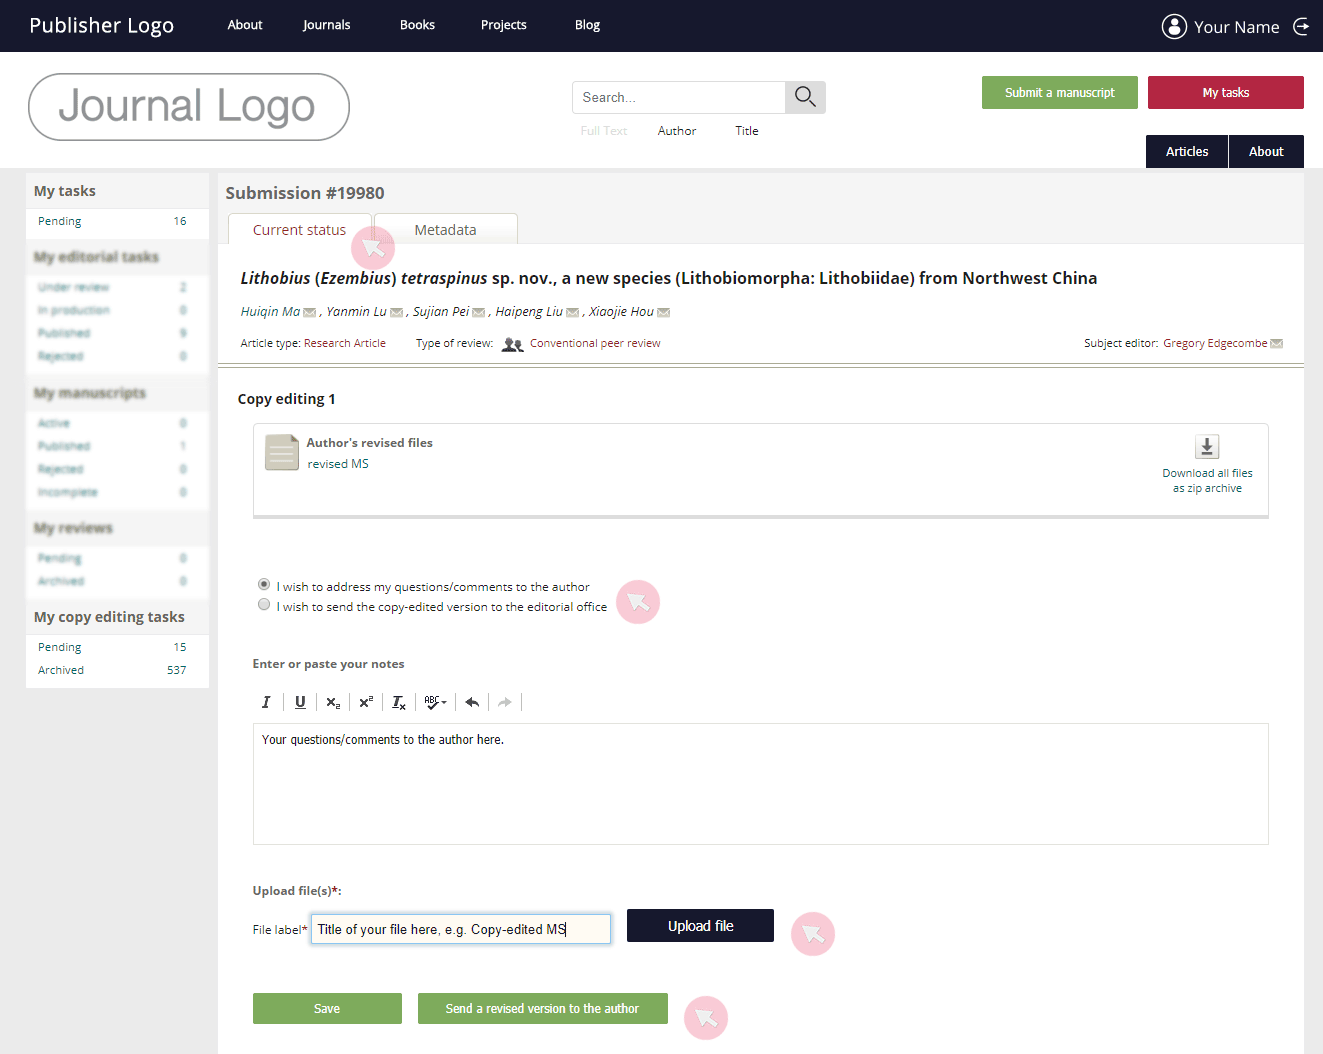
Upload copy-edited manuscript versions
1 Locate a manuscript in Pending in the My copy editing tasks menu and access it by clicking on its title.
2 In the Current status tab, select one of the options:
- I wish to address my questions/comments to the author
- I wish to send the copy-edited version to the Editorial office
In case you have points to discuss with the author, choose the first option and send your copy edits to him/her. Alternatively, email the copy-edited version to the Editorial office, if you consider the manuscript ready for further processing.
3 Use the text field to leave your general comments to either the author or the SE / Editorial office (depending on the selected recipient).
4 To upload your revised version of the manuscript, type in a title in the File label field and then use the Upload file button to upload the file from your computer.
5 Click the Send revised version to the author or Send revised version to Editorial office button at the bottom to submit your revised version. Showing will be the button corresponding to the option selected above.
6 Alternatively, click Save to complete your revised version submission at a later stage.
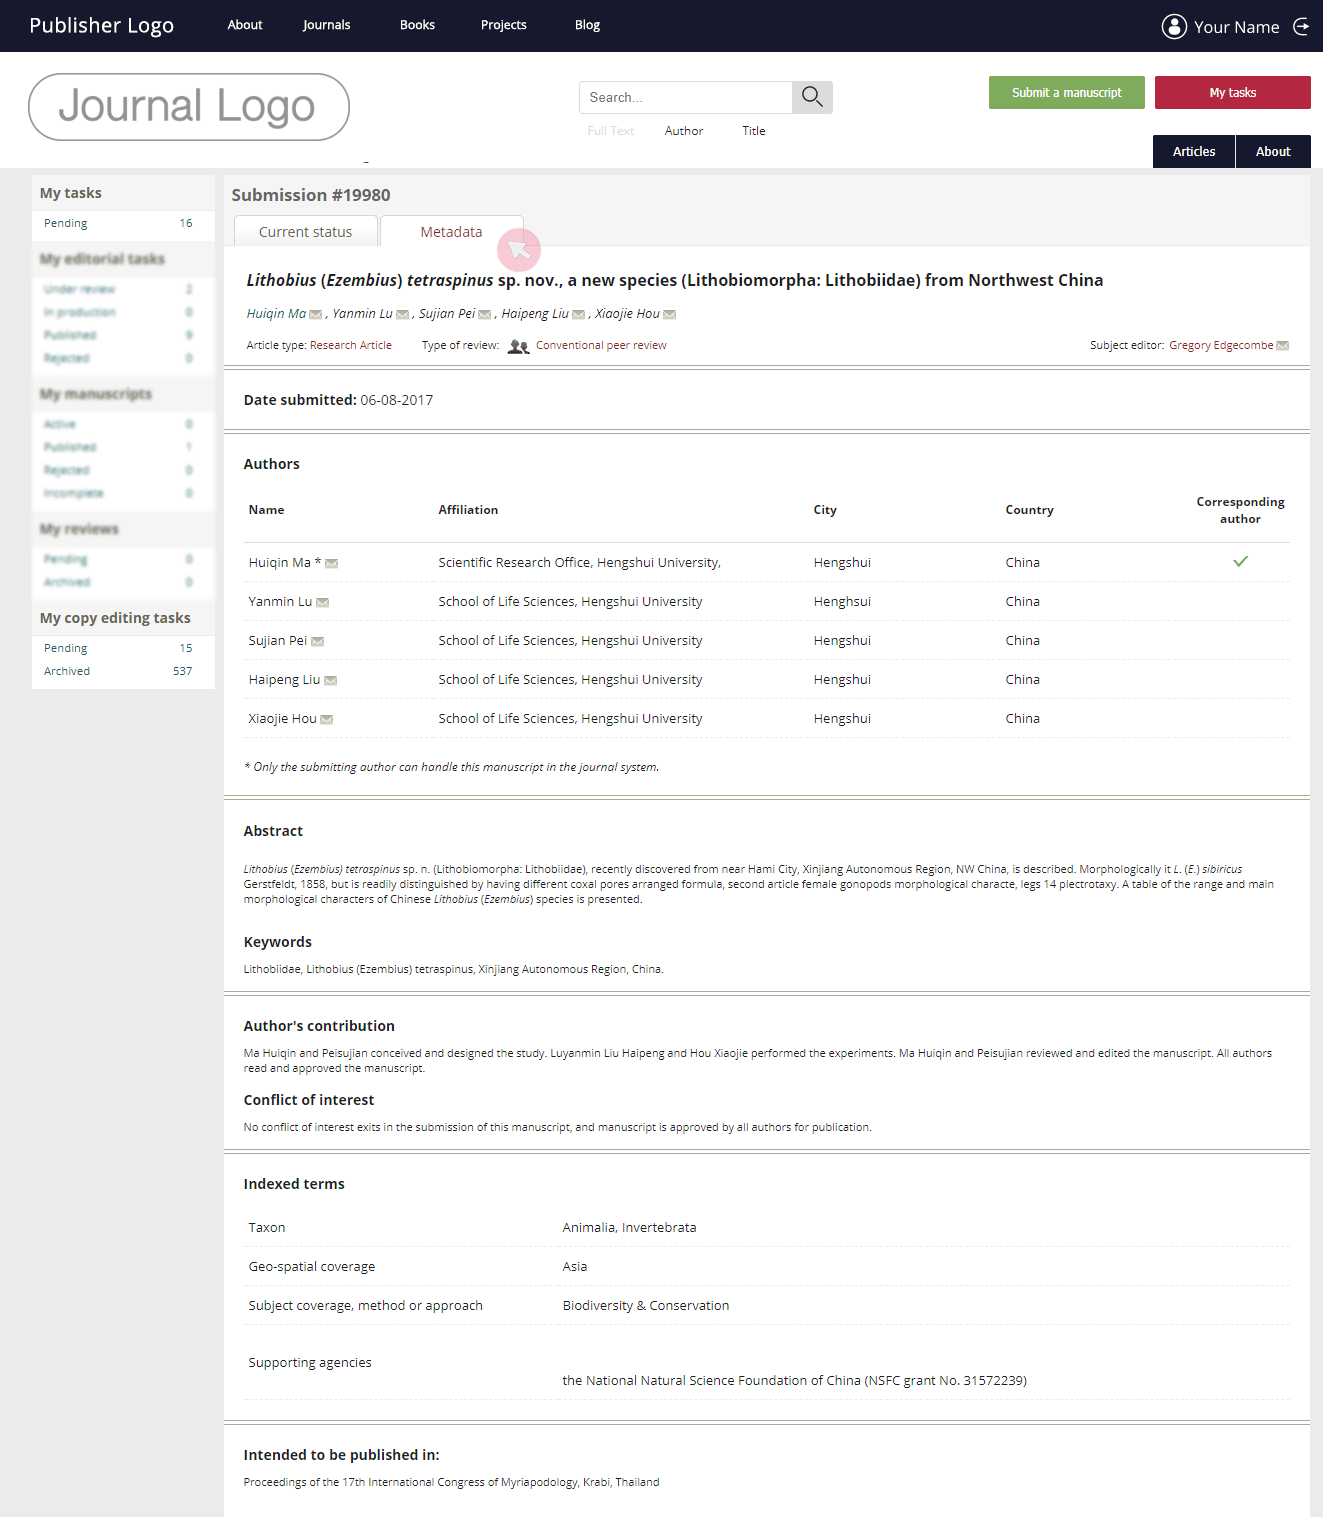
Access manuscript metadata
1 Locate a manuscript in My copy editing tasks and access it by clicking on its title.
2 Go to the Metadata tab to access the metadata of the submission. The metadata includes a number of details, such as submission date, authors’ affiliations, abstract and keywords of the paper, classifications assigned to the manuscript and others.
Communicate with authors and subject editors
Use the clickable
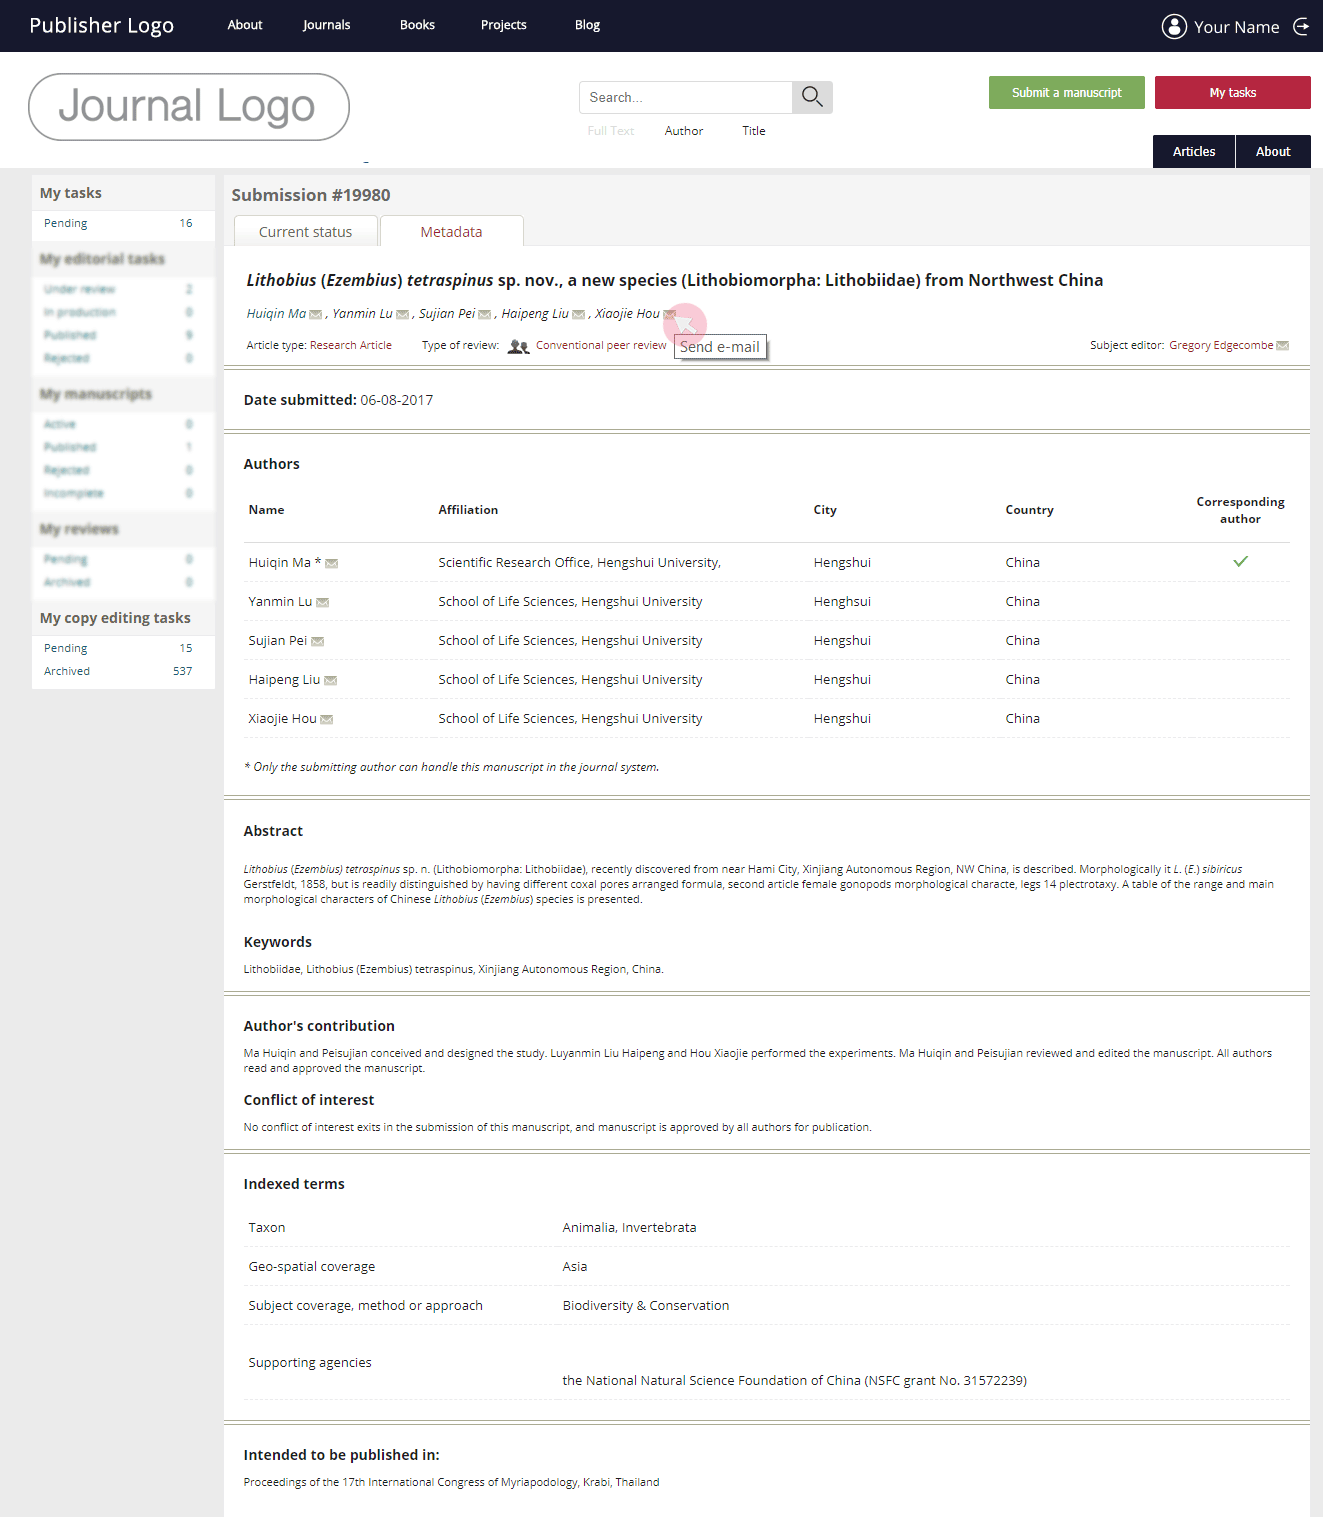
Note: The recipient will receive the email from your email address added to your user account. To change your contact email, click on your user name visible in the upper right corner of the screen and go to Account settings (see the Managing user accounts chapter).
Access archive of copy-edited manuscripts
1 Access all manuscripts copy-edited by you in Archived in the My copy editing tasks menu.
2 The Status column shows the manuscript’s current processing stage.
3 A clickable Digital Object Identifier (DOI) for each manuscript is visible once the manuscript has proceeded to the layout stage. When the paper is published, the link becomes active and leads to the published article.
Note: The manuscripts are ordered by ID number (high to low) with the most recently submitted showing first. They are not listed by the order of their CE assignment.
4 To access a detailed information about a manuscript submission, click on its title.
5 The Current status contains the submission files sent for production. Your copy-edited version appears at the bottom of the page. All accompanying comments left to the author / Editorial office are also visible.

6 The Metadata tab includes a number of details, such as submission date, authors’ affiliations, abstract and keywords of the paper, classifications assigned to the manuscript and others.
Role
Reviewers in ARPHA are all users who have submitted at least one review to a manuscript processed by the system.
A reviewer evaluates the scientific quality of assigned manuscripts. A reviewer needs to provide critical yet constructive feedback to the author(s) and a recommendation for either revision, acceptance or rejection of a manuscript to the Subject editor. Reviewers may reveal their identity or remain anonymous, depending on a journal’s terms and policy.
Accept / Decline review invitations
Review invitations in ARPHA are normally sent from either the Subject editor, Editor-in-Chief or Managing editor via automated email notifications. The email will contain the name of the Subject editor who has nominated you and an automatic login link to the manuscript. Your agreement or refusal to review the manuscript will usually be expected within 5 days.
Note: Your review invitations are based on the expertise listed in your user account. In case you are receiving invitations for manuscripts outside your competence, click on your user name in the upper right corner of the screen and go to My expertise to edit your expertise (see the User accounts chapter).
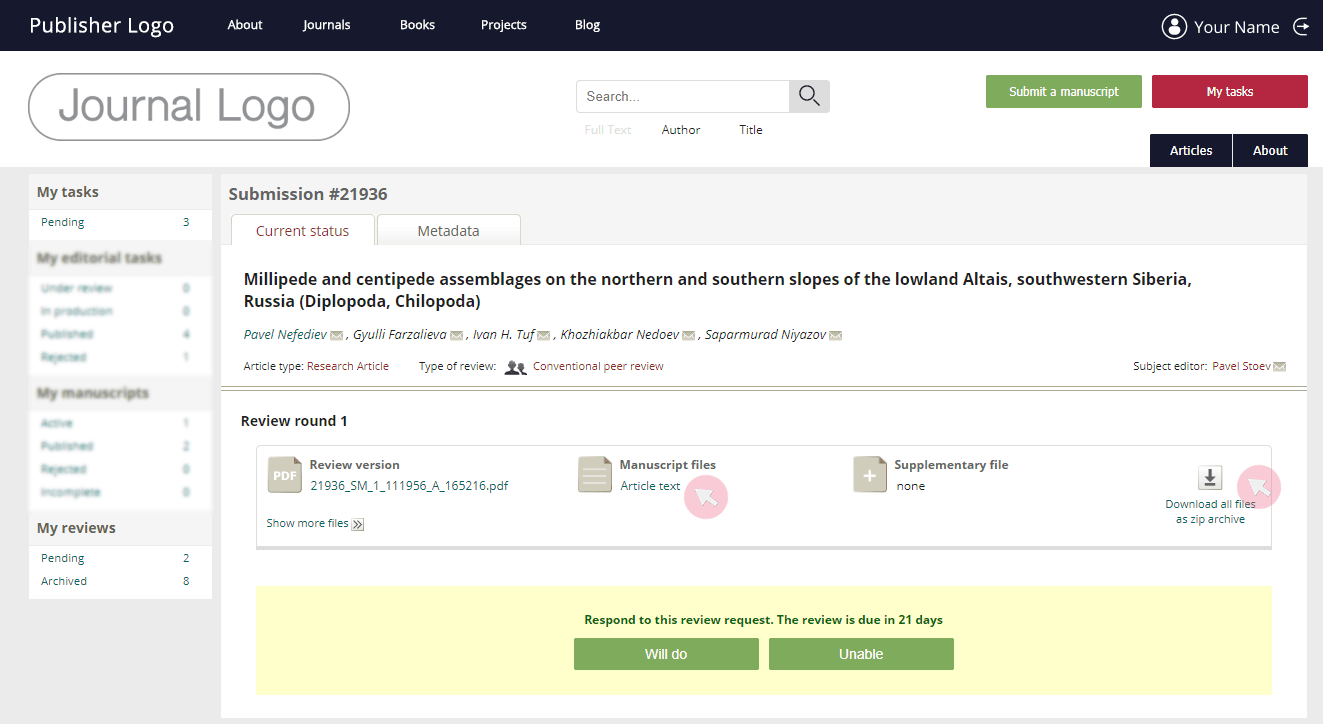
1 Click on the hyperlinked title of the manuscript from the email notification to access it.
2 Use the button on the right-hand side to download all submission files. To download the files one by one, click on their titles.
3 Use the buttons at the bottom of the page to either accept or decline the invitation.
Note 1: By default, two reminders will be emailed to you until you either accept or decline the review invitation in the system. The reminders are sent on the first and the third day past the due date for your response.
Note 2: By default, a reminder will be emailed to you on the first day past the due date for your review submission. In case you do not submit a review within seven days, your review invitation will be canceled.
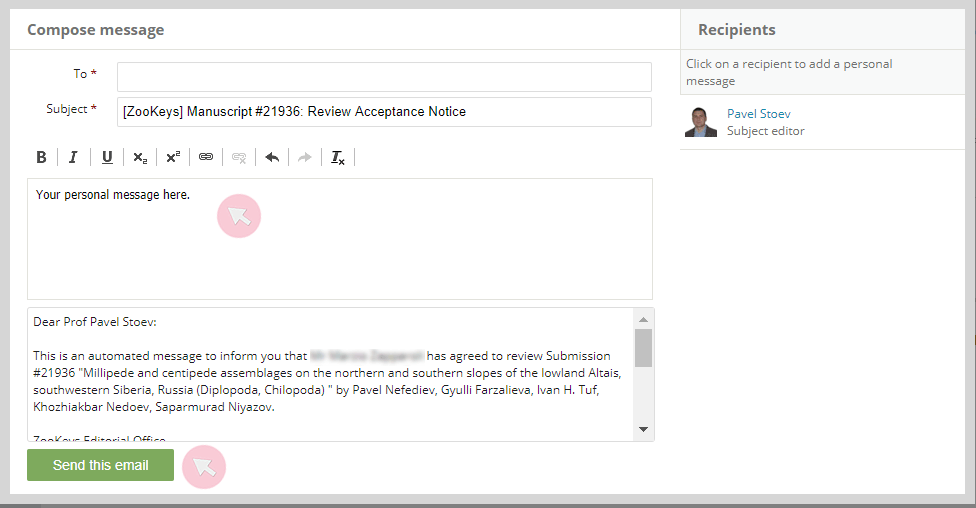
4a If you accept the review invitation, you will see the automated message that will be sent to the Subject editor. You can use the empty space above to add your personal message.
Once you accept a review invitation, your review will be expected within a certain time frame as set up by the journal (normally 21 days). Use the Pending tab in the My reviews menu to keep track of the deadline. To request an extension for your review submission, contact the journal’s Editorial office. To access your user dashboard and the manuscript, use the My tasks button visible in the header of the journal’s page once you have been assigned with a task from the journal or have submitted a manuscript to it.
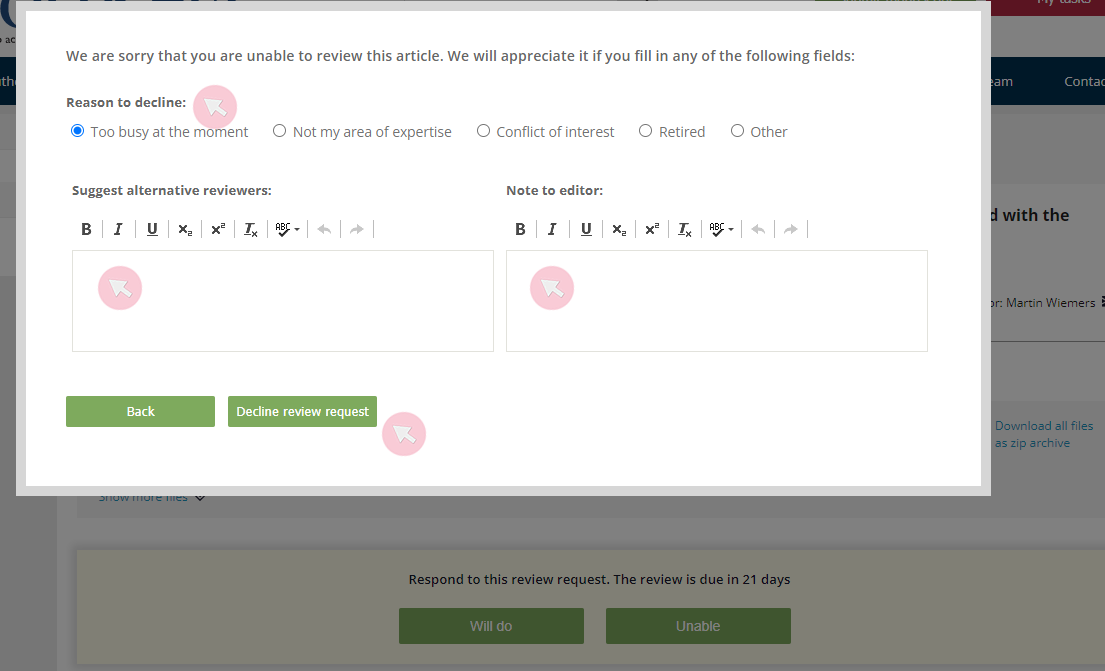
4b If you decline a review invitation, you will be asked to fill in a short form, where you can select your reason. You are also encouraged to use the free text field to suggest colleagues who might be suitable reviewers for the paper. You can also add your personal message to the editor in the box on the right. After you complete the form, click the Decline review request button.

Access the manuscript submission files and metadata
1 Follow the hyperlinked manuscript title in the email notification to access the manuscript. Alternatively, find it in Pending in the My reviews menu* and click on its title.
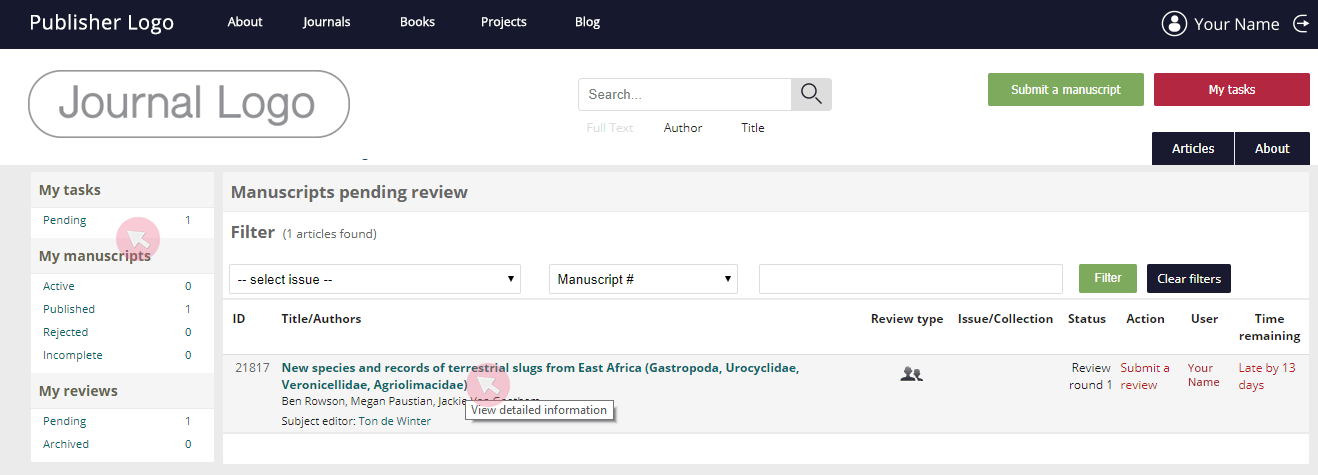
Note: The task will be visible in the My reviews menu only after you have accepted the review invitation via the system.
*To access your user dashboard, use the My tasks button visible in the header of the journal’s page once you have been assigned with a task from the journal or submitted a manuscript with it.
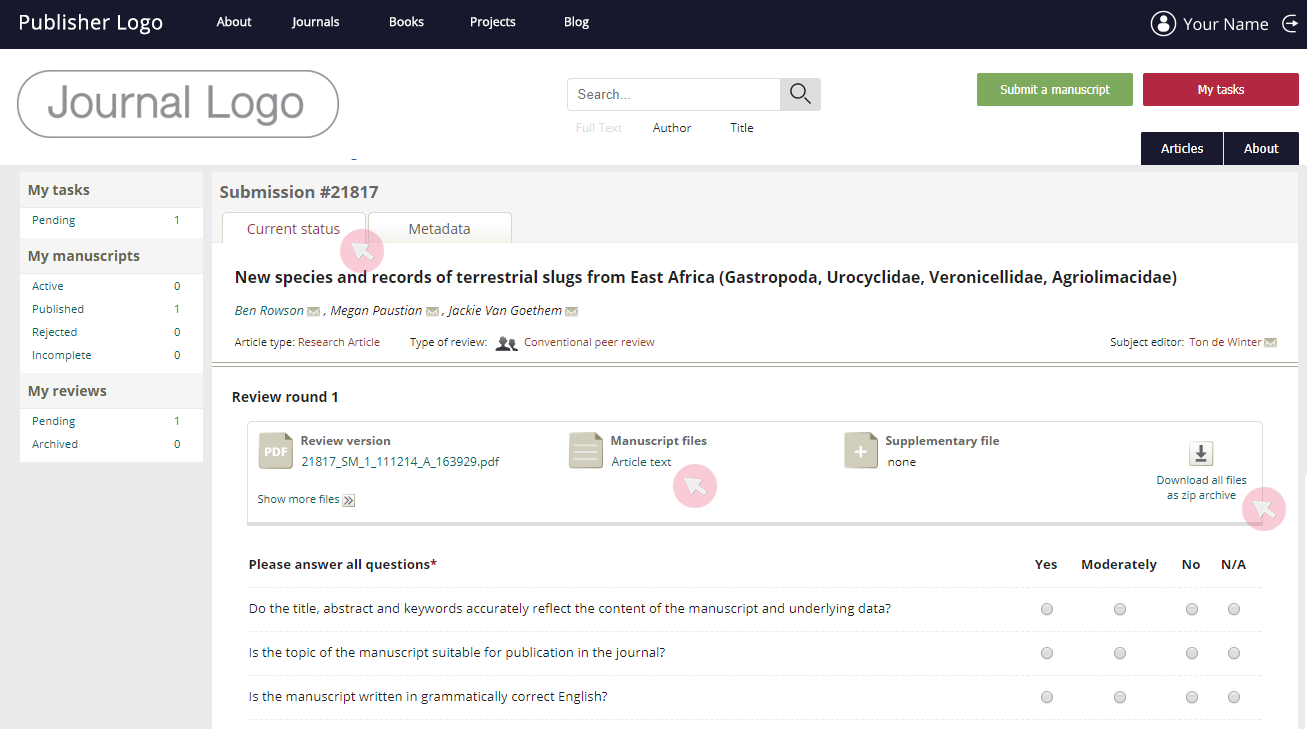
2 Go to the Current status tab to find the latest submission files and use the button on the right-hand side to download all of them. To download the files one by one, click on their titles.
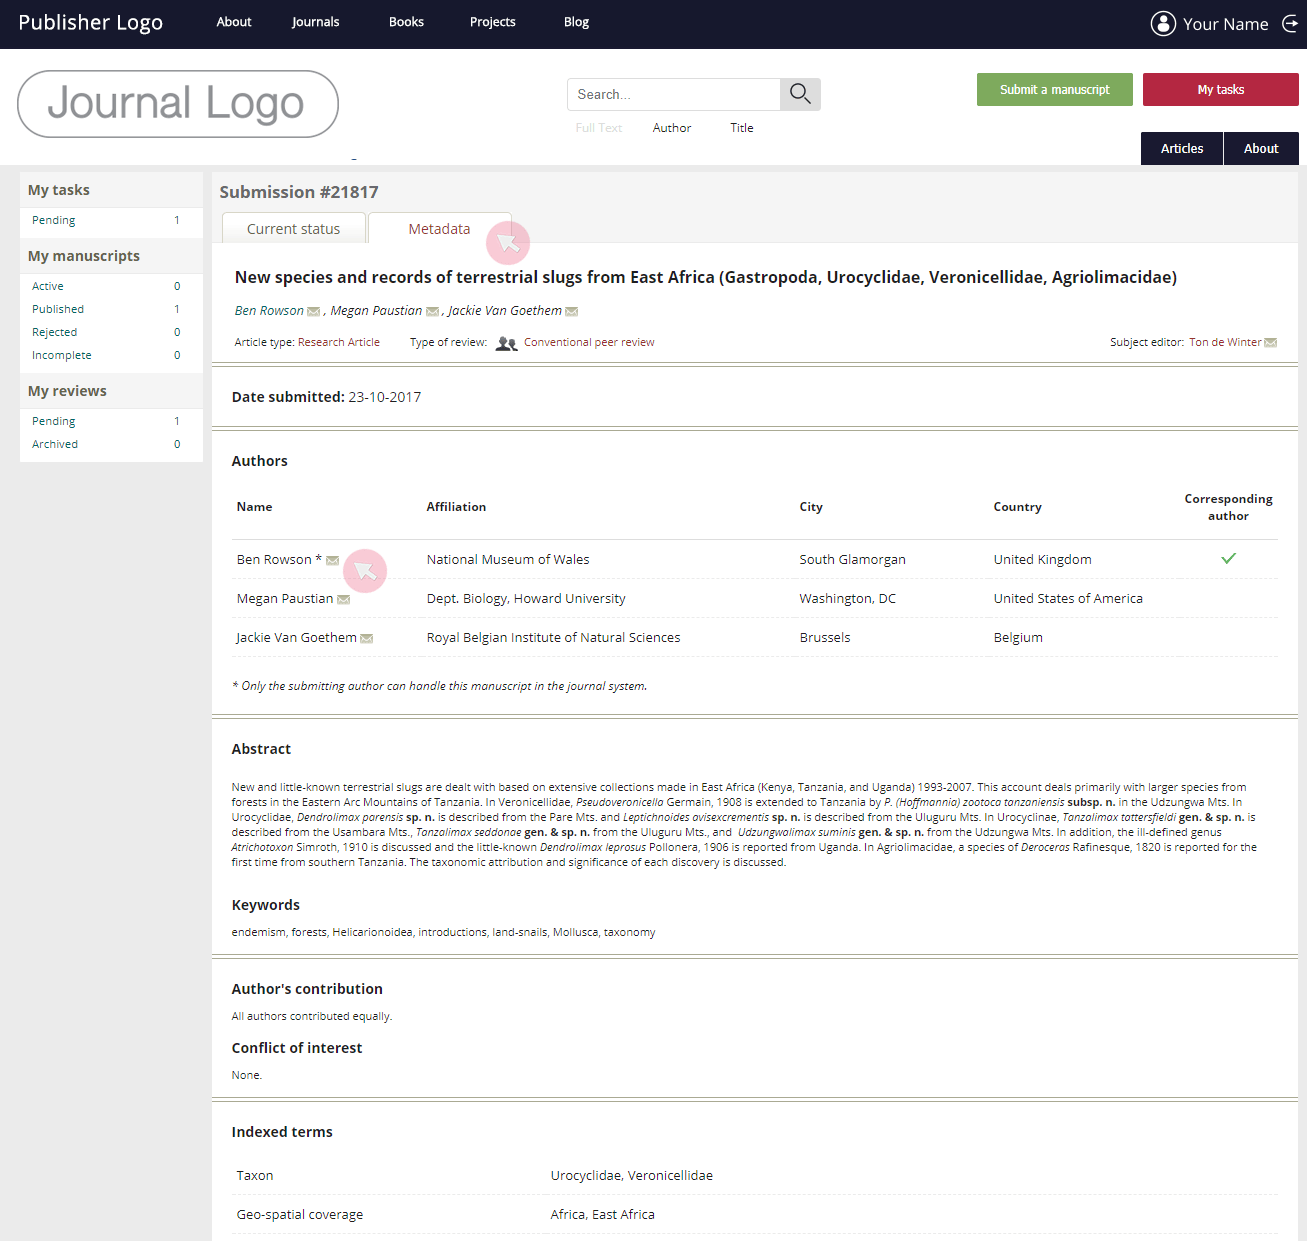
3 Go to the Metadata tab to find a number of details, such as the submission date, authors’ affiliations, abstract and keywords of the paper, classifications assigned to the manuscript and others.
You can send an email to the user by clickingnext to a user’s name.* Alternatively, right click the icon (
) to copy the user’s email address.
*The recipient will receive the email from your email address added to your user account. To change your contact email, click on your user name visible in the upper right corner of the screen and go to Account settings (see the Managing user accounts chapter).
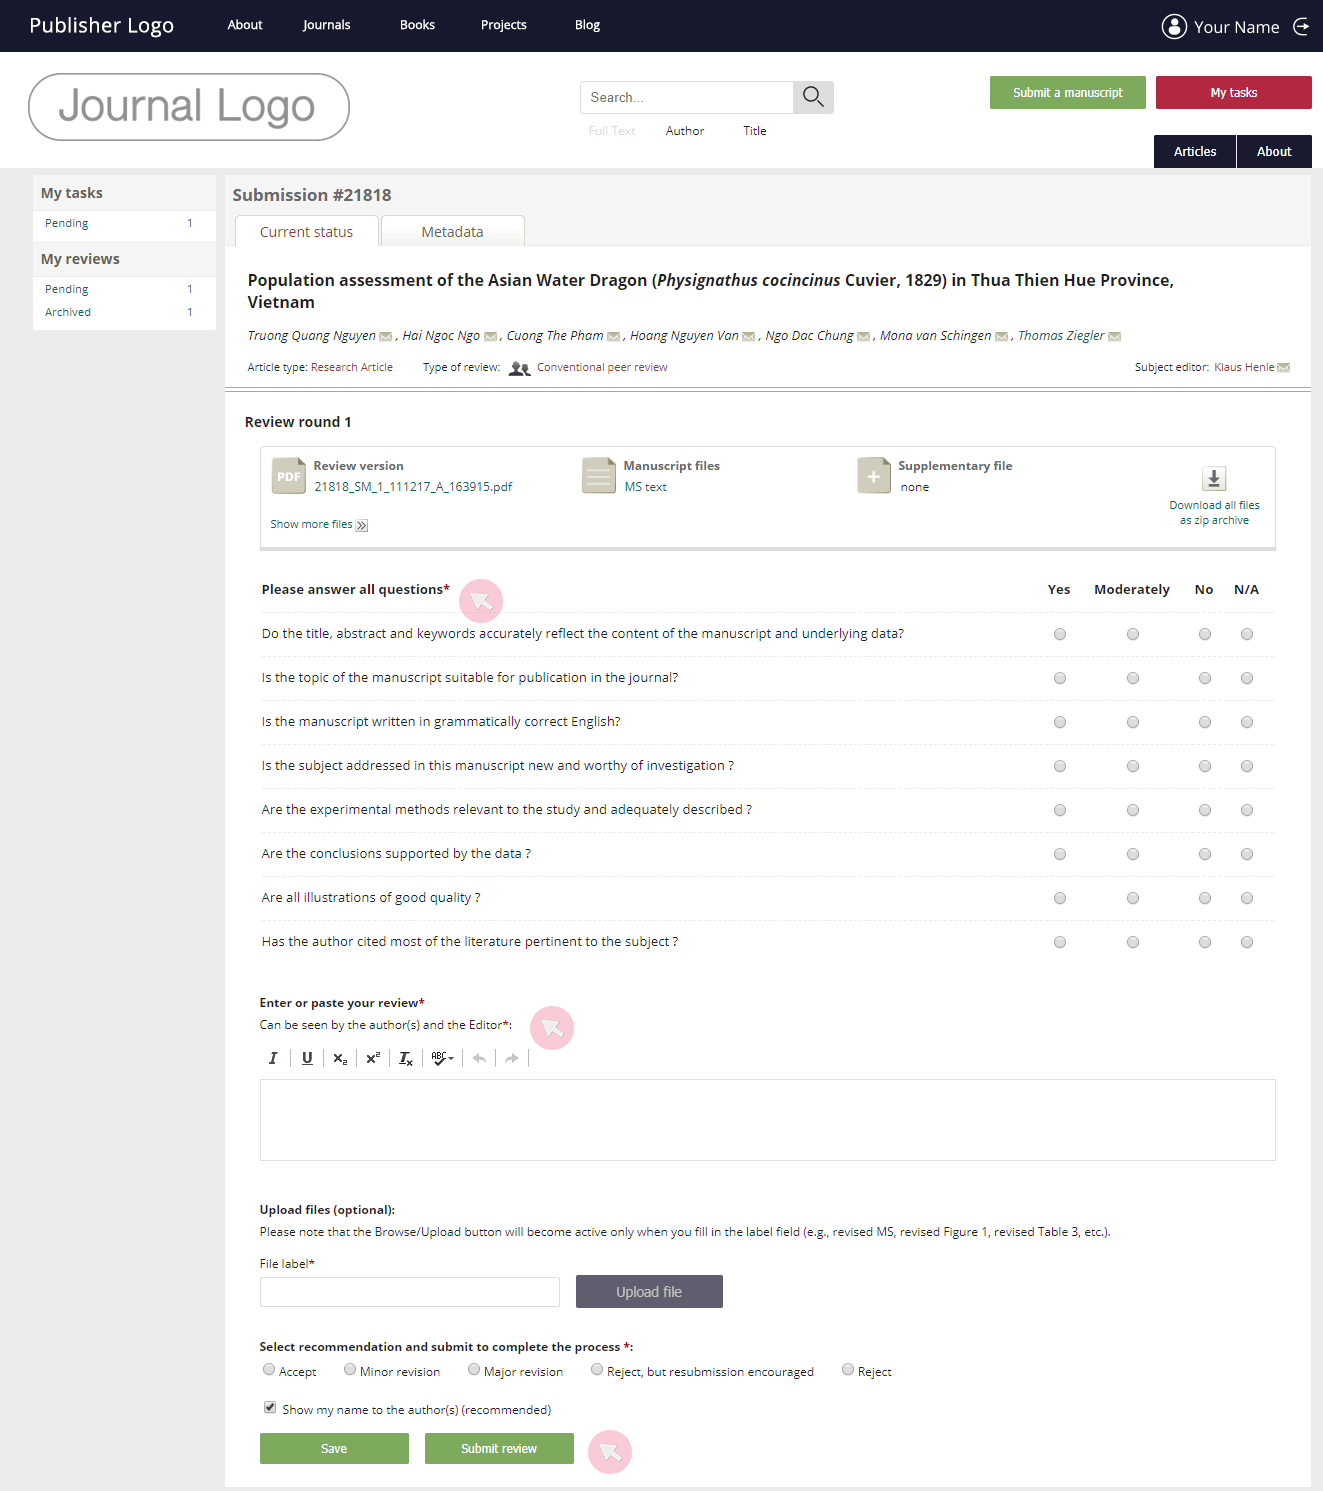
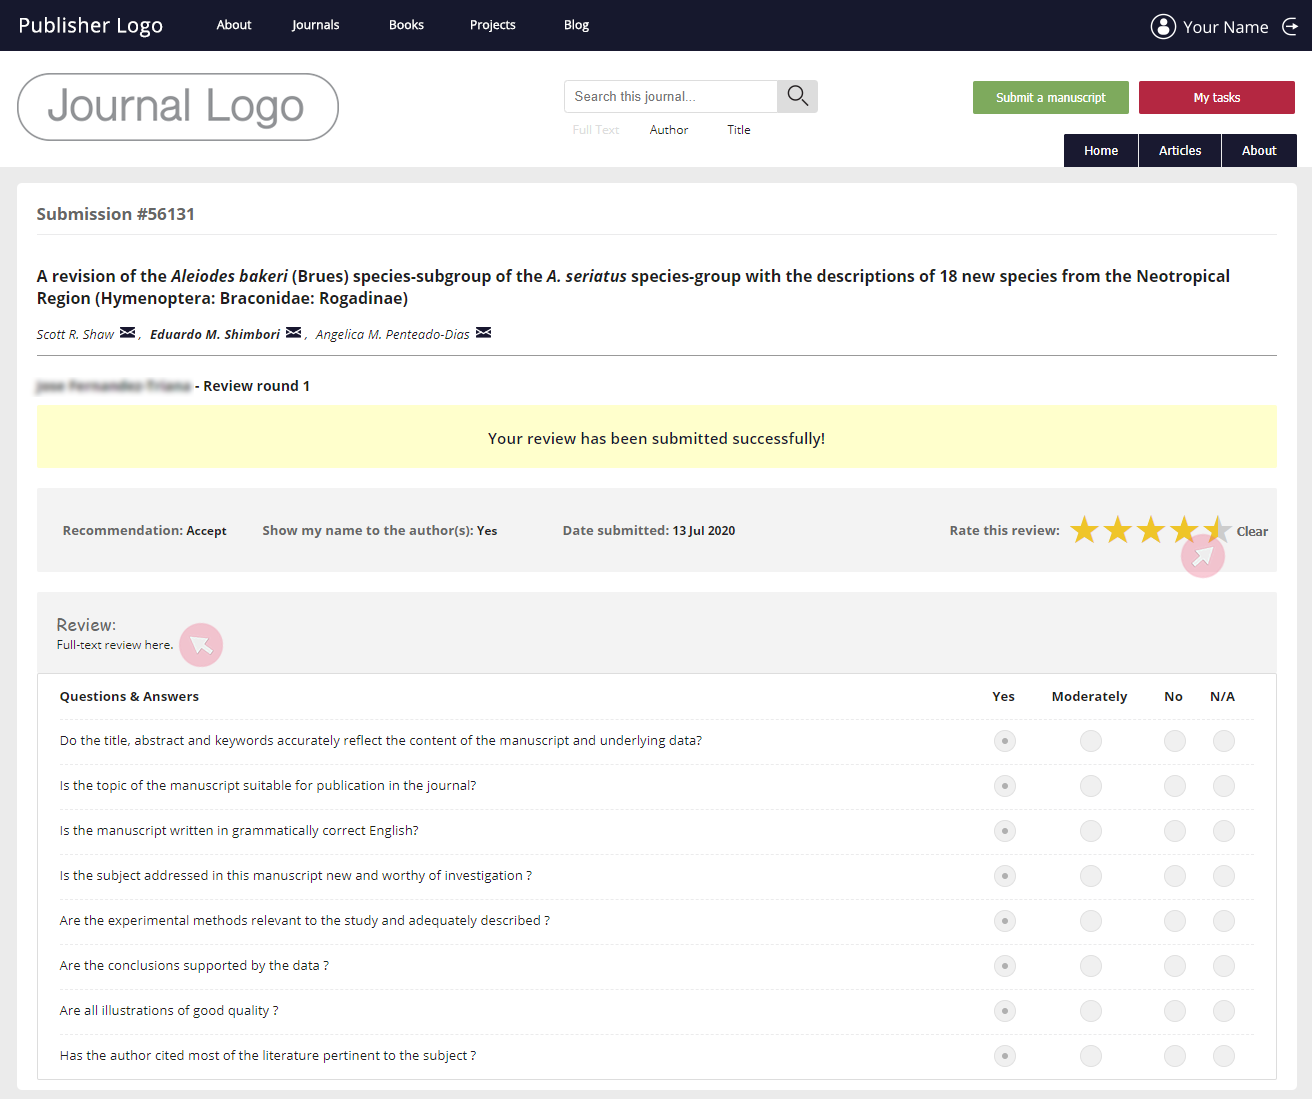
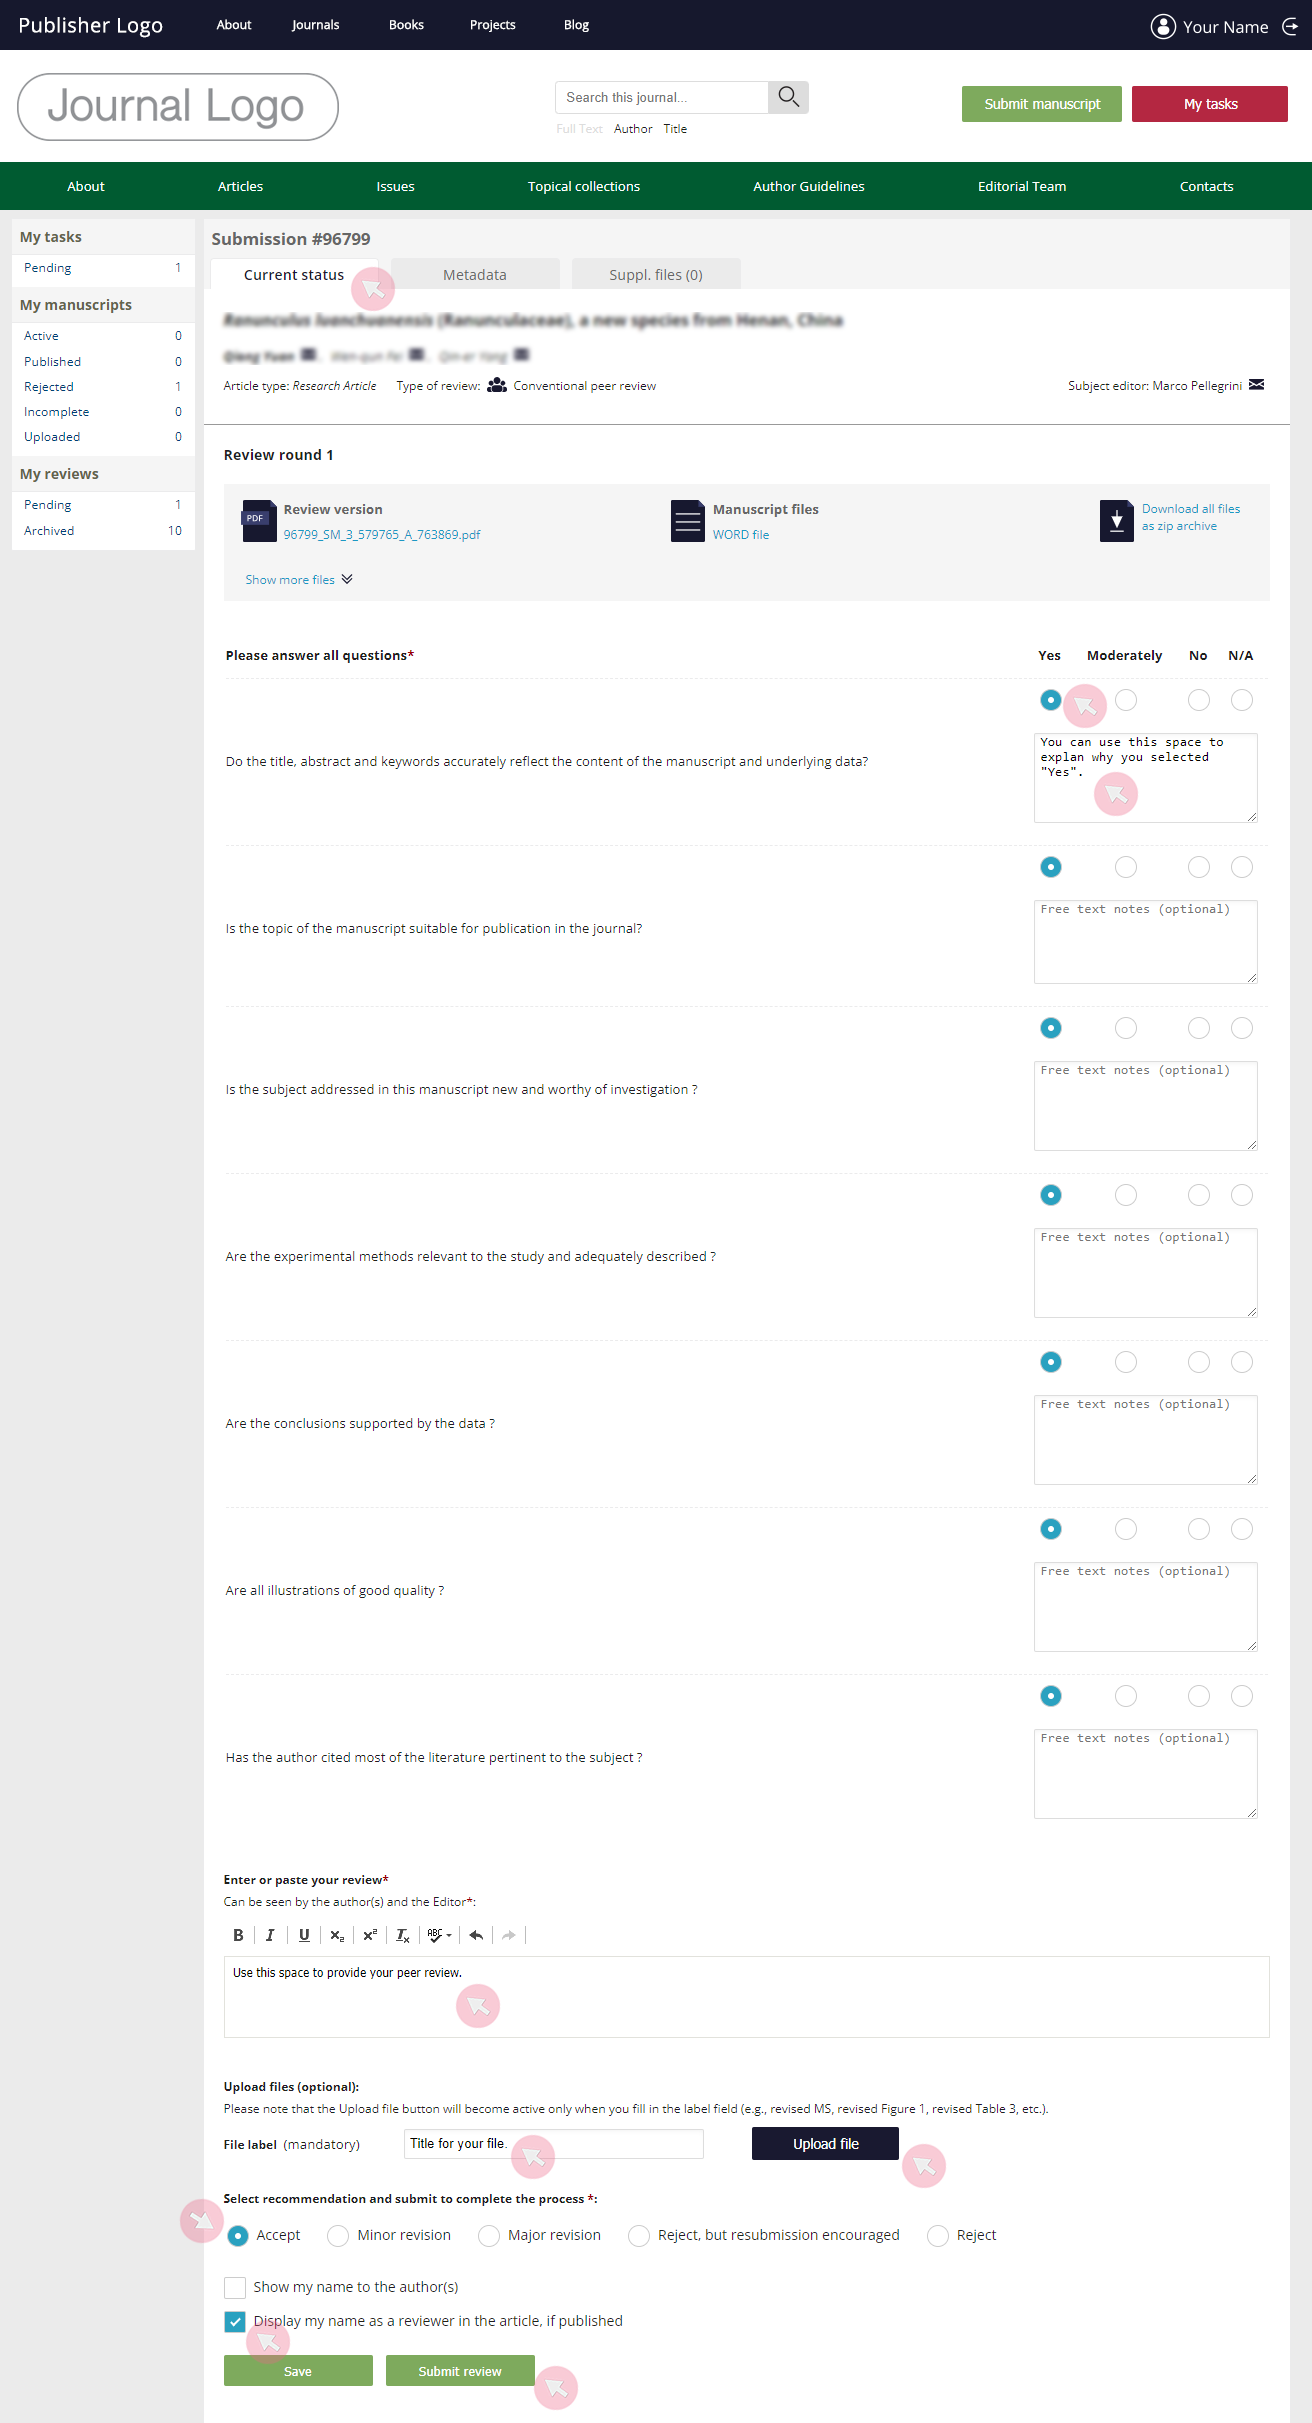
Submit a review
Note: ARPHA supports open science practices, hence reviews are set up as non-anonymous by default. However, a reviewer may still opt to remain anonymous by unchecking the corresponding option while completing the review form (see below). Please note that your name may be visible in comments and tracked changes in the manuscript files.
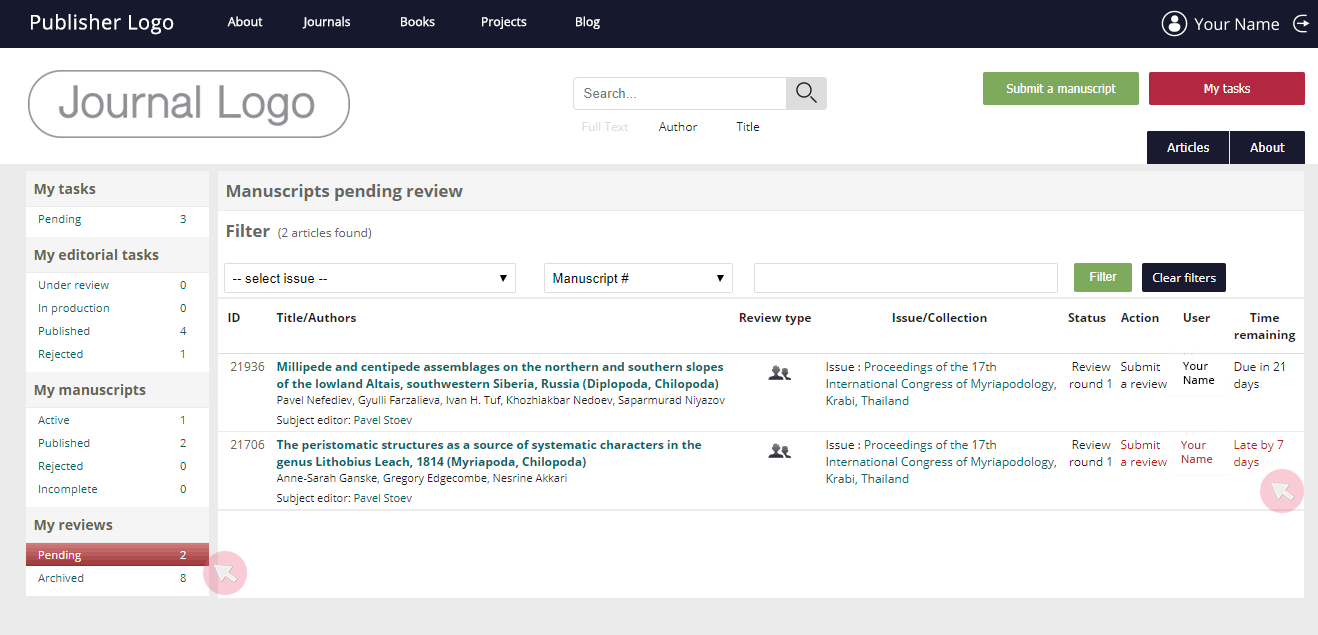
1 Locate the manuscript in the Pending tab from the My reviews menu. Click on its title to access the submission.
Note: The task will be visible in the My reviews menu only after you have accepted the review invitation via the system.
2 Go to the Current status tab to access the review form and submit your recommendation regarding the publication of the manuscript.
3 Answer all questions in the review form (mandatory). Use the text boxes to explain the reasoning behind your selected choice in your own words (optional).
4 Provide your review in the text box below the questionnaire. Make sure to clearly explain the reasons behind your recommendation.
5 If necessary, upload files (e.g. the manuscript file containing inline comments and/or notes). Type in a title for your file in the File label box and then use the Upload file button to browse your device.
Note: In case you do not wish to reveal your identity to the author(s), ensure that you delete any personal information, such as your name next to track changes/notes in a document file.
6 Select your recommendation on revision, acceptance or rejection of the manuscript.
7 You are encouraged to reveal your identity to the author(s) by checking the box at the bottom of the page. Here, you may also opt to make your contribution as a reviewer public in the event that the article is accepted and published.
Note: The box is checked by default in line with ARPHA’s open science policy.
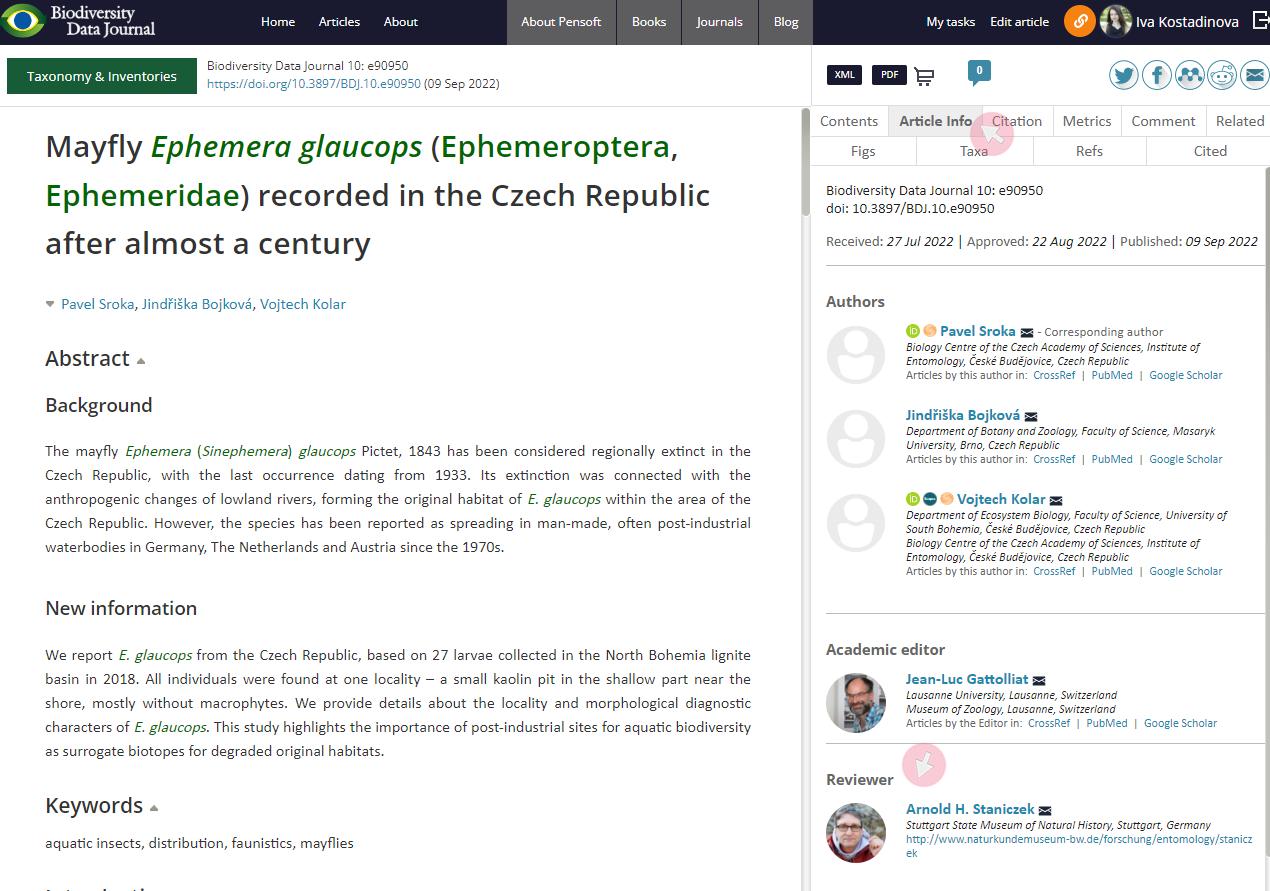
8 Click the Submit review button when ready with your evaluation. Alternatively, use Save to complete your review submission at a later stage.
If you do so, your name, affiliation and email address will be displayed next to those of the Academic editor (or Subject editor) on the article webpage.
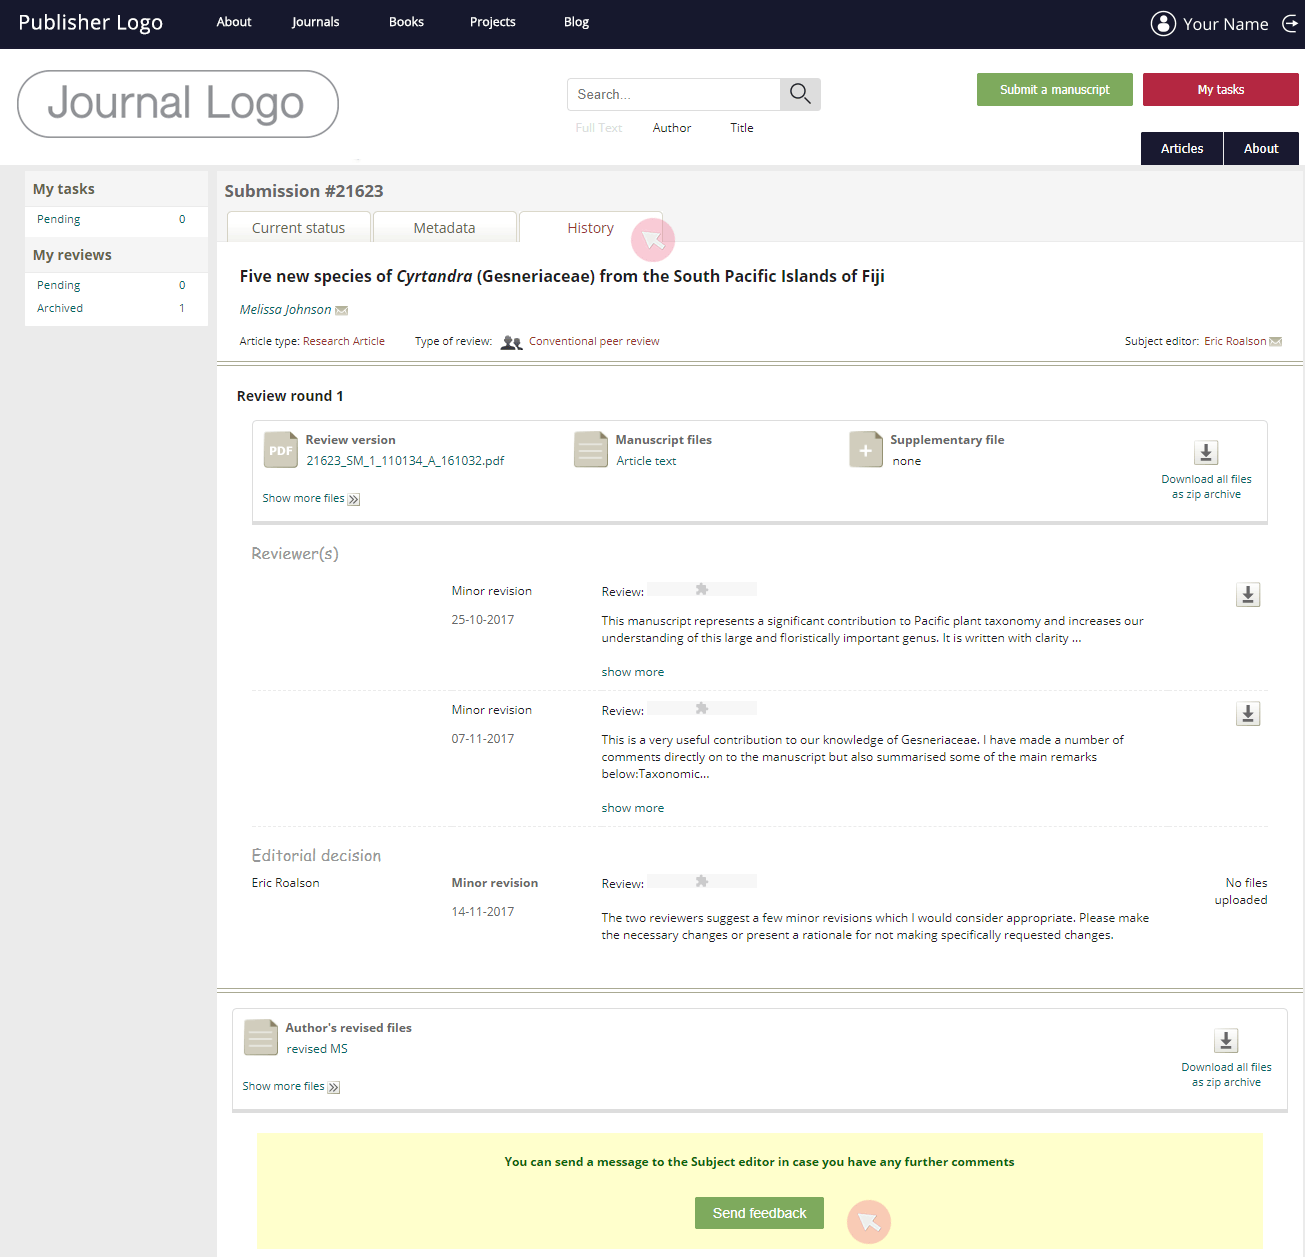
Send feedback to the Subject editor on the revised manuscript version (optional)
Journals published on the ARPHA platform can opt for the Revised version cross-check feature where reviewers are invited to access the revised manuscript as soon as the author submits such. Although the reviewers are not required to take any further action at this stage, they can still send their comments and feedback to the Subject editor if they wish to do so.
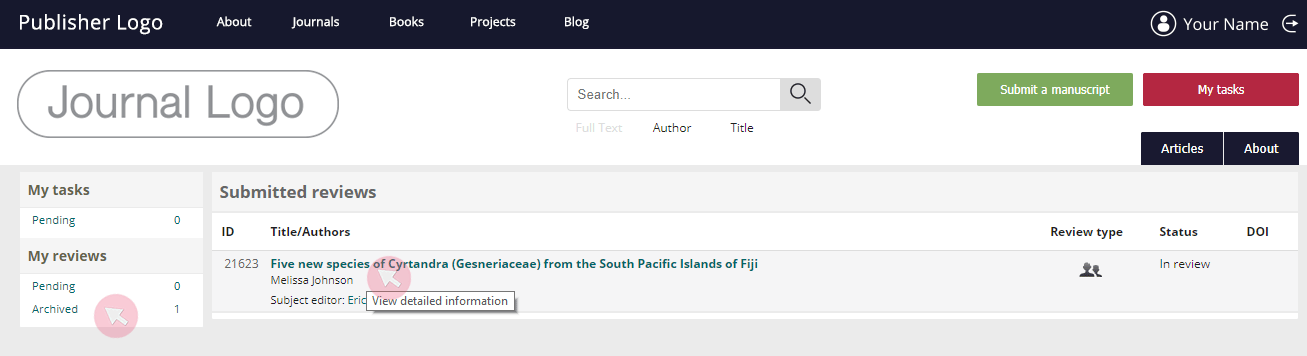
1 Follow the hyperlinked manuscript title in the email notification on the submission of a revised manuscript version of the manuscript you have reviewed. Alternatively, find the reviewed manuscript in the Archived tab from the My reviews menu and click on its title to access it.
2 Use the Send feedback button from the History tab to submit your comments to the Subject editor.
Role
An author is any ARPHA-registered user who has submitted* a manuscript to a journal using the ARPHA publishing platform.
To have his/her manuscript accepted for publication, an author needs to ensure that his/her work is of sufficient scientific / linguistic quality to conform with the journal’s scope and policy.
*Co-authors can also access the manuscript submission once they are registered with the system and added to the list of authors. However, their user rights are very limited compared to those of the submitting author. Most importantly, they cannot upload revised versions and proofs. It is only the submitting author who can assign another co-author as a submitting author.
Submit a manuscript
Please ensure that you have provided all mandatory information and your manuscript and submission files fully comply with the journal’s policy and standards. Failure to do so may result in your manuscript being returned for corrections and resubmission prior to peer review.
1 Log in to your ARPHA account at the journal’s website.

2 Press the Submit a manuscript button in the header to start the submission process.
Note: The submissions steps and their content may vary across article types and journals, depending on the journal’s terms and policy.
3 Provide all mandatory information requested at each page to complete your submission.
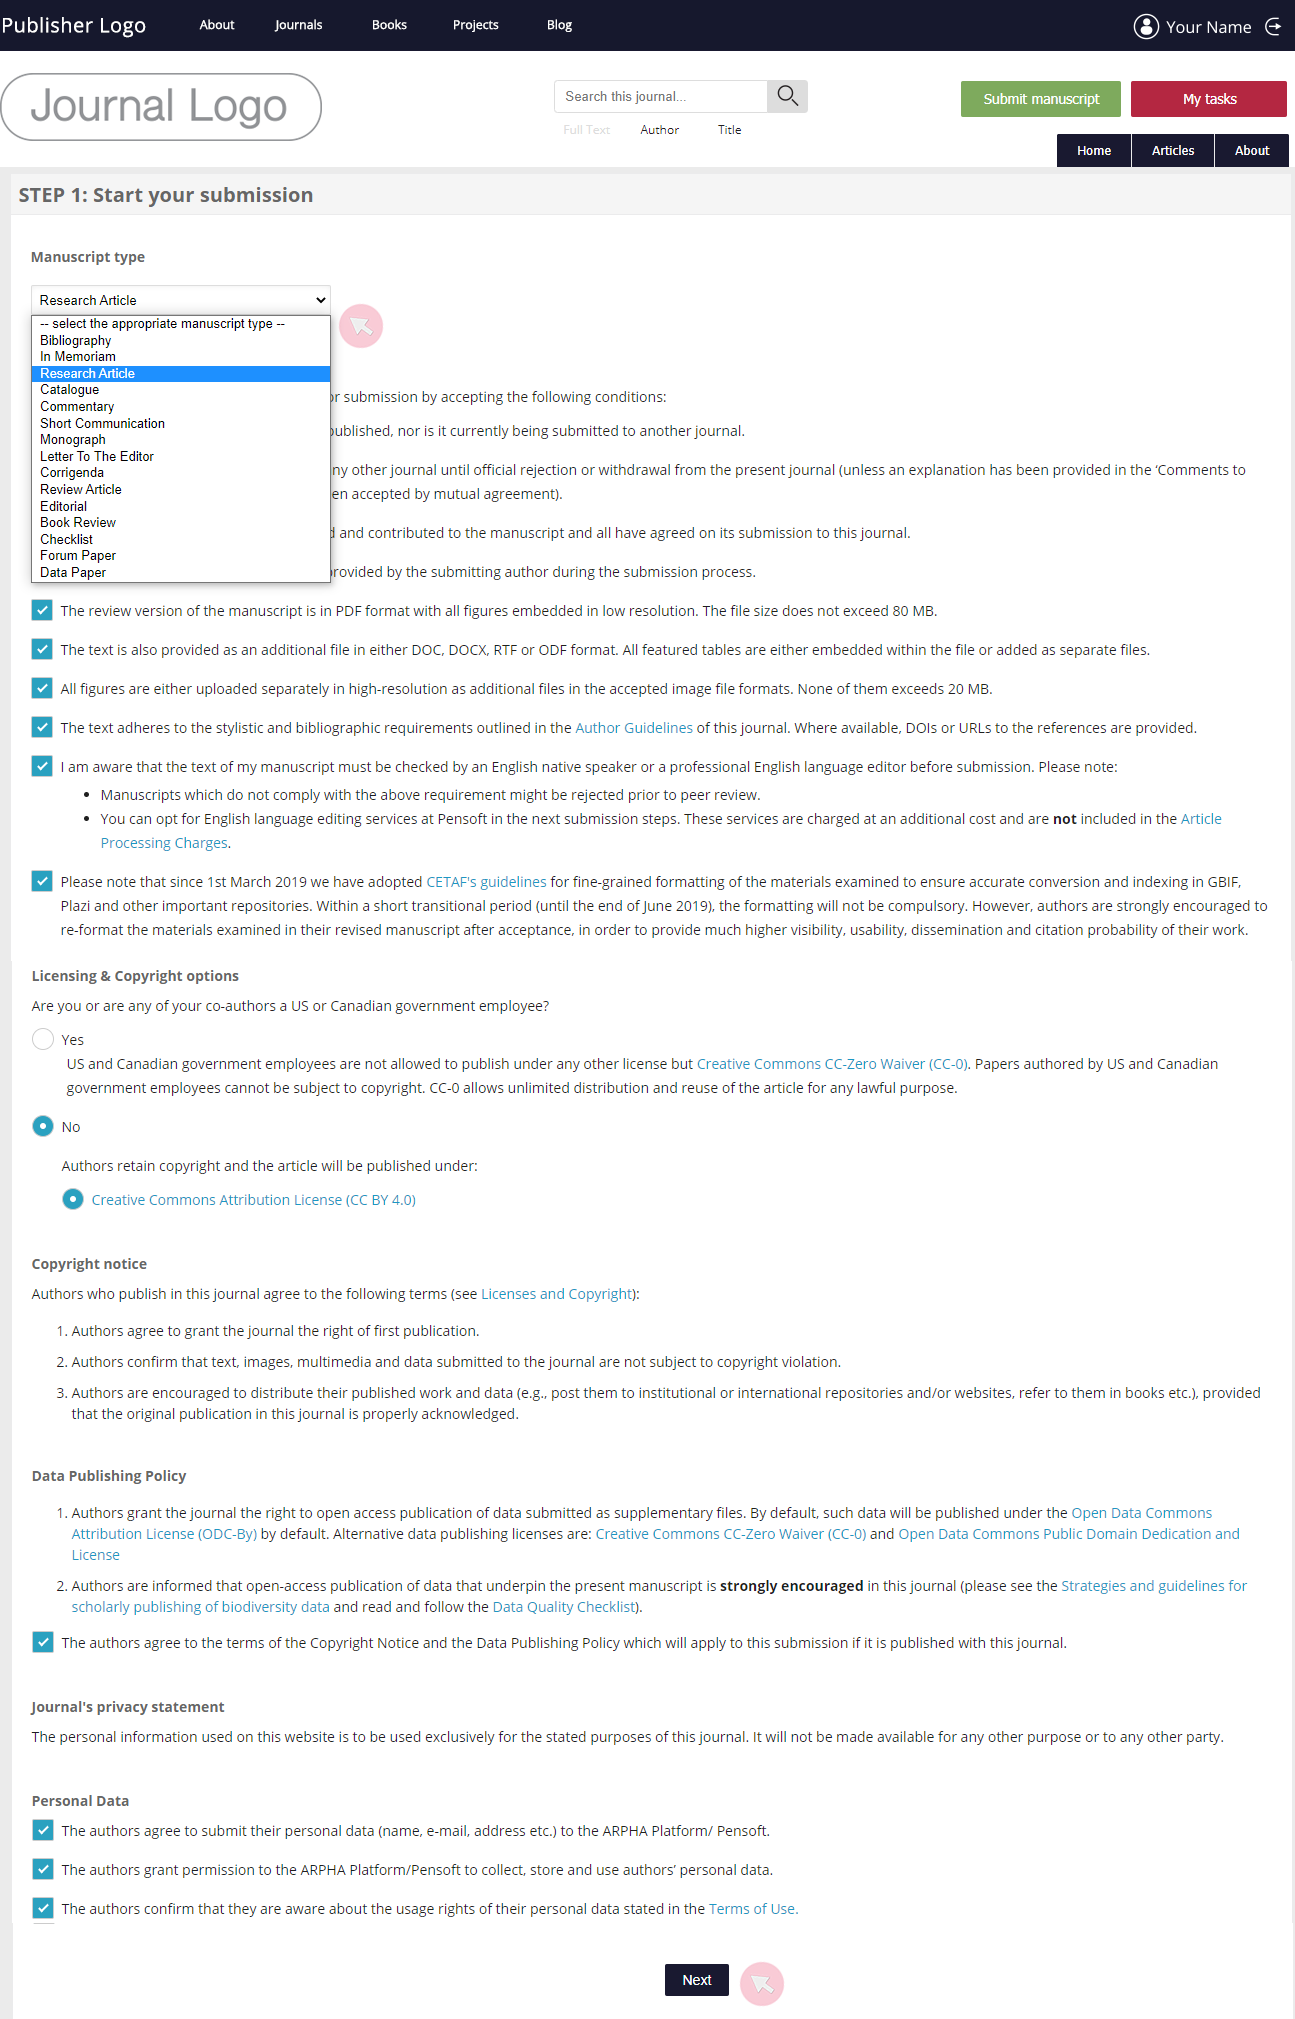
Note: To return to a previous submission step, click Back at the bottom of the page (any edits in the current step will be automatically saved), rather than the equivalent functionality button available from your browser. The latter may crash the submission, so you will need to refresh the webpage.
4 Your submission is only successful when you click the Finish button at the last step and receive the corresponding notification.

Note 1: In case you have assigned your manuscript to a Special issue (SI) / Topical collection (TC), your submission will need to be approved by the Collection editor before it proceeds to peer review. In case your manuscript is declined by the Collection editor, you will have the option to either submit it to a regular issue (you will not be required to go through the submission process again) or withdraw the submission from this journal.
Note 2: The co-author(s) as well as the author, will receive an email notification about the new manuscript submission, provided that they have been listed as authors by the submitting author during the manuscript submission process.
5 Access a list of your incomplete submissions from your author dashboard after login. Find them in the Incomplete manuscripts tab in the My manuscripts menu*. Use the clickable commands at the right-hand side to either complete or delete it.
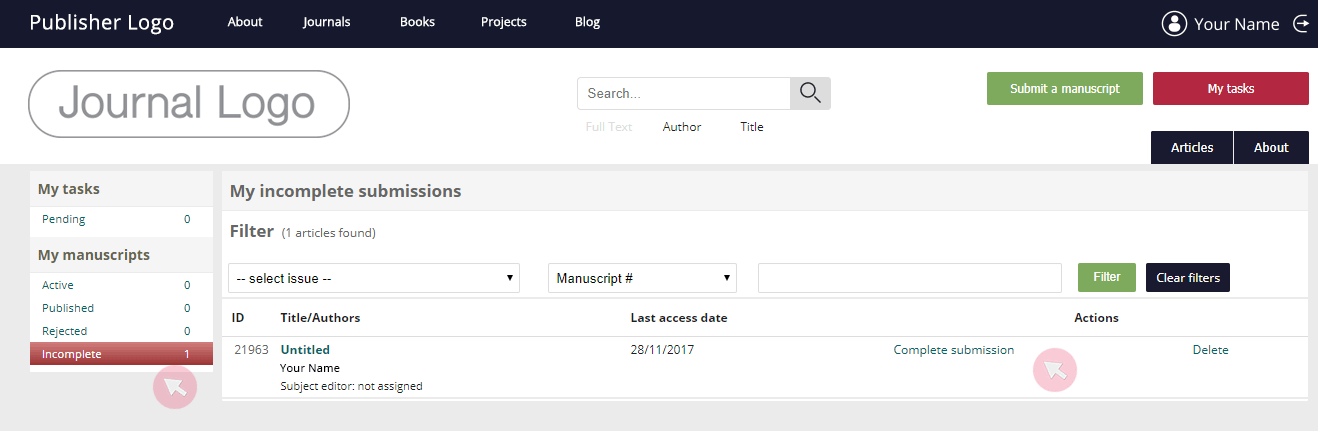
Note: All manuscript submission forms are automatically saved in the system until you submit or delete them.
*The menu is accessible from the My tasks button visible in the journal’s header. The button becomes visible once you start a manuscript submission or have been assigned with a task.
Submit a preprint
During manuscript submission, authors can opt to post their pre-review manuscript as a preprint on ARPHA Preprints.
Note: The integration with ARPHA Preprints is an opt-in service available to journals hosted on ARPHA. Please consult with the ARPHA Preprints website to ensure the journal of interest supports the preprint platform.
Tip: Go to the Manuscript submission form section below to learn how to complete your journal article manuscript submission.
1 Note your wish to post a preprint while completing the submission form for your article manuscript.
2 Familiarise yourself with the ARPHA Preprints’ terms of services. You will need to confirm that you agree with all of them before you proceed to post your preprint.
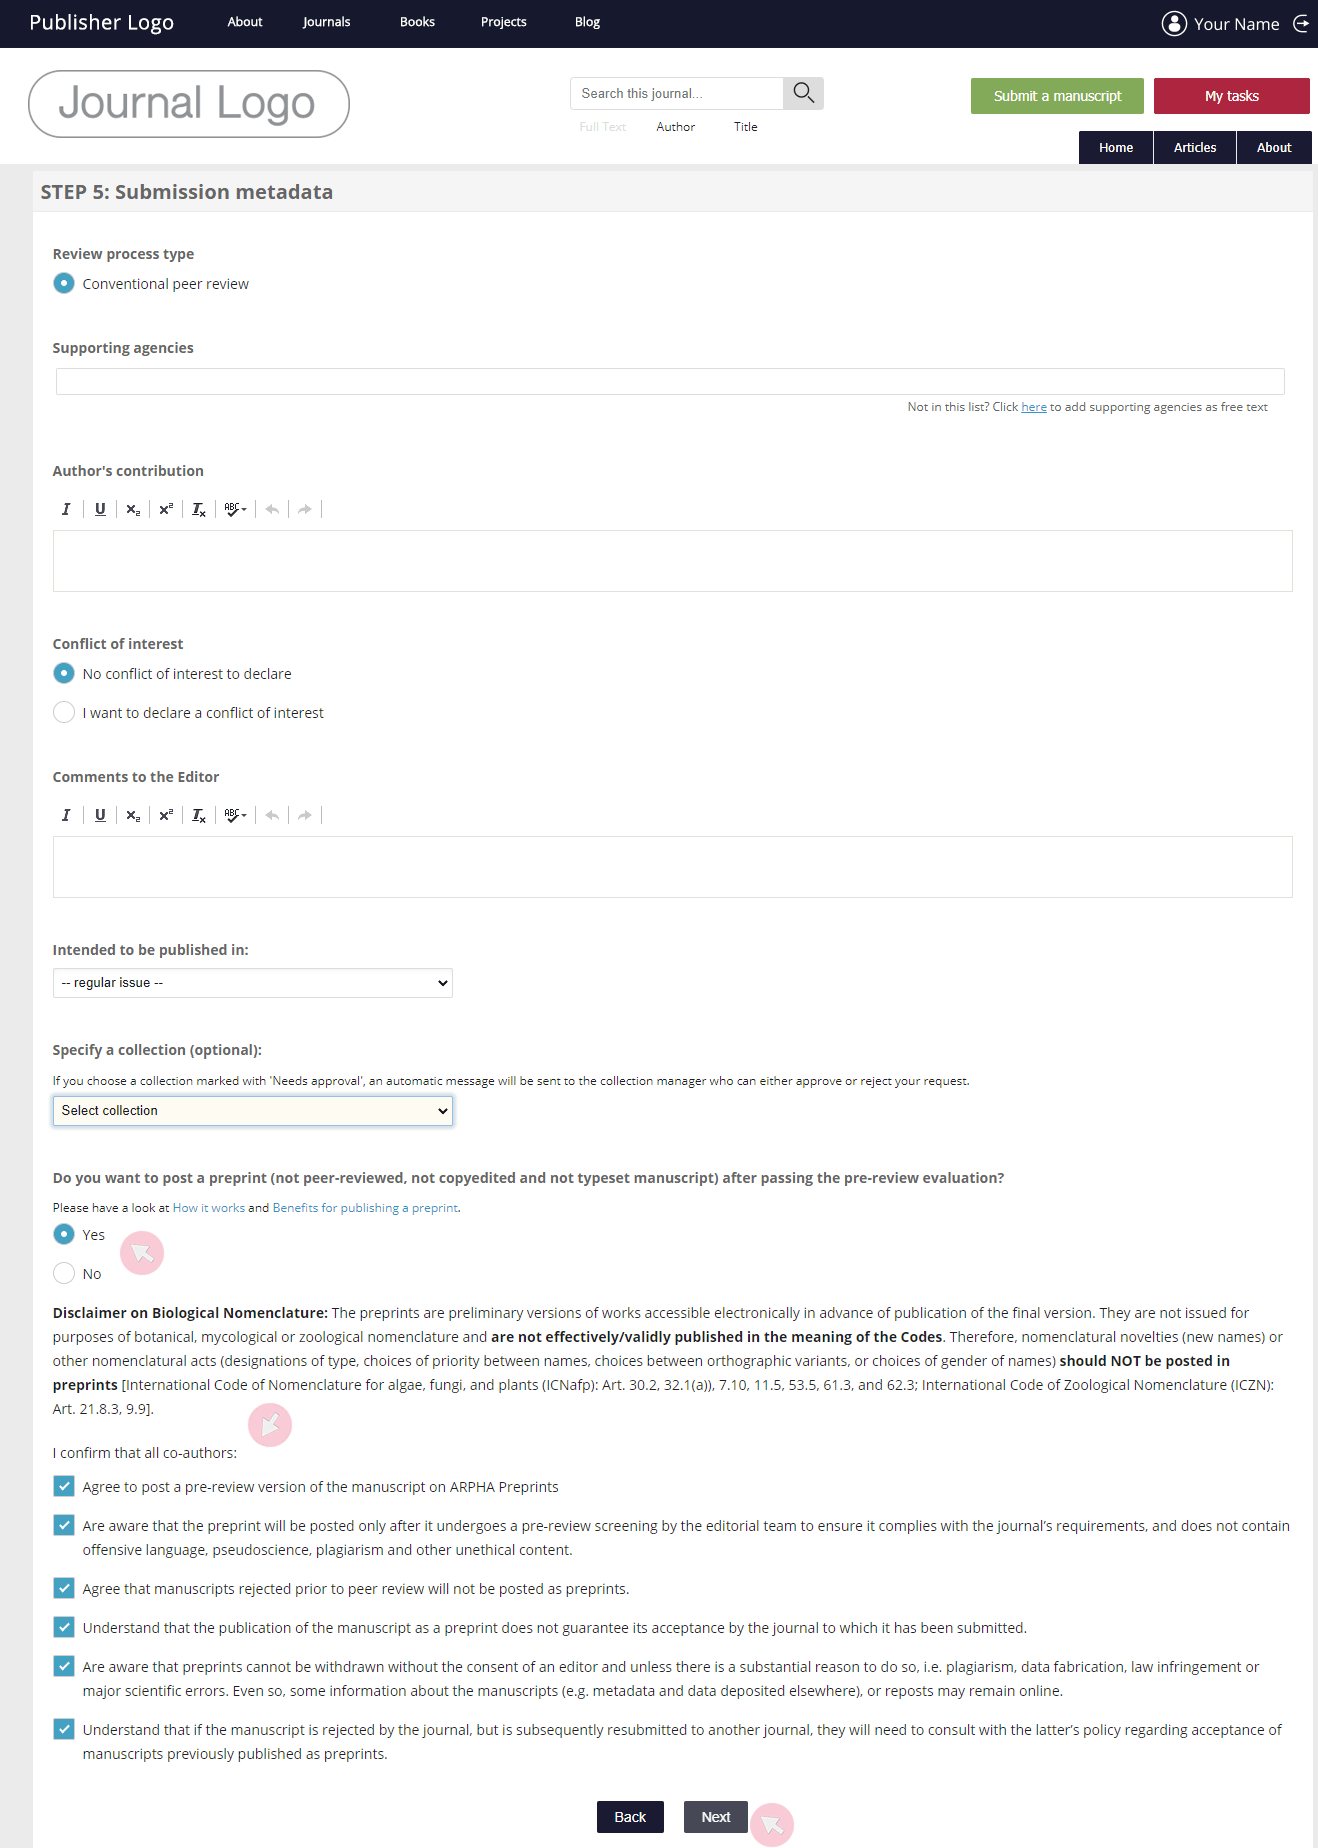
3 Upload your submission files as required. These are the files that will be used for both your preprint and article.
Note: Make sure that all figures are marked and captioned accurately. They will be listed at the bottom of your preprint.

4 Check and confirm the PDF file displayed. This is how your preprint will appear on ARPHA Preprints. If you wish to replace the file, either click replace to upload your own PDF file or go back to the previous step and resubmit your Word file.
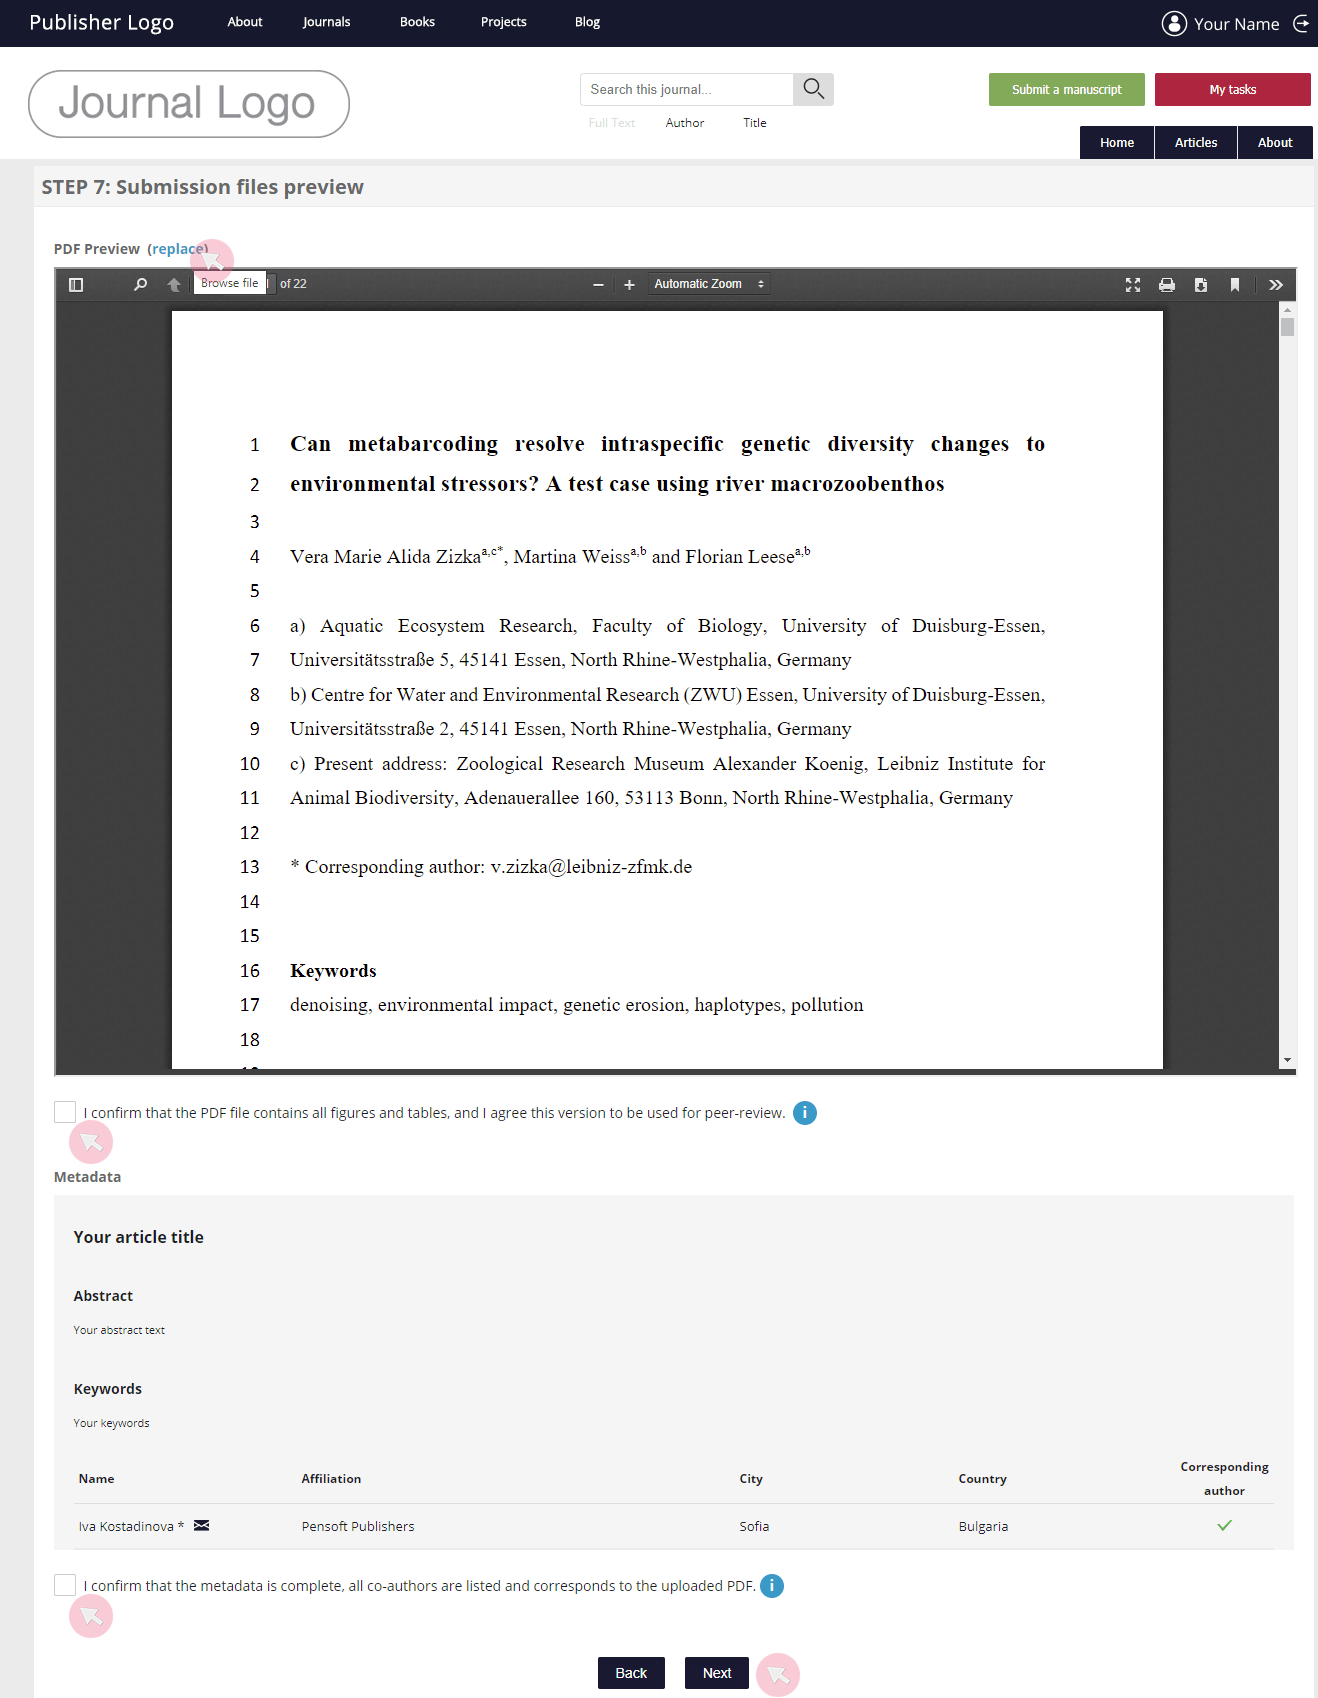
5 Once you finalise your journal article manuscript submission, your pre-review manuscript will be forwarded to the journal’s editorial office. Following a basic screening to ensure the submission complies with the journal’s requirements and does not contain offensive language, pseudoscience, plagiarism or other unethical content, your preprint will be posted on ARPHA Preprints, while your article manuscripts proceeds to peer review. Normally, this shall take between one and a few days. You will be notified via email once the preprint is posted.
Note: Even if the pre-review manuscript successfully completes the initial basic screening, the journal editor reserves the right to decline the preprint at his/her discretion, for example, on the grounds that the article type is not suitable to be posted as a preprint (e.g. editorial, commentary, obituary, corrigenda).
Manuscript submission form
1 Select the article type your manuscript corresponds to by using the drop-down menu and check/confirm that your manuscript is ready for submission in accordance with the journal’s format and conditions.
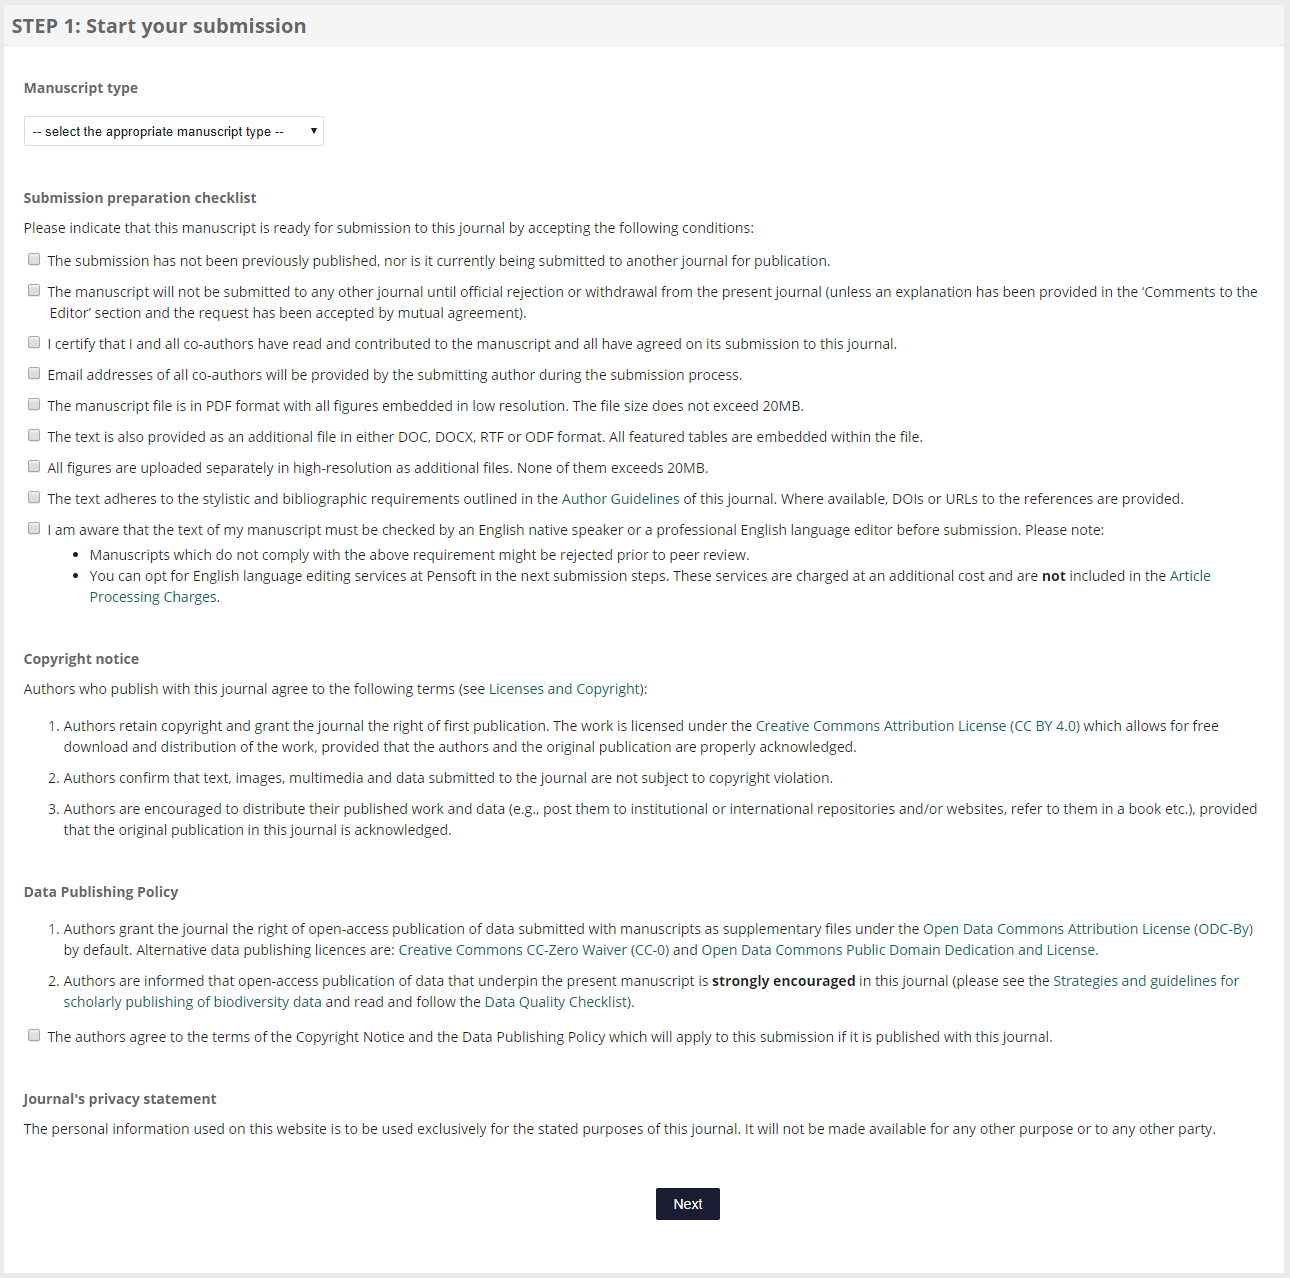
2 Select a payment option or request a discount / waiver and opt for additional services*. The Article Processing Charges (APCs) are invoiced once the manuscript is accepted for publication. Additional charges are invoiced prior to the provision of the additional service (e.g. language editing, Tailored PR campaign).
Note: Depending on the journal’s APC policy - some authors might be eligible for special discounts or waivers, e.g. if the submitting author is a society member. Please ensure that you note it here if this is your case. Otherwise, you will be required to make a full payment.
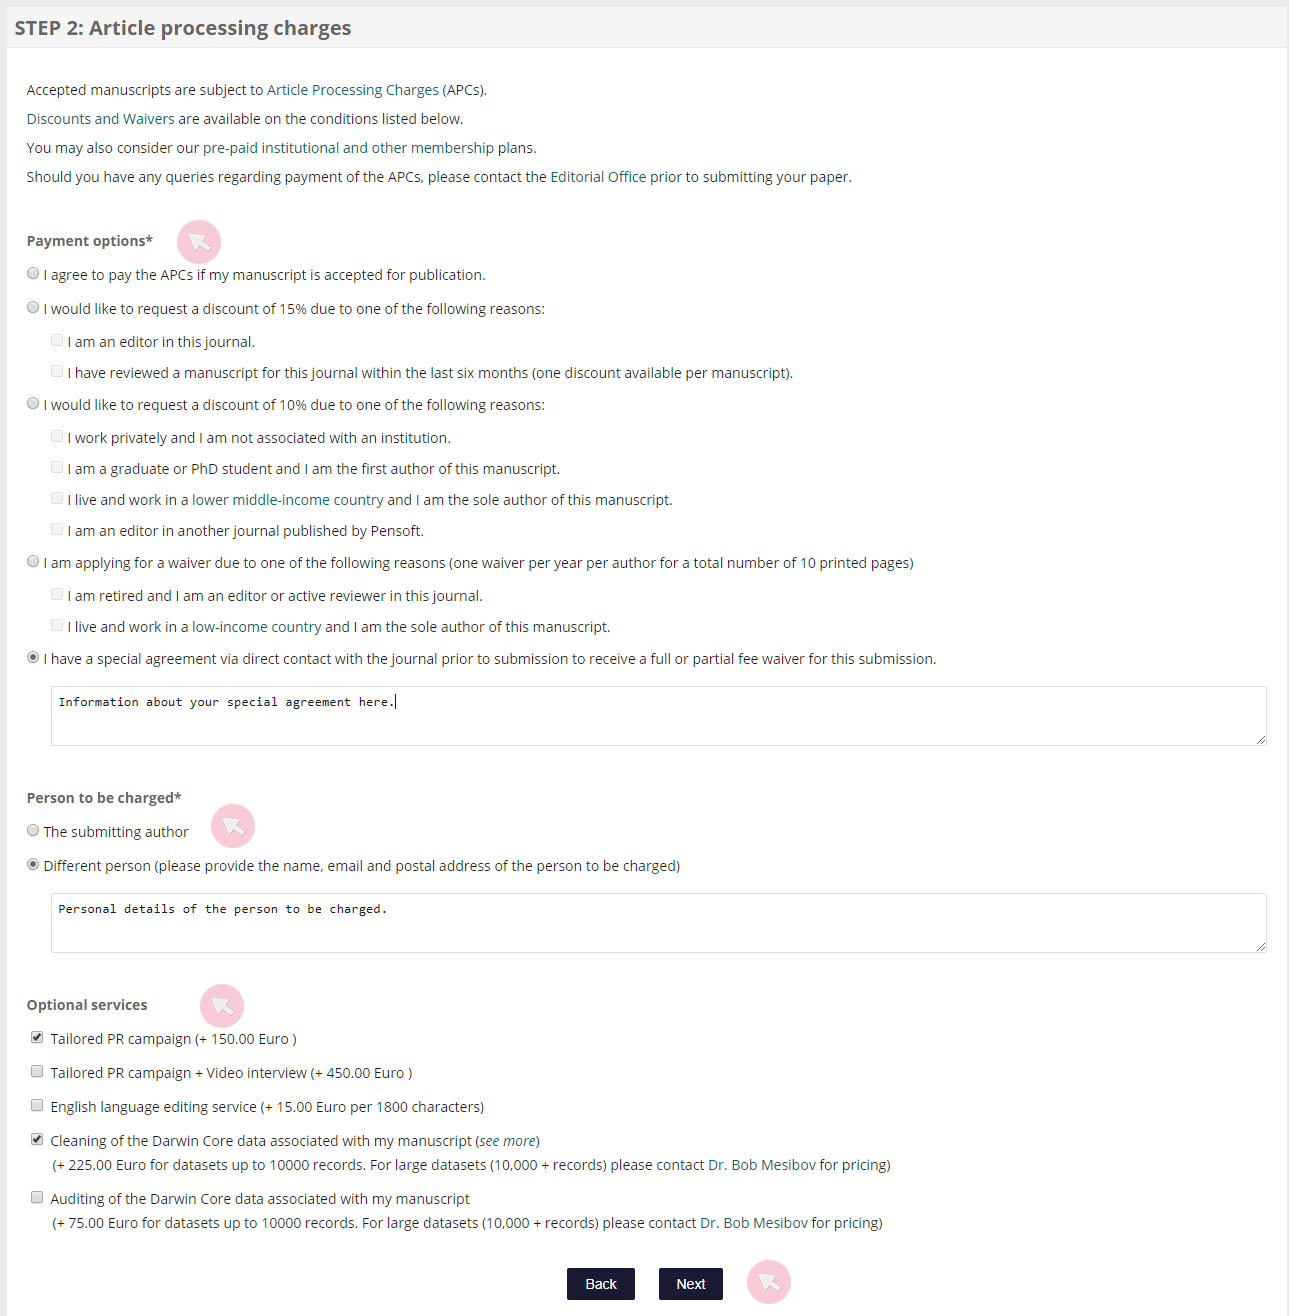
Note: In case you select to appoint another institution/person to be charged or state that you have a prior agreement regarding the charges, the system will generate additional text fields for you to provide more details.
*Subject to an extra charge shown in parenthesis.
3 Add your co-authors’ details and the article metadata (title, abstract and keywords) of your manuscript. These will comprise your paper’s metadata used for indexing once the manuscript is published.
- To add a co-author, type in his/her name or email in the text box provided. A list of ARPHA-registered users matching the query will appear. If the user you are searching for is present in the system, click Add to list. If not, use the Add a new author button at the bottom to create a new user and add him/her as a co-author.
- To re-order the authors list, use the arrows at the left-hand side or drag and drop the author’s name.
- Click the pencil icon to update an author’s personal details (e.g. name, email, affiliation(s), city, country and link to an ORCID iD).
- Click within the Author contributions (CRediT roles) box to see the list of contributor roles as available from the CRediT's Contributor Roles Taxonomy. You may assign the most suitable one for each of the paper's co-authors (if the CRediT Contributor Roles feature is available at the journal).
- Click the academic hat icon to make one of your co-authors the submitting author and let this person handle* the manuscript from now on.
- Use the check boxes in the Corresponding author column if an author other than yourself is to be listed as such in the published article.
- Click on Appoint as submitting author in the Authors section to change the submitting author.
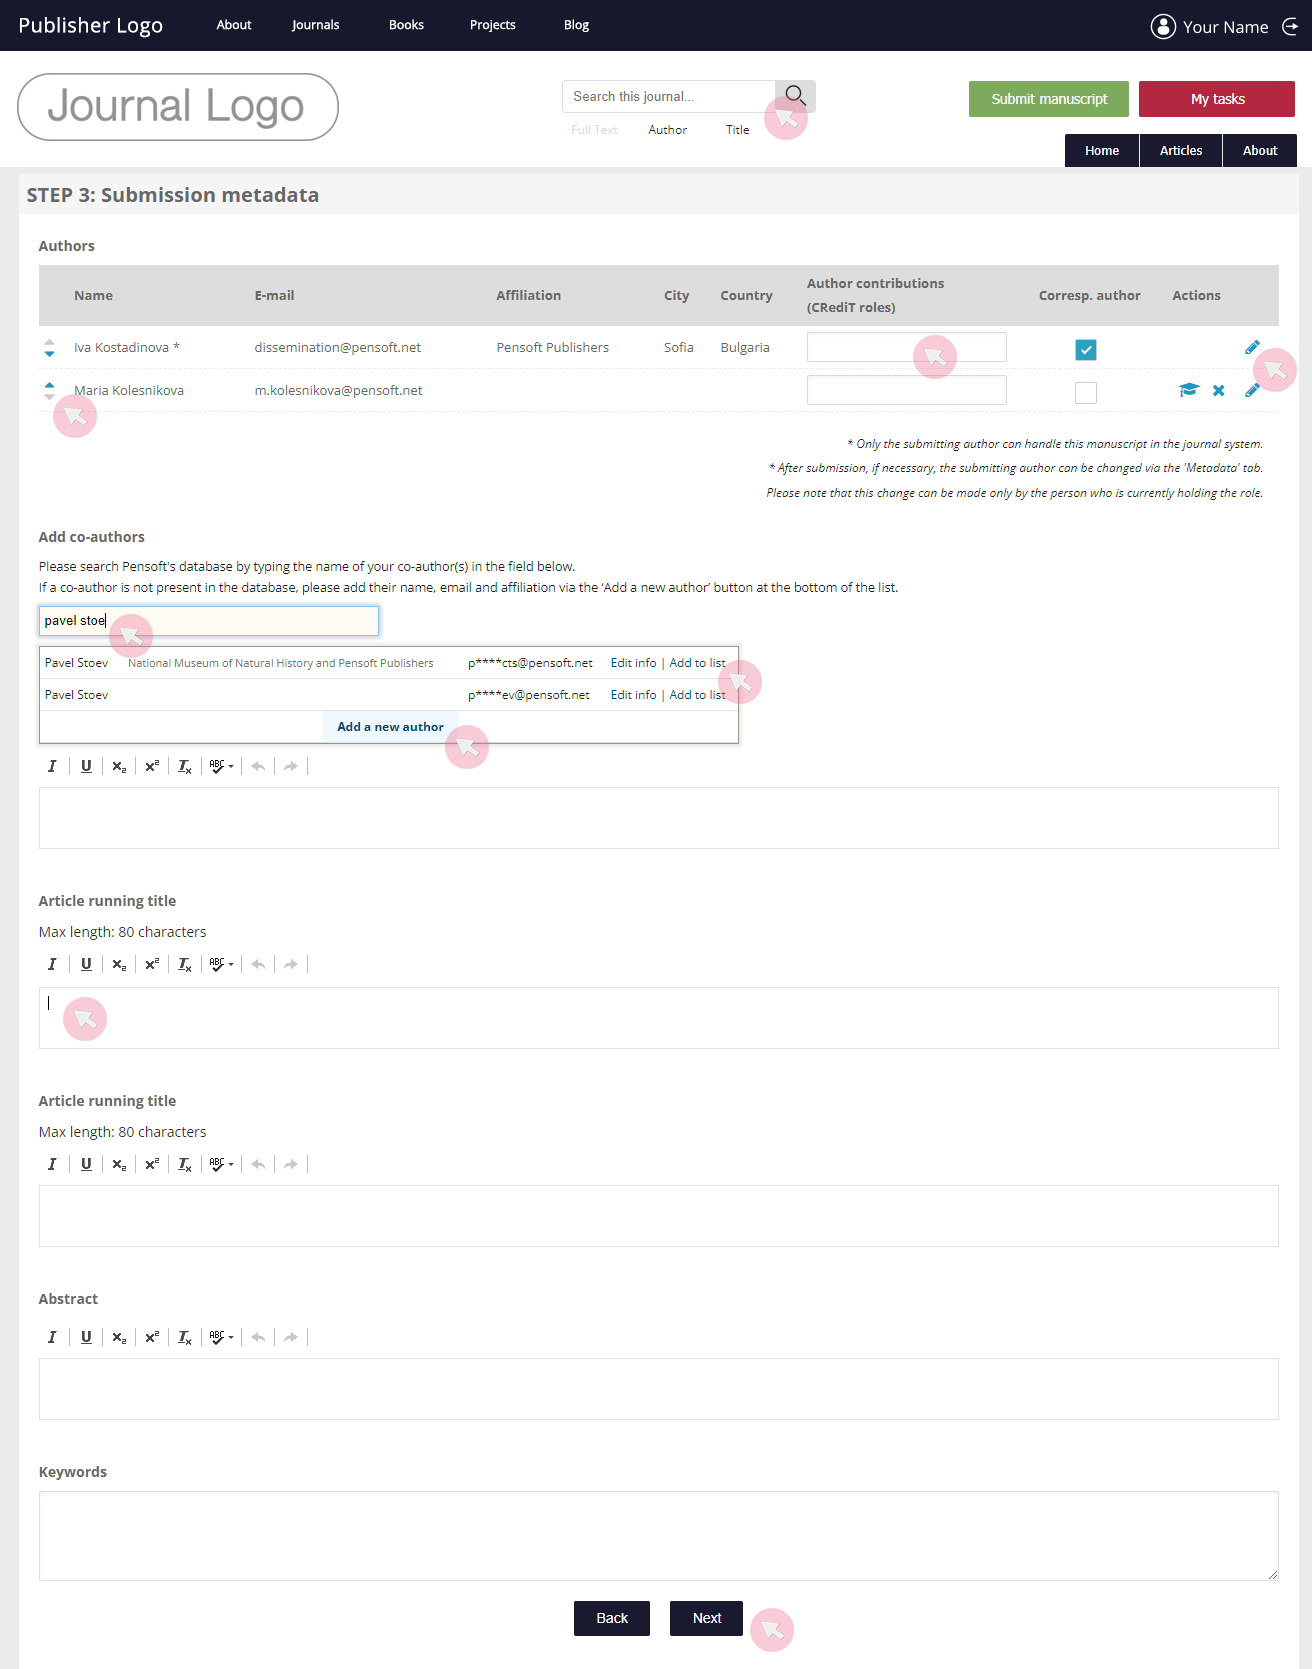
*Only the submitting author can handle the manuscript in the system. If you re-delegate the role to an author other than yourself, you will no longer be able to submit revised versions / proofs. It is only the submitting author who can assign another co-author as a submitting author.
4 Assign classifications categories for your manuscript using the hierarchical classification trees. These will comprise your paper’s metadata used for indexing once the manuscript is published. Use the plus (+) symbol on the left-hand side to access the sub-categories or type in the text field. Check as many boxes as necessary.
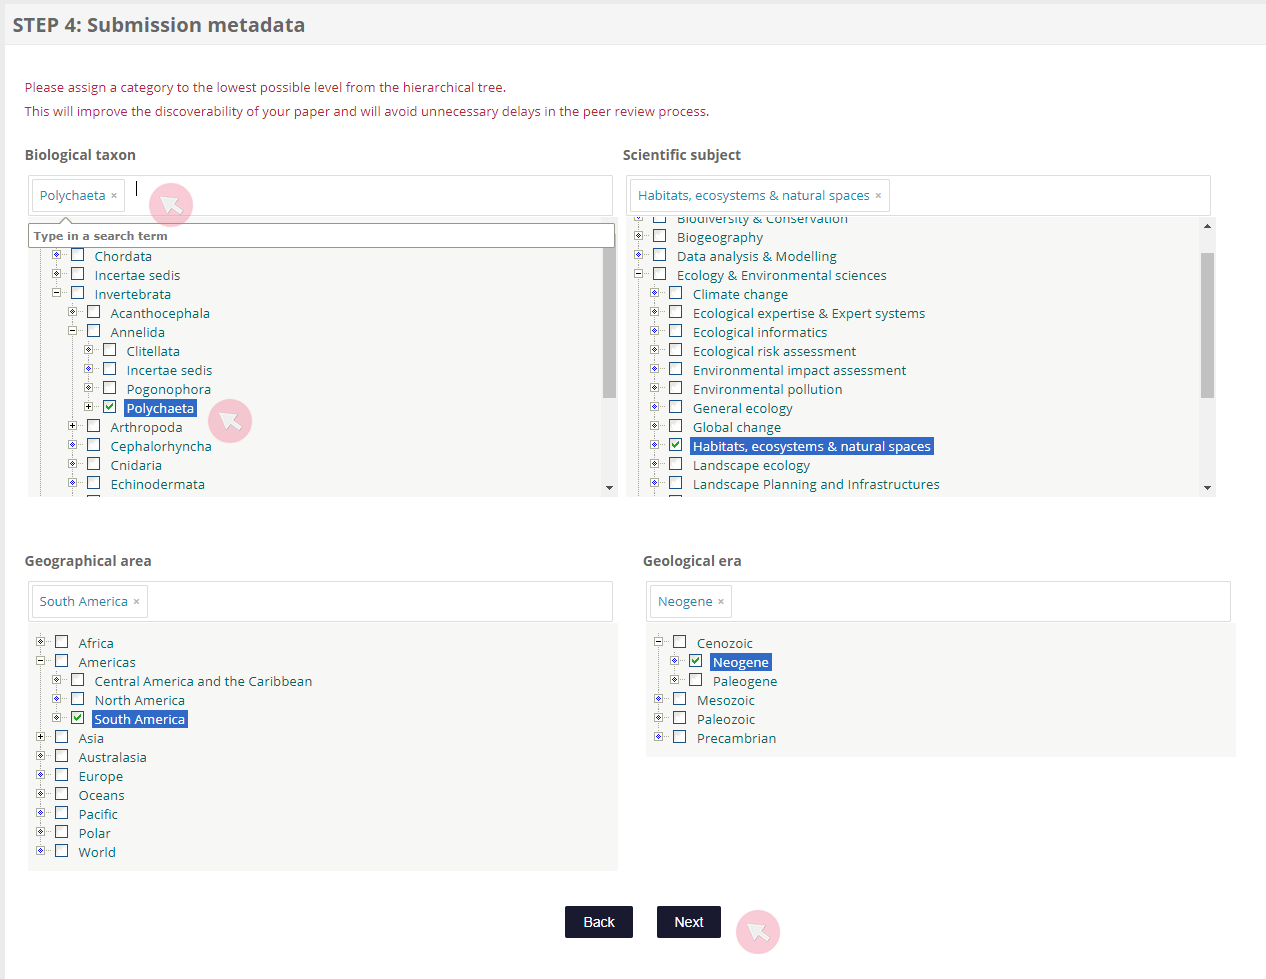
Note: We strongly recommend that you select the lowest possible categories and unselect the higher classifiers as it will facilitate and expedite the peer review process and put your published articles in the right context for better discoverability and indexing.
5 Select the type of review process (if applicable) and provide additional information to complete the metadata of your manuscript used for indexing once the manuscript has been published.
- Mark any supporting agencies, authors’ contributions and potential conflicts of interest in the corresponding fields. Please note that these texts will appear unaltered along with your article if the latter is accepted for publication.
- Leave your comments to the Editor. Note that these will appear along the manuscript submission files while being processed in the system. Your comments will be visible to the journal editors.
- Use the drop-down menu at the bottom of the page to submit your manuscript to an already existing special issue.
- You can opt to post your manuscript as a preprint on ARPHA Preprints, following a basic in-house screening. For more information, visit ARPHA Preprints. Note that the ARPHA Preprints integration is only available to ARPHA-hosted journals that have explicitly requested to be opted in for this service.
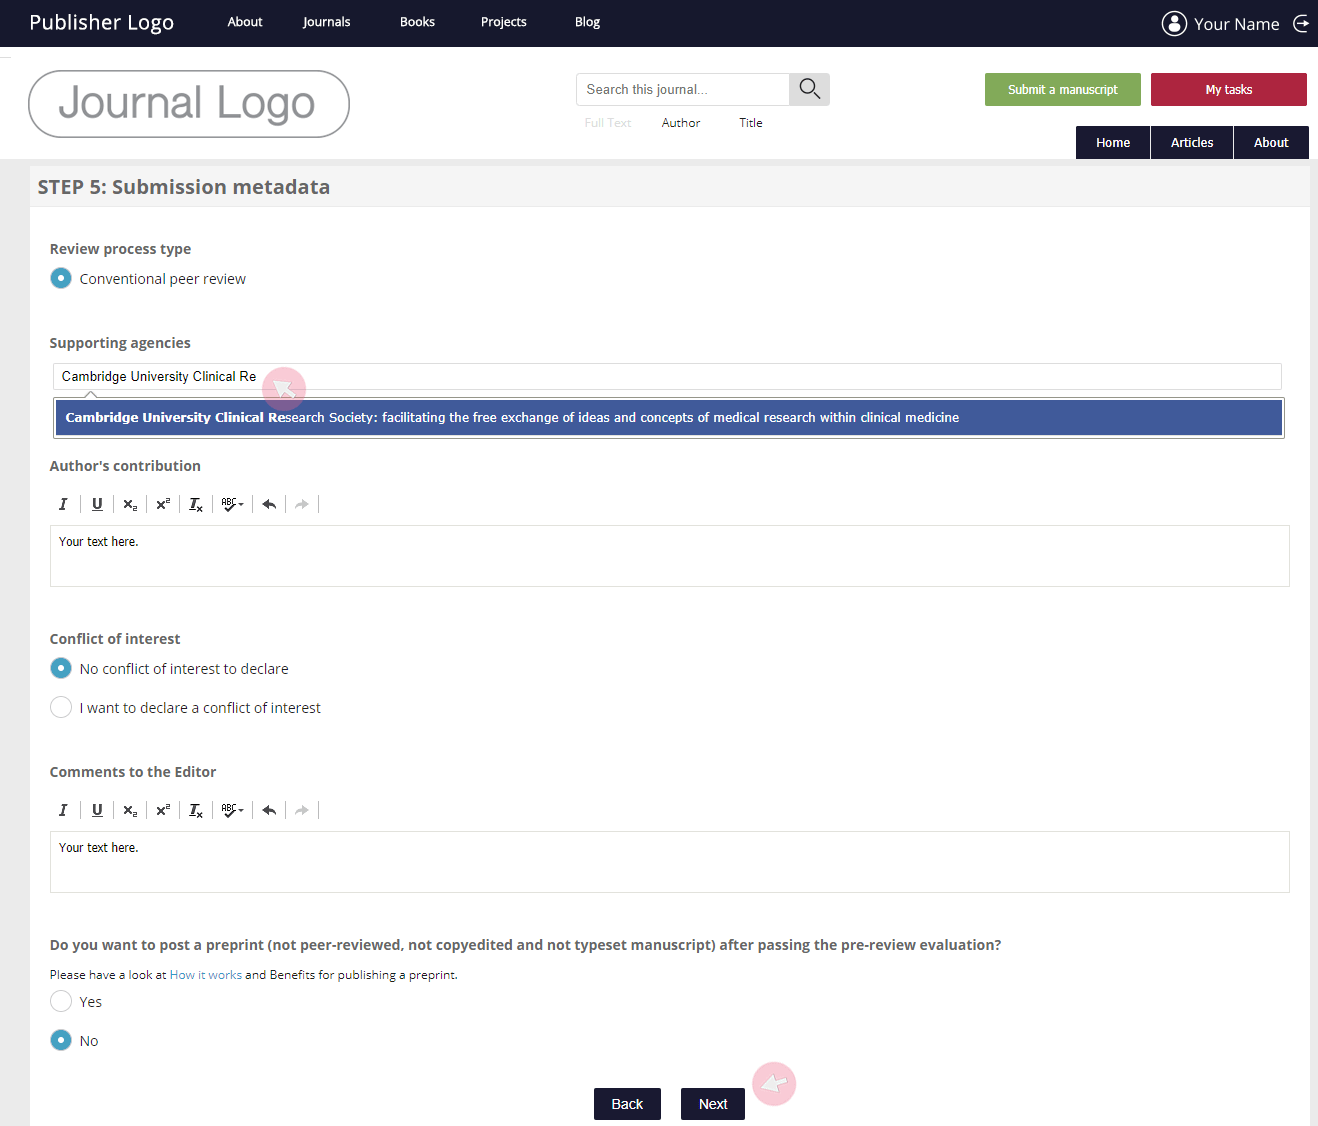
6 To upload your submission files, make sure that they comply with the requirements noted within each section.
- Click within the Upload Word file here space to browse the files on your computer and upload your manuscript. Alternatively, drag and drop the file. You are recommended to include within your Word file all featured figures (in low resolution) and tables, along with their captions. This copy will be used by the reviewers and as a preprint, if you opt to post your manuscript as such on ARPHA Preprints. Once the file is uploaded, you can replace it by uploading a new file in the same manner. To download the file, click on its File name.
- To provide your figures in high resolution, upload each as a separate file by clicking in the Upload Figures here space and browsing your computer files. Alternatively, drag and drop the files.
- Click in the Article thumbnail space to browse your computer files and upload an image that you would like to be displayed next to your paper’s title when appearing in article lists.
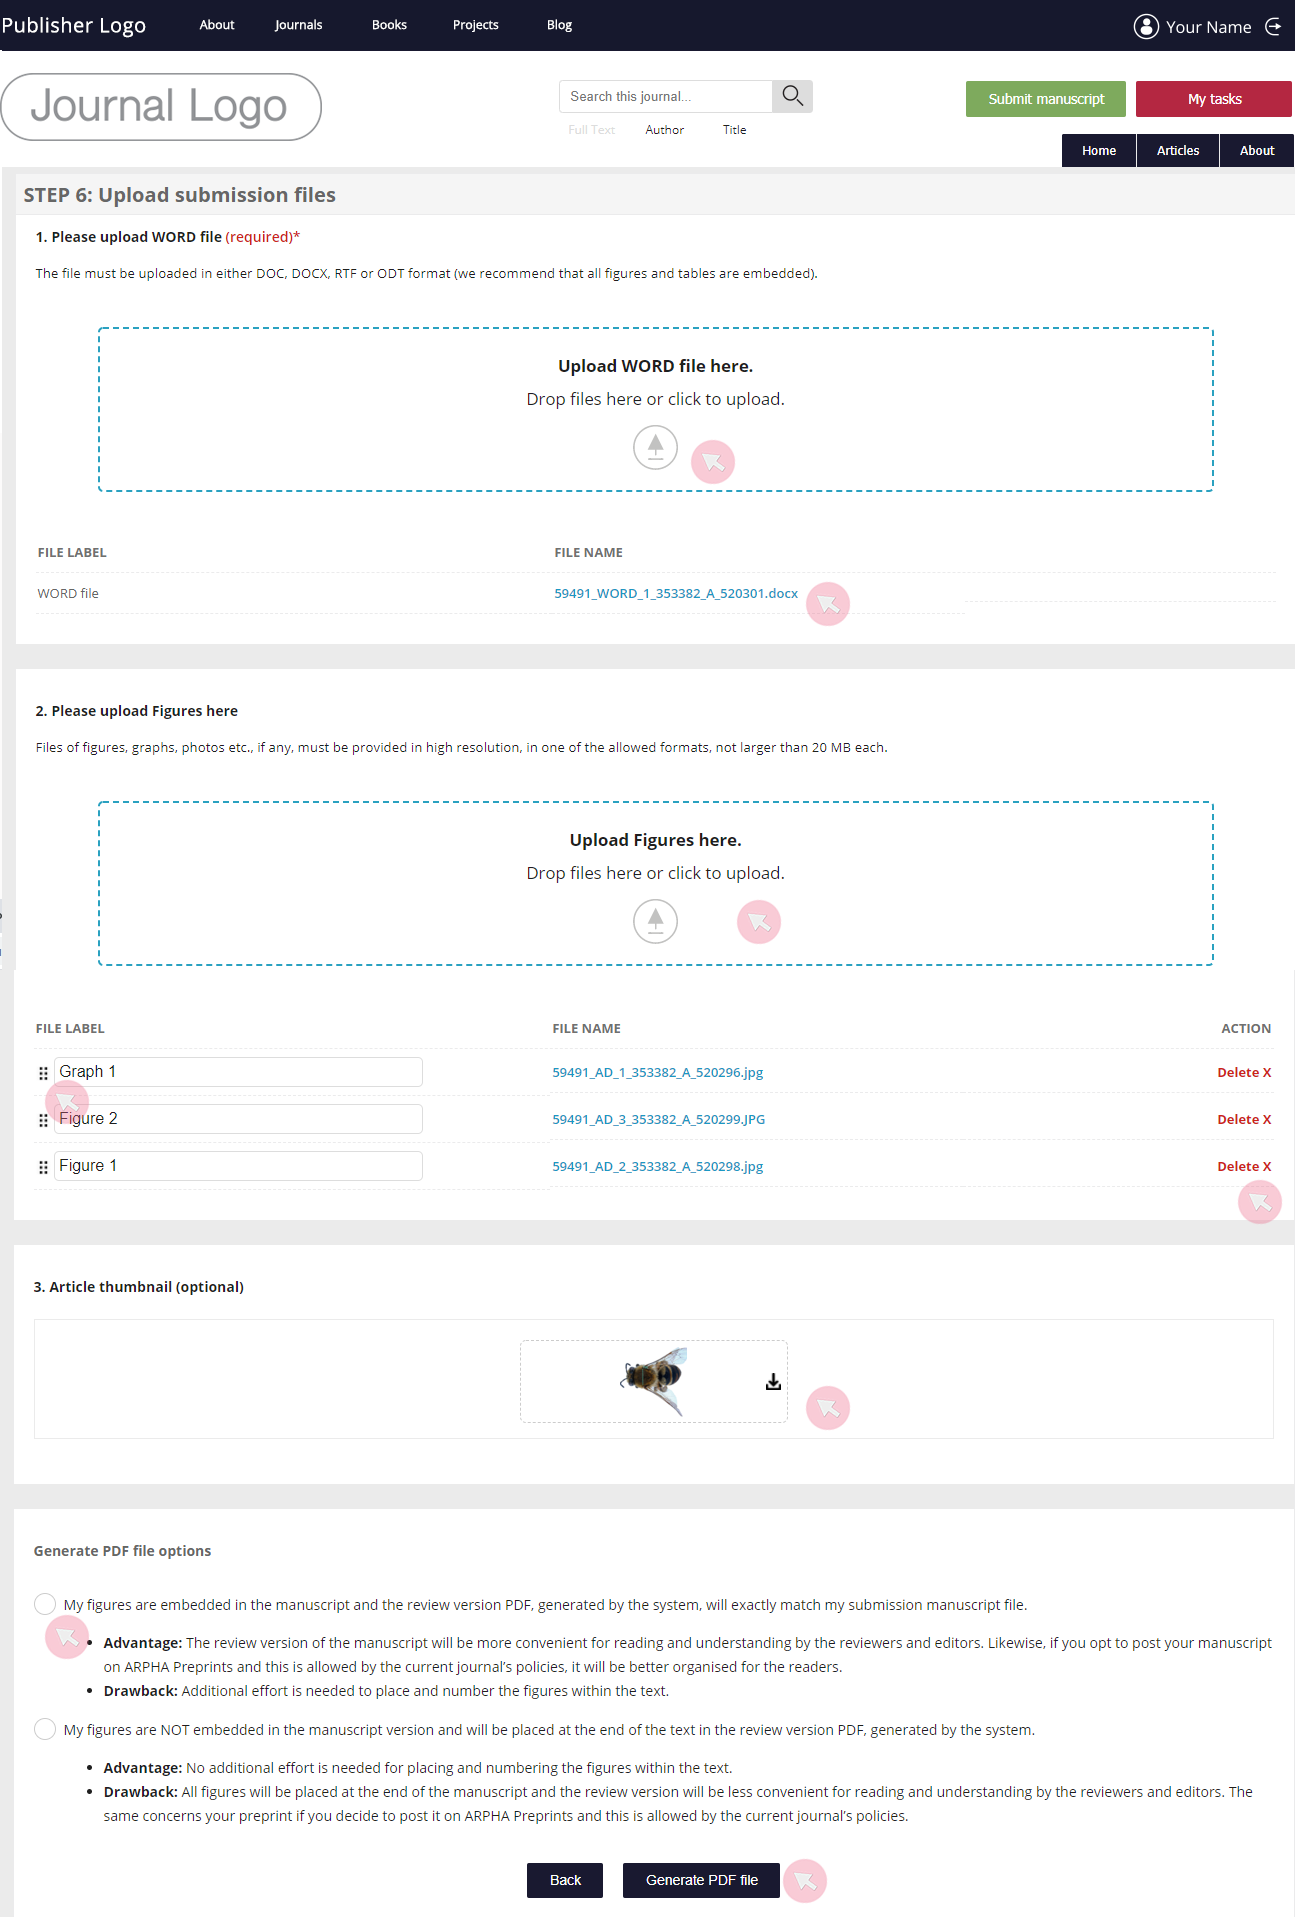
Note: Once you upload a file, it will appear in a list. Type in the text boxes below File label to name each file. Click on the dots on the left of any file and drag it up / down to change the order of your files. Use the clickable Delete on the right to remove any of the uploads.
Note 2: In journals operating a double-blind review process, authors need to remove all personal information from the submission files meant for review and production. They also need to provide a separate Cover file for the use of the handling Subject editor only. This file needs to contain*:
- Collection (if any)
- Manuscript type
- Manuscript title
- Author names with an indication of the corresponding author
- Author affiliations
- Emails
- ORCIDs
- Data availability statement
- Authors contributions
- Acknowledgements
*Please consult with the author guidelines on the journal’s website to see a full list of the specific details required by the journal at which you are submitting.
7 Review the PDF file of your submission along with its metadata. Tick both checkboxes to confirm that the text and figures displayed are ready to proceed to peer review and that the metadata contains the necessary details for all authors. You can replace the PDF file with your own version by clicking Replace at the top.
8 Click Add a supplementary file to upload the files from your computer one by one. Click Next to proceed with your submission without adding supplementary files.

In the new window, fill in the form and upload the file. Click Save to either upload more files, or proceed with the submission of your manuscript.
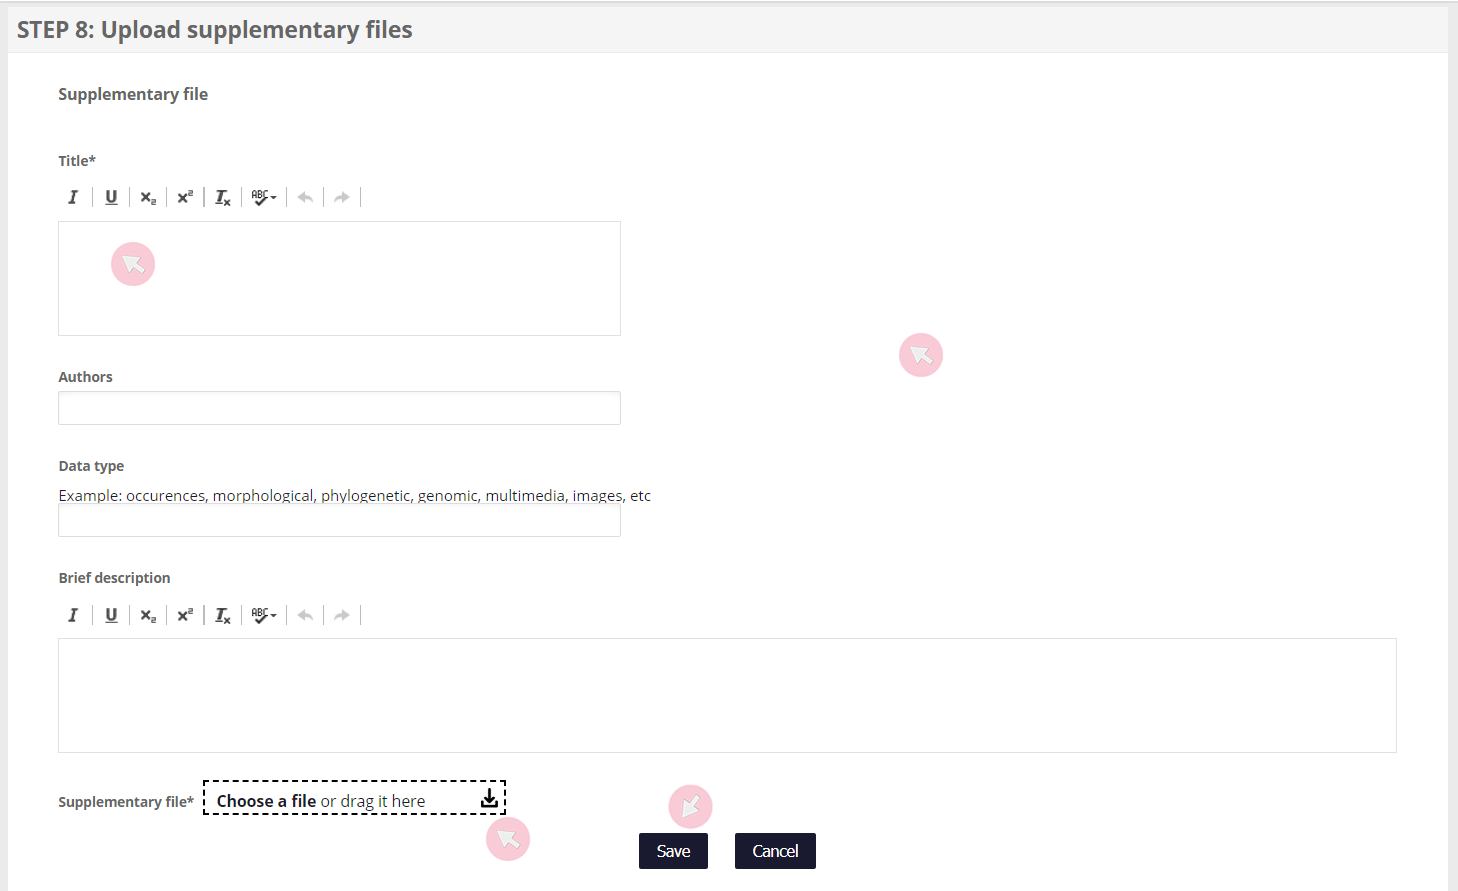
When you upload and save a supplementary file, it will appear in the list as shown below. Note the Edit and Delete actionable commands on the right-hand side. When ready with all your supplementary files, click Next.

9 Suggest reviewers by inserting their name/email address. As you type, a drop-down list of ARPHA-registered users matching the search query appears. If the person you are searching appears, click Add to list. If not, scroll down the list and use the Add a new reviewer button at the bottom to create a new user. Remove selected users by using the clickable command in the Action column.
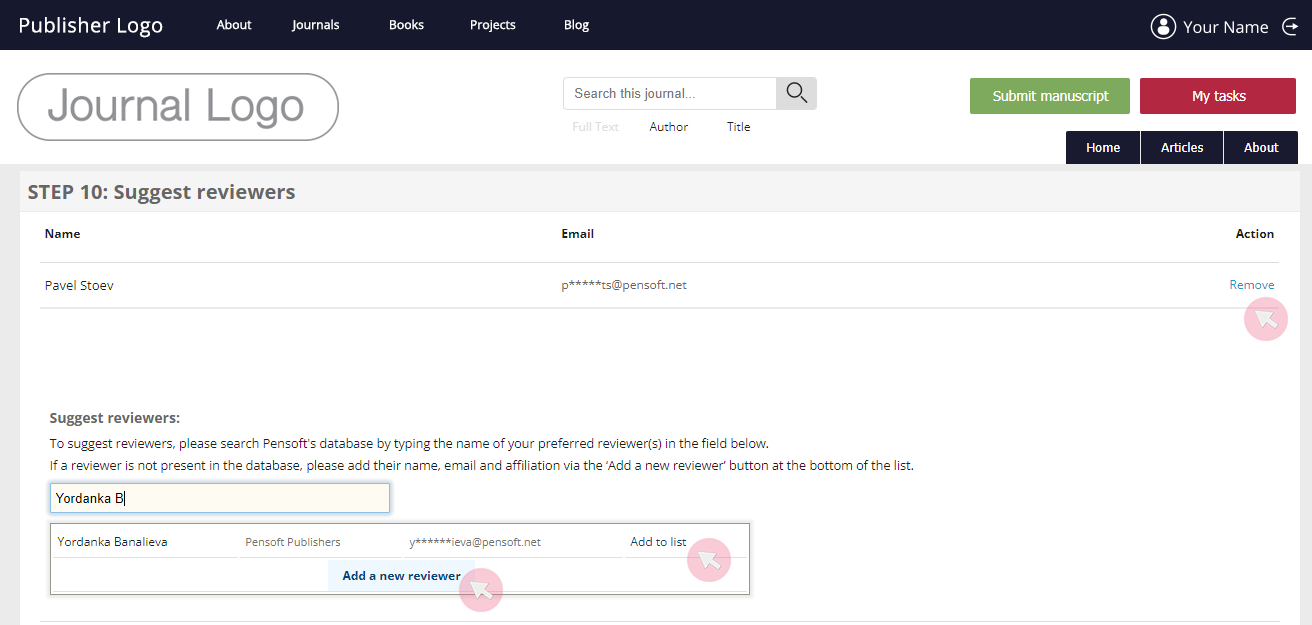
Note: This step might be mandatory, depending on the journal’s terms and policy.
10 Finalise the manuscript submission.
Re-submit manuscript prior to peer review
The Editor may return your manuscript for corrections prior to peer review on the occasion that your manuscript does not fully comply with the journal’s policy and standards. Ordinarily, the reason would be minor technical issues, e.g. noncompliant image format or missing metadata.
If this is the case, you will receive an email notification via the system asking you to submit a corrected version.
1 Use the link from the email to access your manuscript submission. Alternatively, find it in Active in the My manuscripts menu and click on its title.
You can find the note from the editor explaining the reason(s) your manuscript has been returned in the Current status tab.
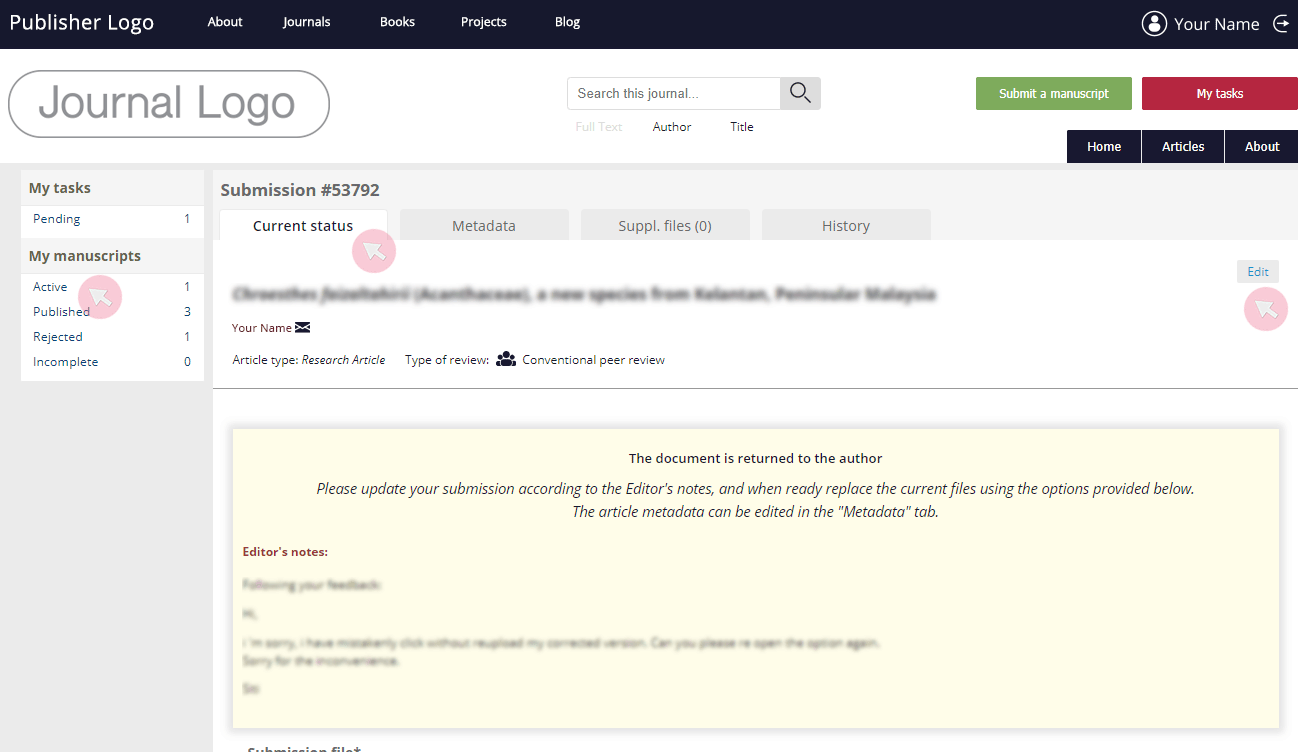
Note: You can edit the metadata and/or the supplementary files in the tabs on the left. However, you can only send the revised submission back to the editor in the Current status tab using the Submit corrected version button at the bottom. See how to update your metadata and supplementary files in the section Author -> Submission form in this manual.
2 Scroll down to access your Submission file (i.e. the PDF file containing your manuscript along with all figures, graphs etc.) as it appears to reviewers.
In the Additional files section, you can find and edit the files of your submission uploaded separately for the use of the production team.
- Replace your submission file from the Action column on the right.
- Delete any of the additional files using the command in the Action column on the right.
- Upload a new additional file by typing in a title in the File label text box. Once you do so, the Upload additional file button will become active. Use it to find and upload the necessary file from your computer.
- Re-order any of the additional files by clicking on the dots on the left and dragging it up / down the list.
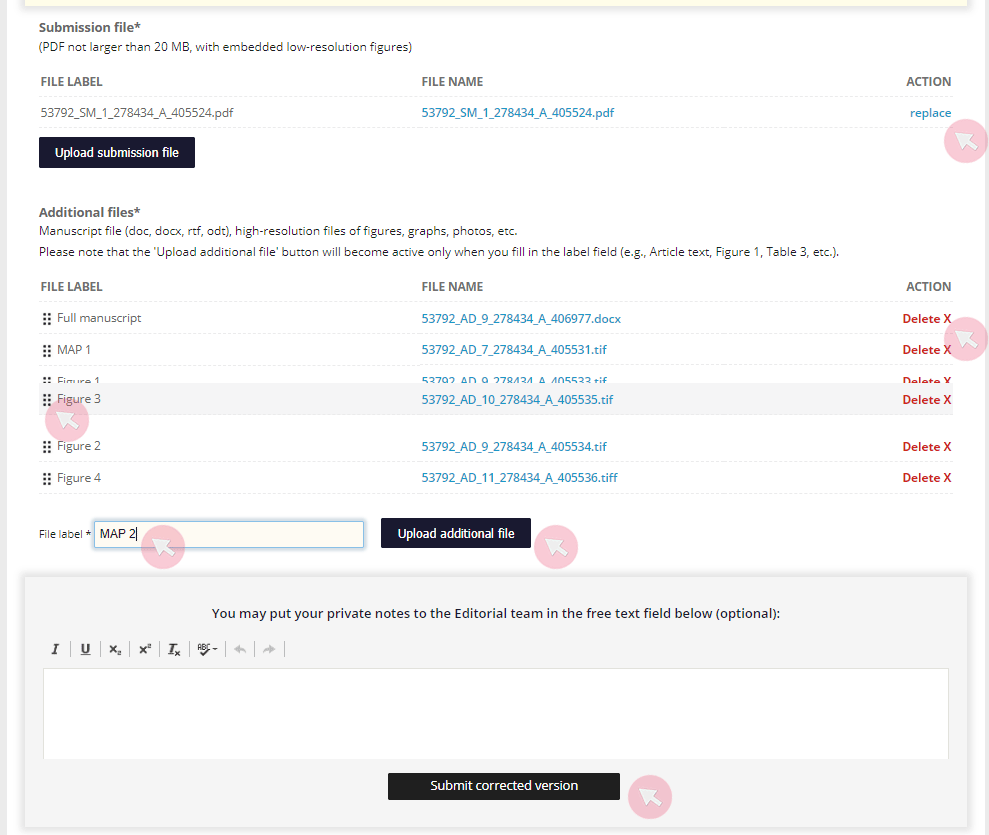
Note: Once you re-submit your manuscript, its status will change to Pre-review evaluation and you will no longer be able to edit your submission.
Edit manuscript metadata
The metadata of a manuscript are details used for indexing once an article has been published. Well-compiled metadata facilitate the discoverability and proper indexing of an article when published. During the processing of the manuscript, these data are used when assigning subject editors and inviting reviewers.
Note: You will only be able to edit the metadata of your manuscript prior to its assignment to a Subject editor and after the conclusion of a review round. You will not be able to make any further changes during a review round or after submitting a proof for production (layout).
1 Locate your manuscript in the Active tab of the My manuscripts menu. Click on its title to access the submission.

2 Go to the Metadata tab and use the Edit within each section to:
- change the article title;
- change the Corresponding author and/or the Submitting author*;
- add/delete authors**;
- re-order authors;
- edit the abstract/keywords;
- edit assigned classifications;
- edit the Supporting agencies/Authors contribution/Conflict of interest sections;
- re-assign the paper to a different journal issue;
- upload an article thumbnail.
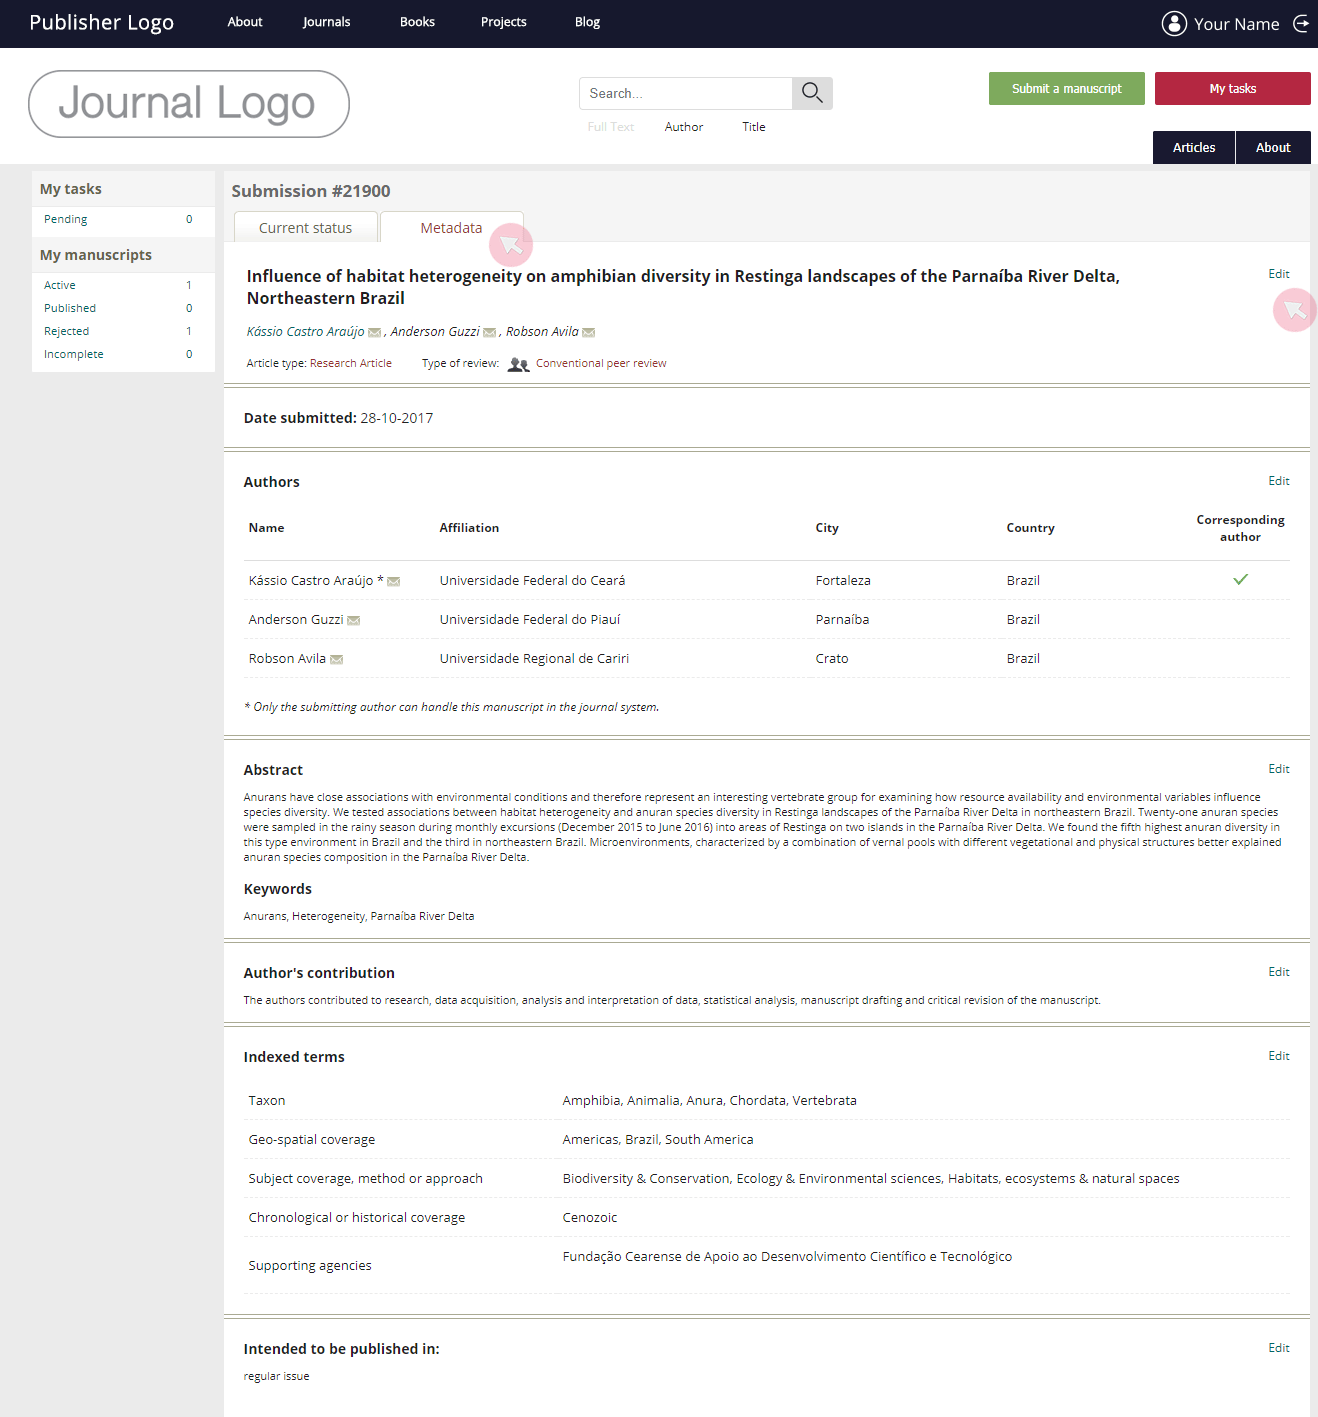
*It is only the submitting author who can assign this role to a co-author. Once a submitting author re-delegates the role, he/she will no longer be able to submit revised version or proofs.
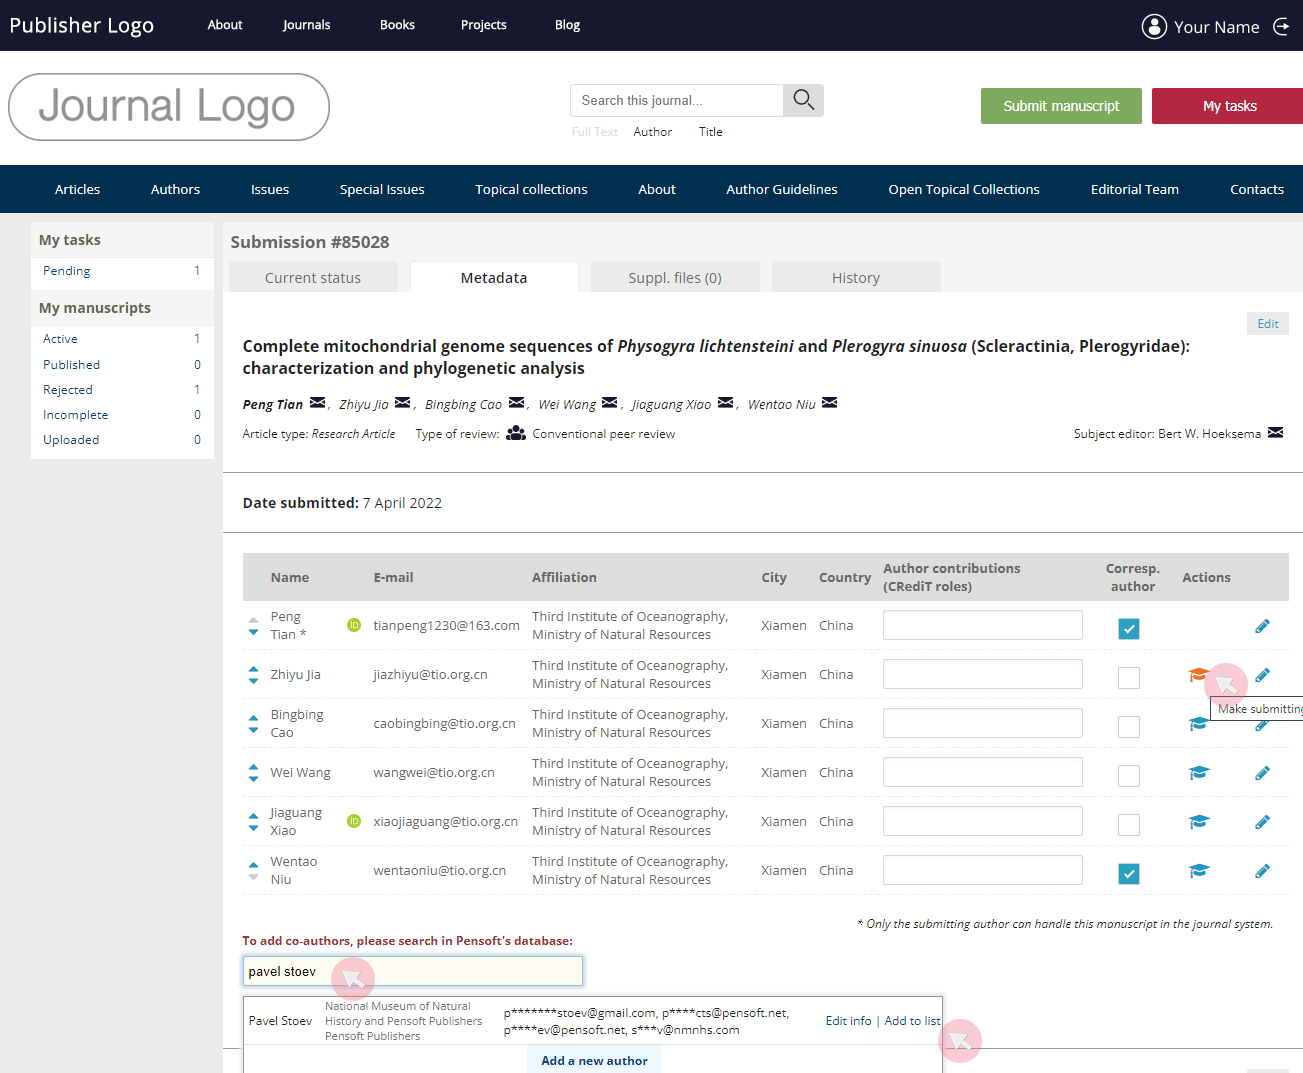
**As you type in a user’s name or email, a drop-down list of ARPHA-registered users matching the searched text string will appear. If the user you are searching for is present in the system, click Add to list. If not, use the Add a new author button at the bottom of the list to create a new user and mark him/her as a co-author of a manuscript.
To add a thumbnail, which will be displayed alongside the headline of your publication when it appears on the journal’s website, newsletter, social media etc., scroll down the Metadata tab. Click within the box to browse the files on your device and select an image.
Once you click Open, you will be able to crop and reposition the selected image, so that it fits in the square frame. Then, it will load to replace the cross seen in the screenshot. Alternatively, you may click the Generate cover button to generate a word cloud from the words used in your manuscript.
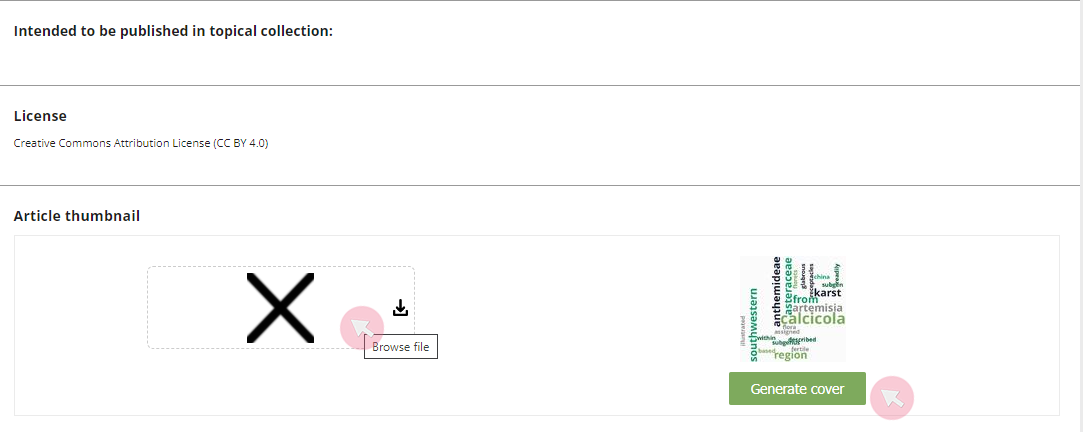
Note 1: You can use the Metadata tab to add an article thumbnail at any point before the publication of your paper, as long as you are the one handling the manuscript (for example, your manuscript has just been accepted and you are in the process of uploading a version for the copy editing stage).
Note 2: If you do not set an article thumbnail - depending on the journal’s policy - the layout editor may select an image from your paper. In case neither you, nor the layout editor sets an image as a thumbnail, a word cloud will be displayed as a thumbnail for your article.
Handle manuscripts under peer review
You will receive an automated email to notify you about the completion of each review round and invite you to submit a revised version.
1 Use the link from the email to access your manuscript submission. Alternatively, find it in Active in the My manuscripts menu and click on its title.
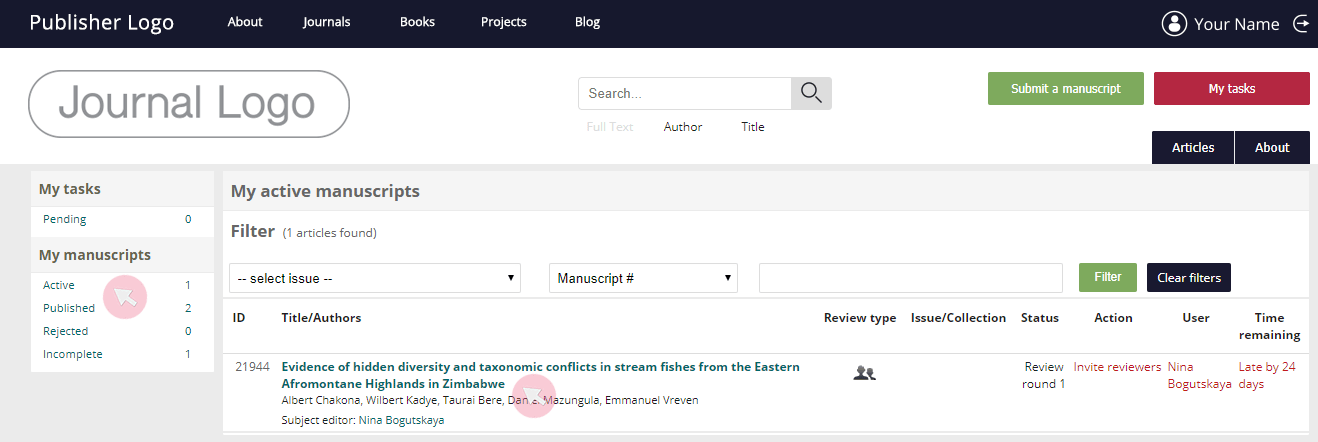
2 Go to the Current status tab to see the recommendations and decisions made by the reviewer(s) and the Editor. Use the buttons at the right-hand side to download your manuscript file(s) along with inline comments.
3 Use the text field to leave your comments to the reviewer(s) and Editor.
4 To upload a revised version of your manuscript, first type in the name for your file and then use the Upload file button to browse the files on your computer.
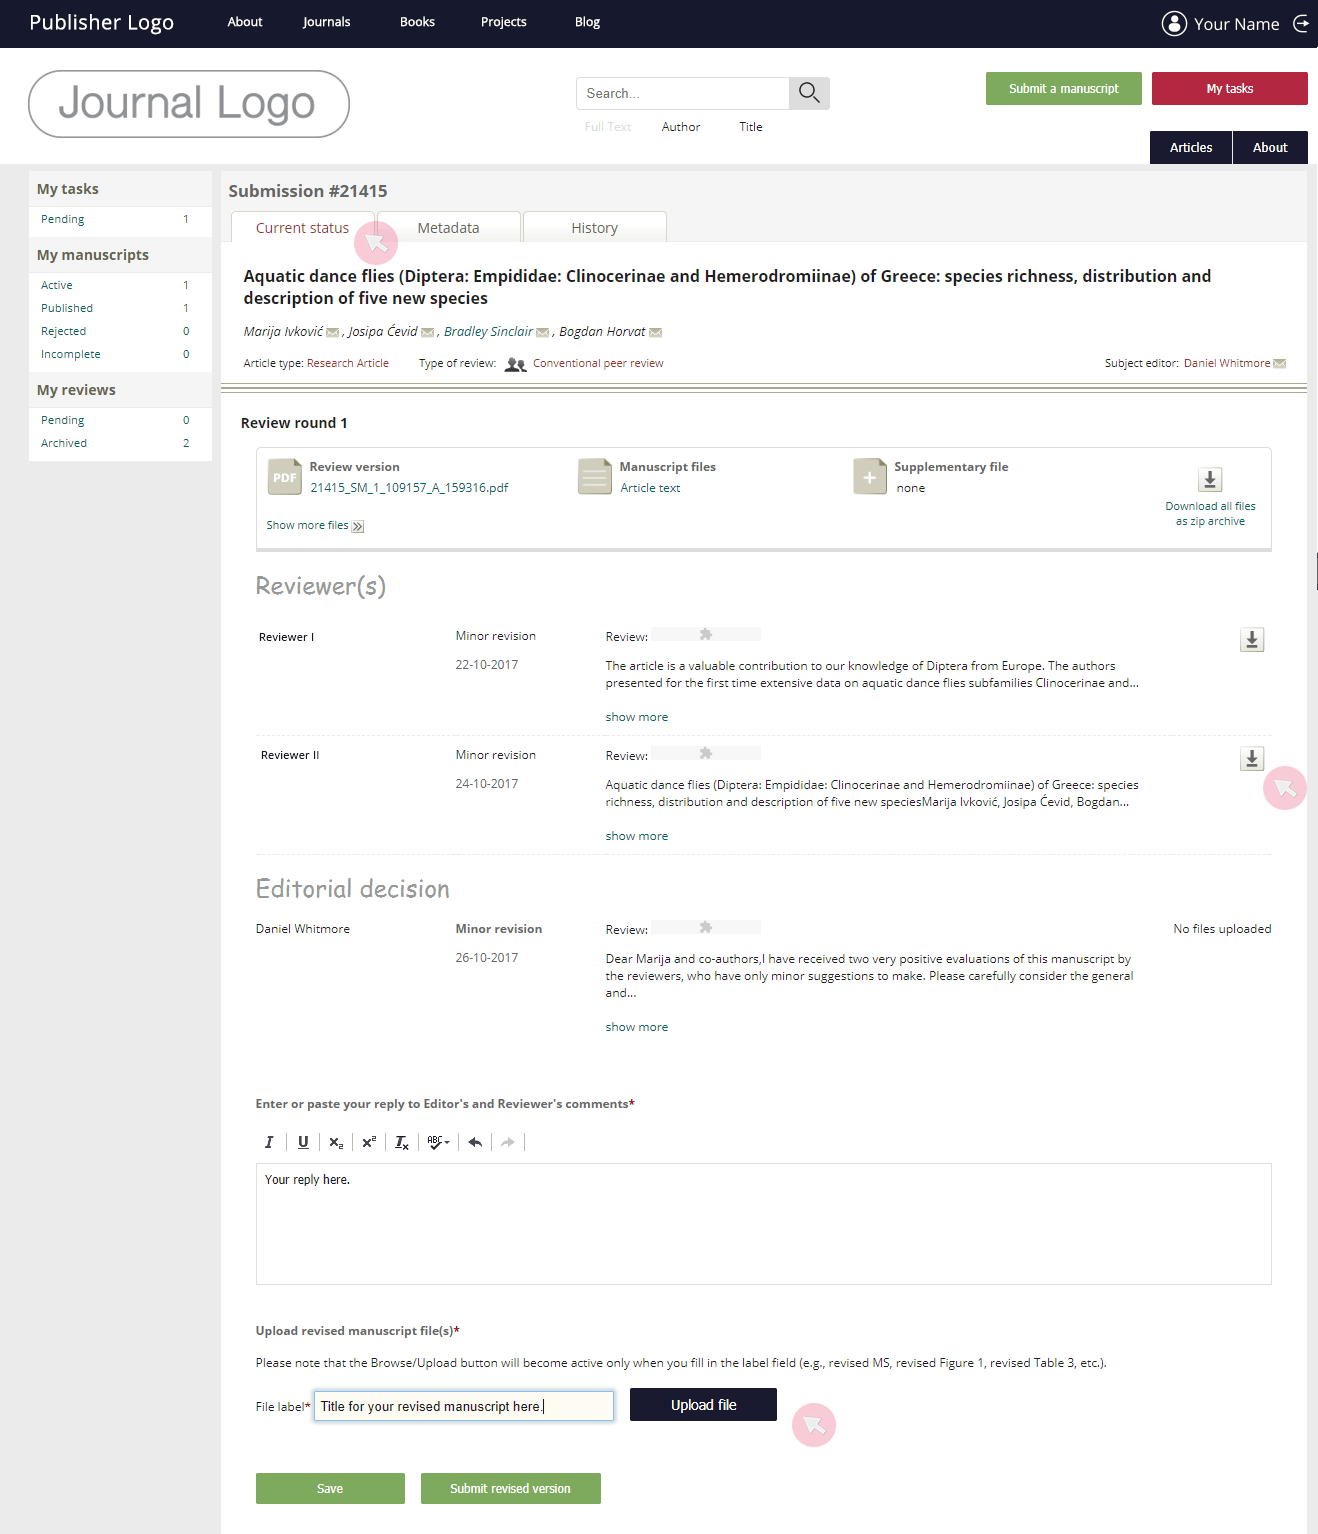
5 Edit the metadata (i.e. authors list, abstract, keywords, Conflict of interest section etc.) of your manuscript prior to submitting your revised version, if necessary. You will not be able to make any changes to these while the manuscript is under review / pending editorial decision.
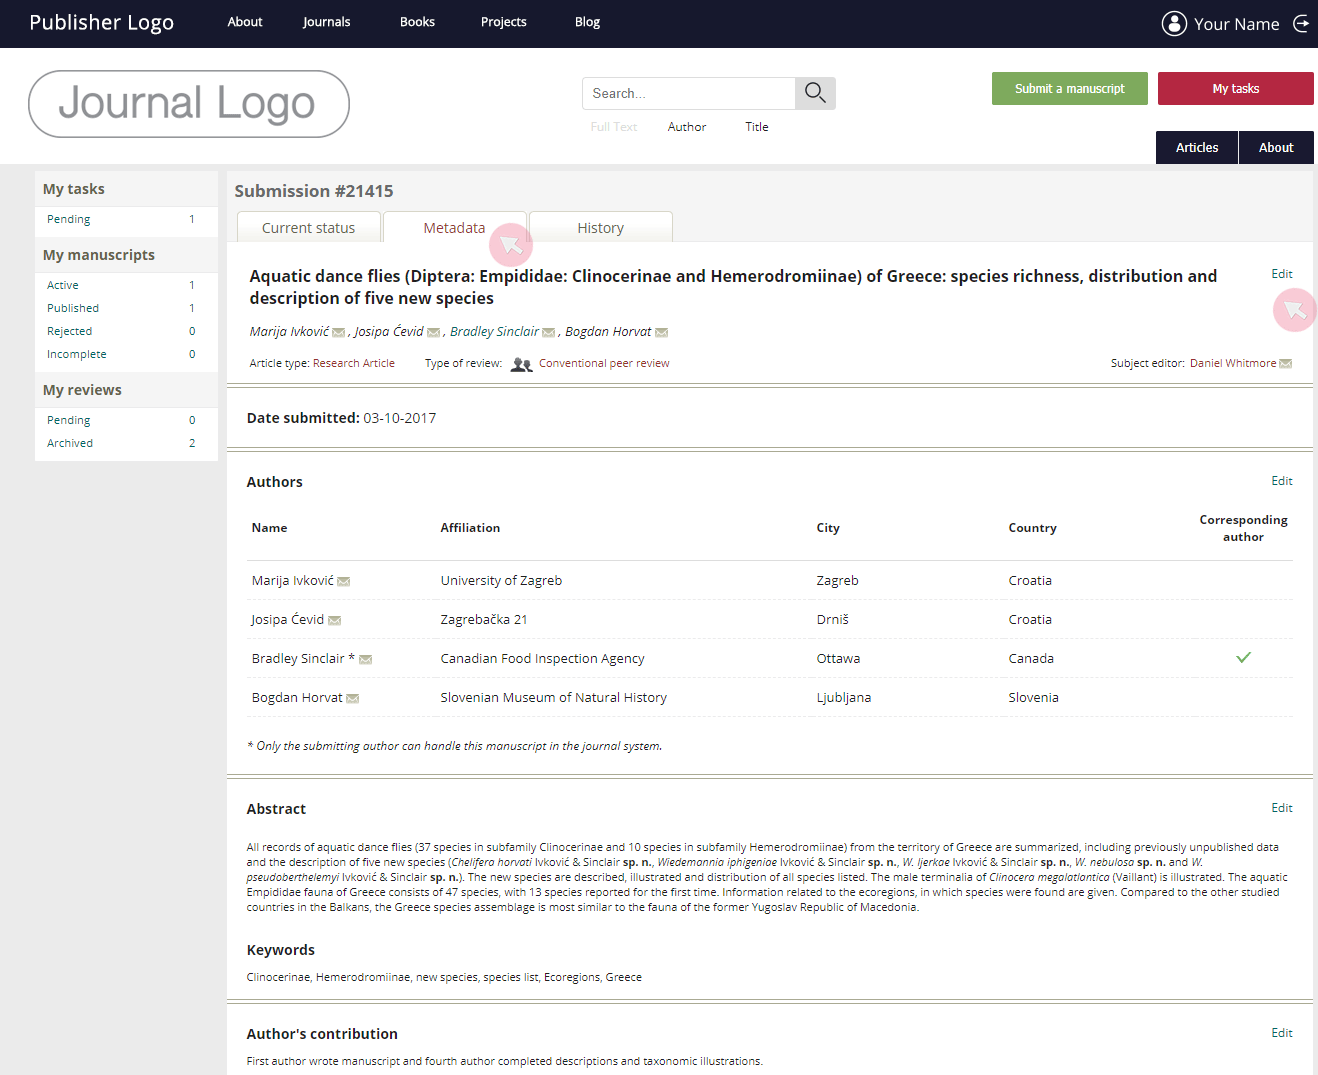
6 Click Submit revised version when ready or use the Save button to complete your submission at a later stage. Once submitted, you will not be able to edit / replace files.
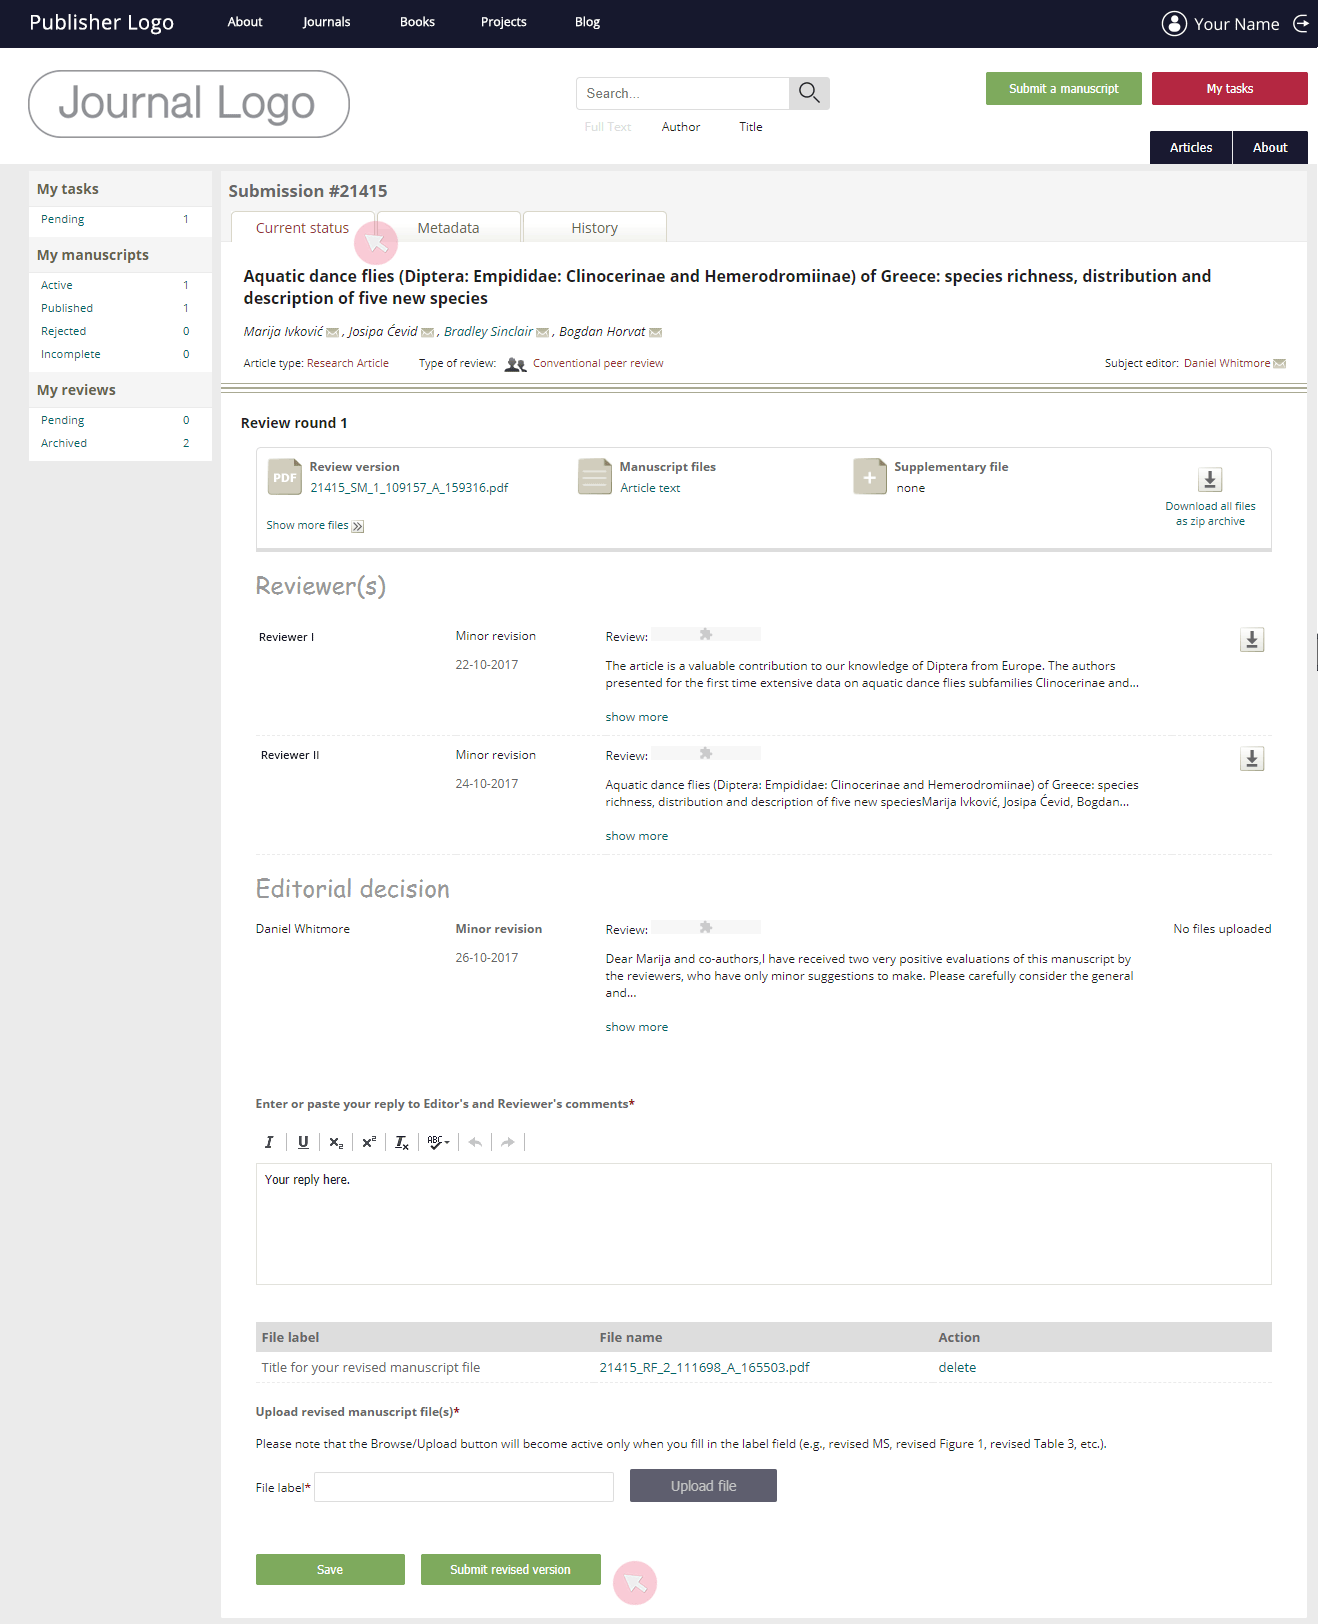
7 Use the History tab to access files from past review rounds and click the download button to the right of the corresponding file(s) (e.g. revised / annotated manuscript, supplementary material, peer review etc.) to save the file(s) to your device.
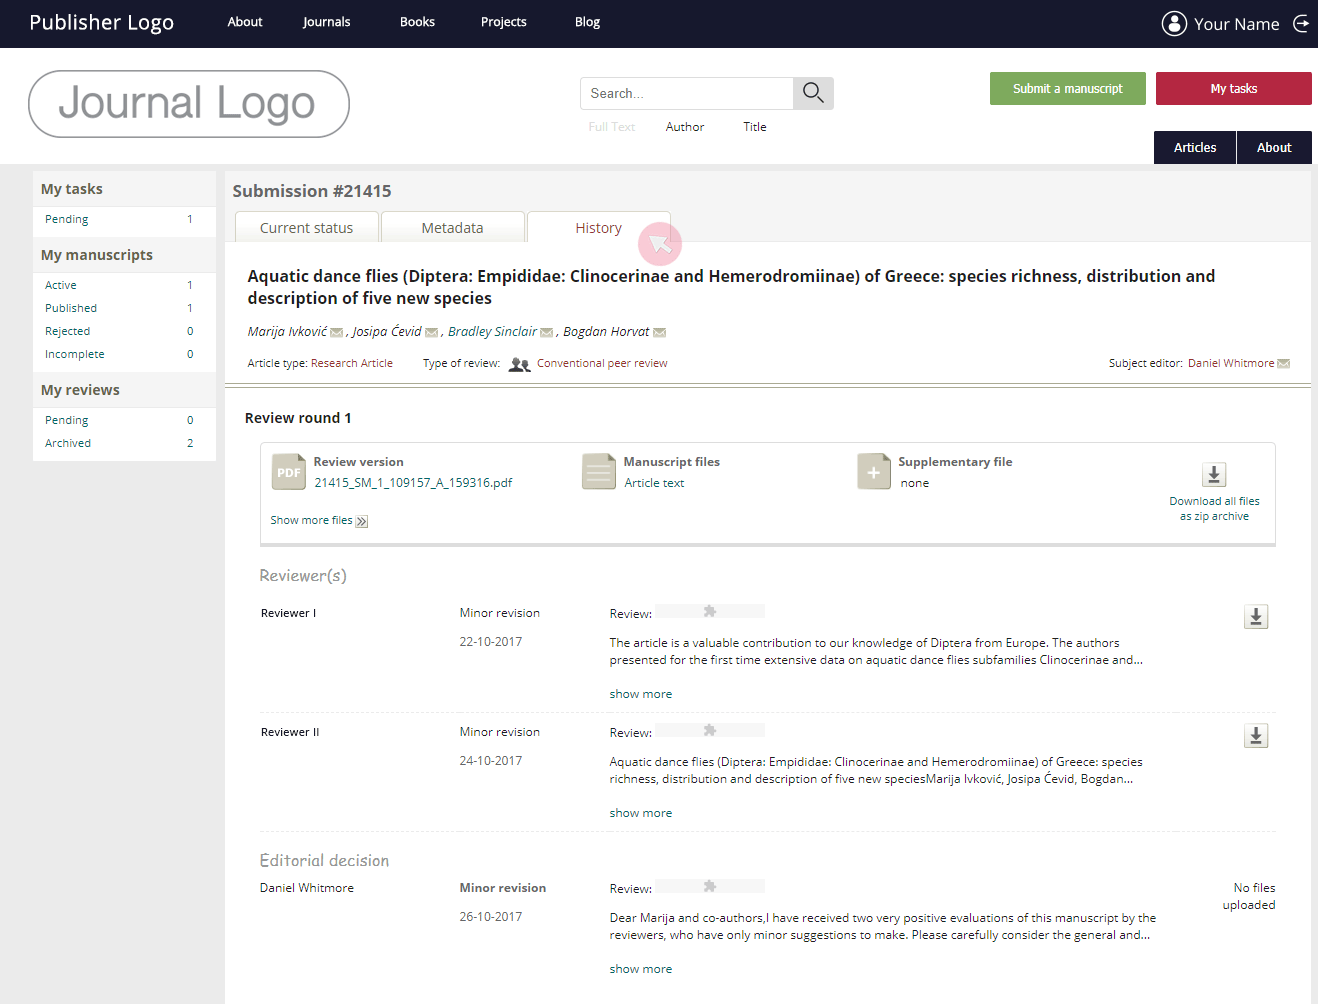
Handle manuscripts in copy editing
You will receive an automated email to notify you about the acceptance of your manuscript and invite you to submit a version for the copy editing stage.
1 Use the link from the email to access your manuscript submission. Alternatively, find it in Active in the My manuscripts menu and click on its title.
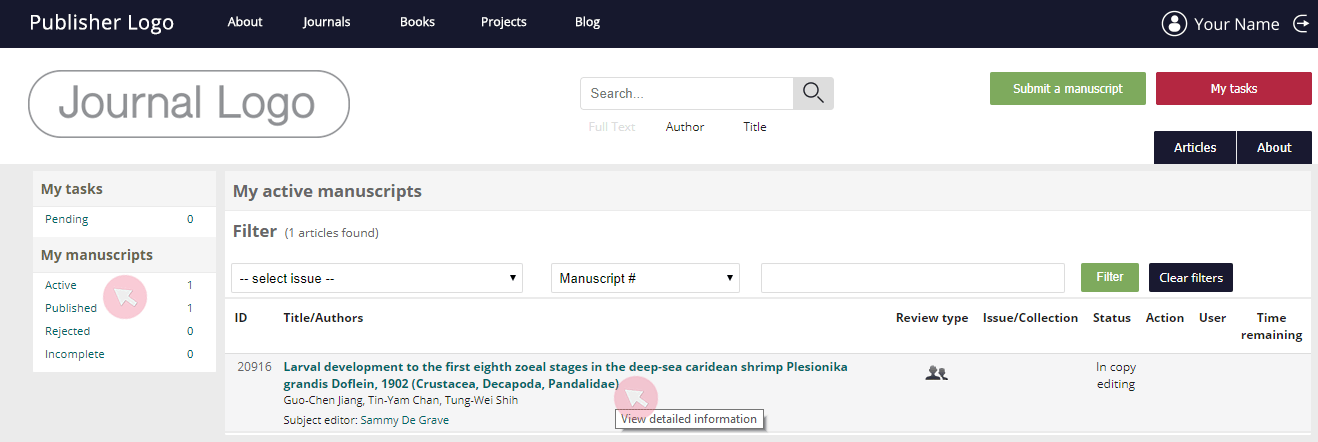
2 Go to the Current status tab to see the final editorial decision and comments. In case the Editor has uploaded any files (e.g. your manuscript with inline notes), locate and download it on the right-hand side.
Note: You might need to correct some fine details before sending the manuscript to the Copy editor, even though it has already been accepted for publication. Make sure to clear any inline comments in the manuscript file and double-check its content, metadata and the Editor’s notes.
3 Opt to either submit a revised version of your manuscript or send your last uploaded manuscript file right away to copy editing. The space below the options will change depending on your choice.
4 To submit a revised version, use the text field to respond to the Editor’s comments, type in a label for your manuscript and then use the Upload file button to browse the files on your device. Either click Submit revised version or use the Save button to complete your submission at a later stage. Once submitted, you will not be able to edit/replace files.
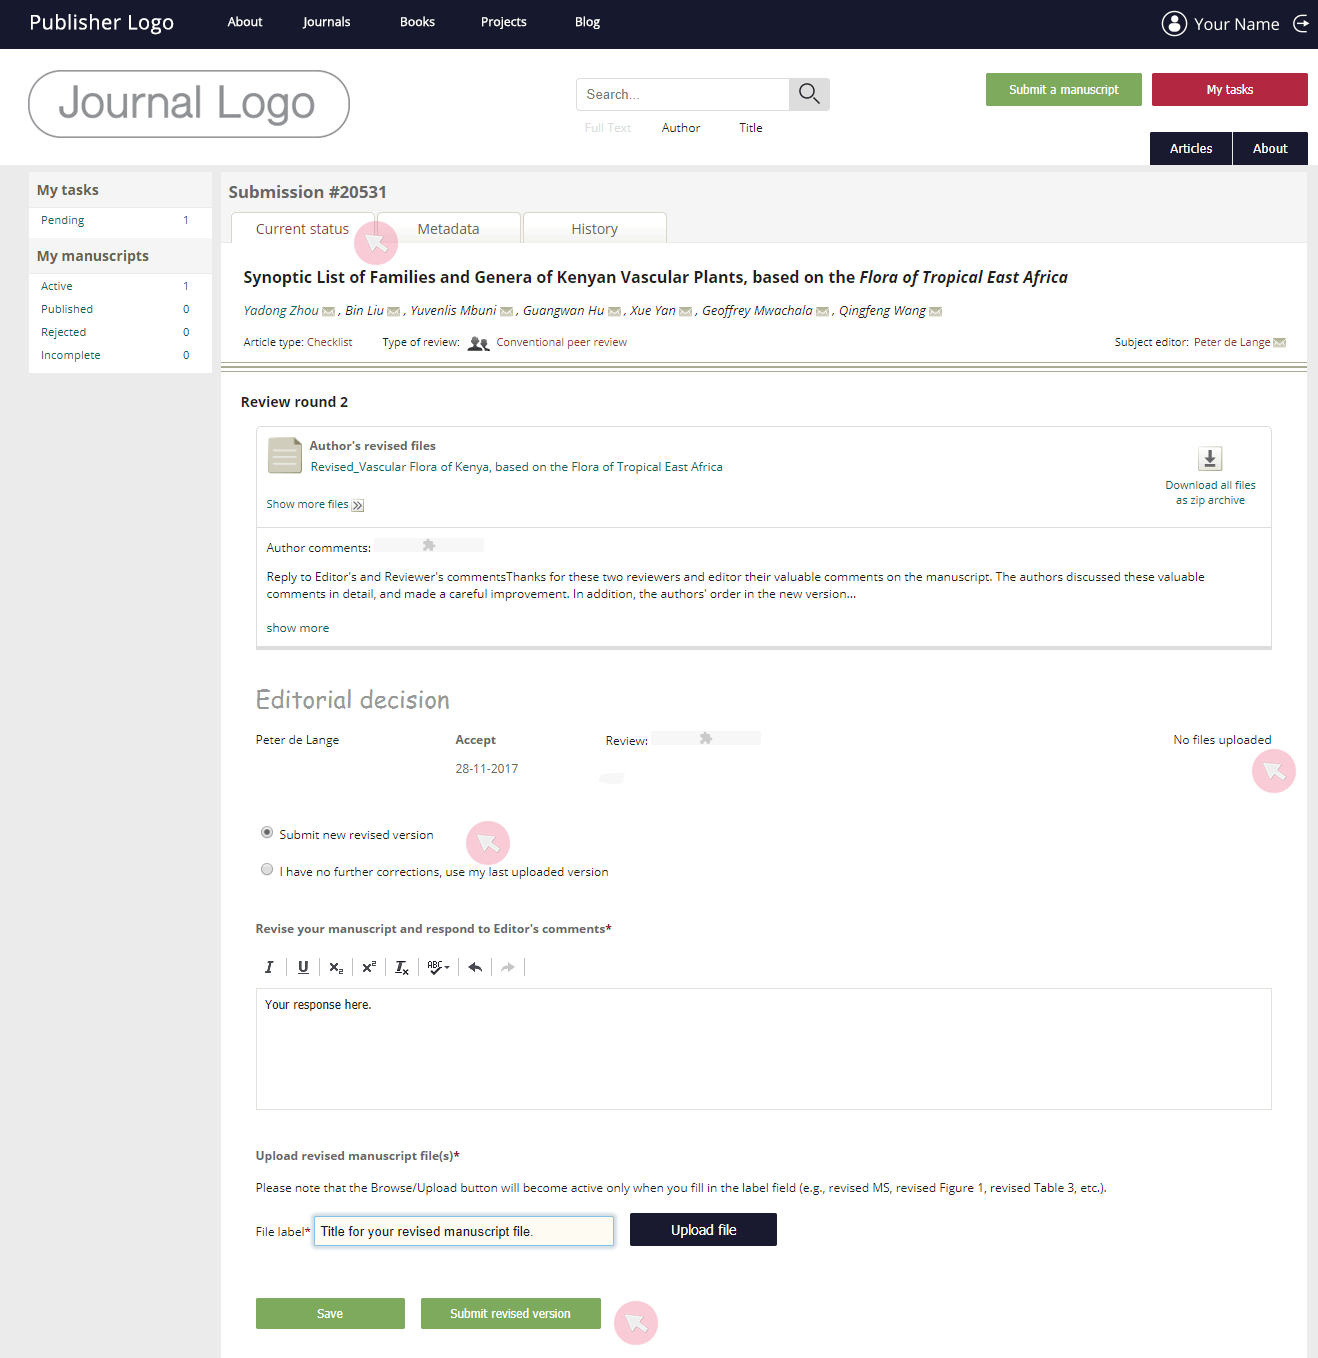
5 In case you are approached by the Copy editor with further questions and requests regarding your manuscript, access your submission in the same way to either address his/her comments or upload a new revised version.
6 Use the History tab to access past versions of your manuscript.
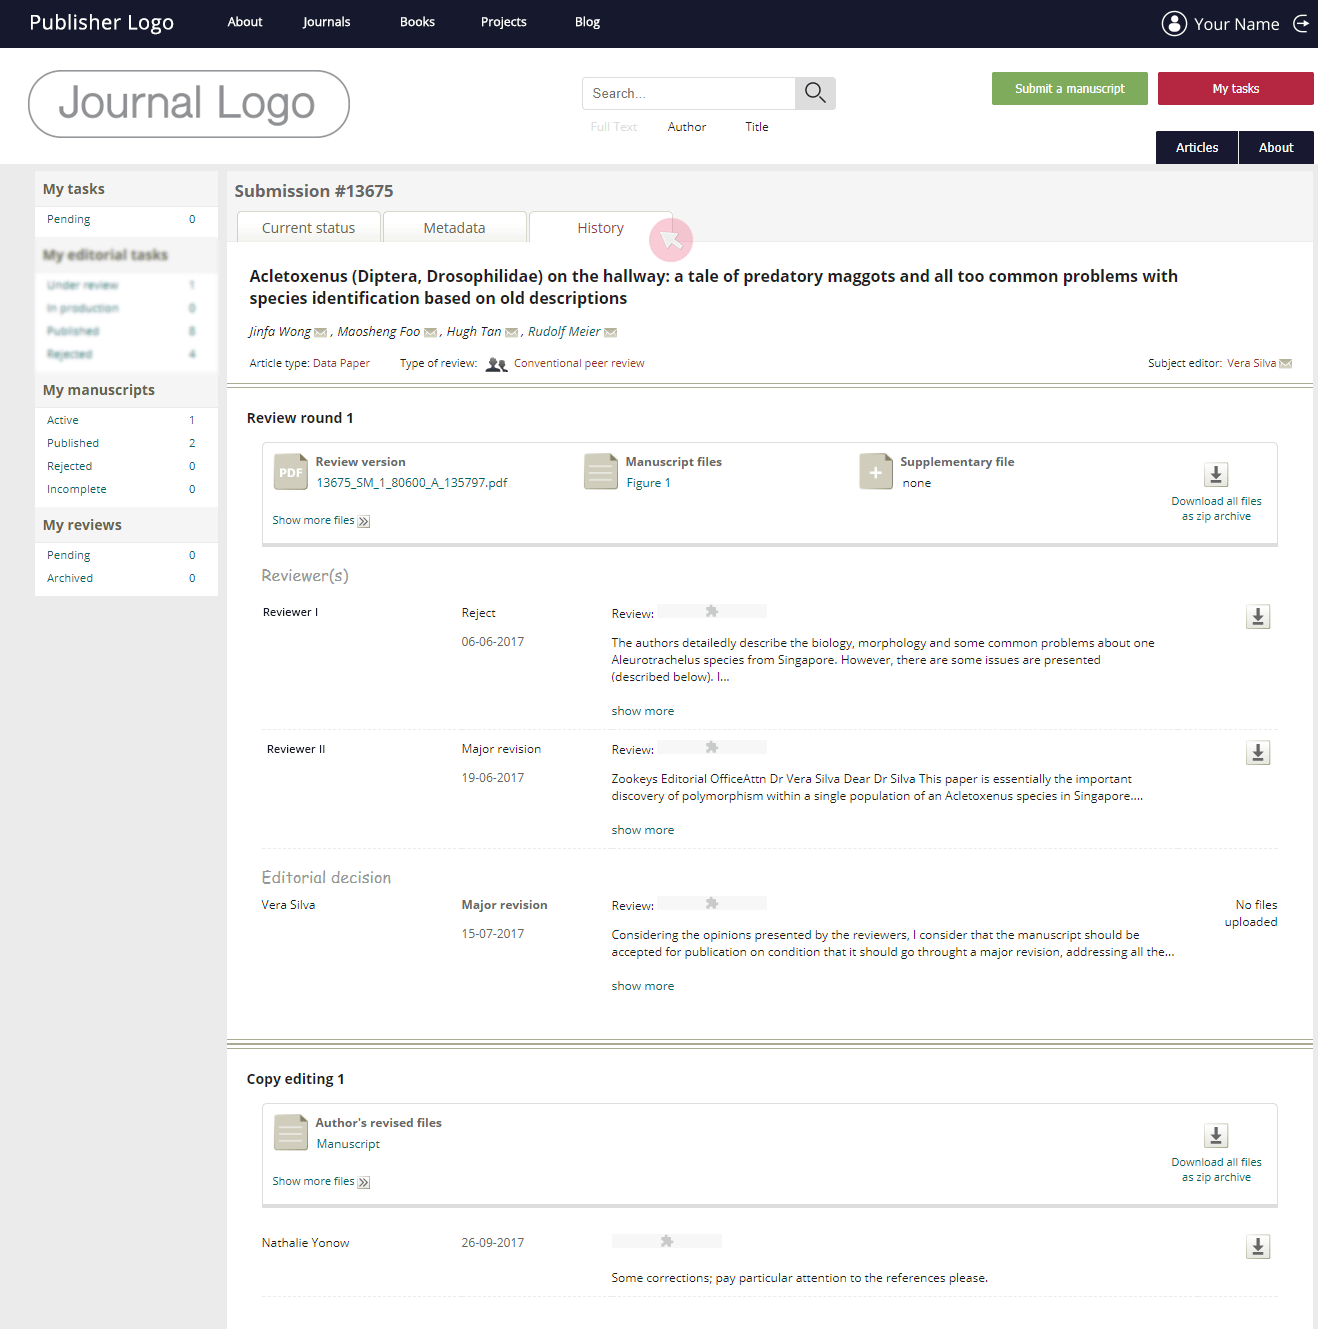
Handle manuscripts in production (layout)
You will receive an automated email inviting you to submit proof corrections once your paper is accepted for publication and/or has completed the copy editing stage.
1 Use the link from the email to access your manuscript submission. Alternatively, find it in Active in the My manuscripts menu and click on its title.
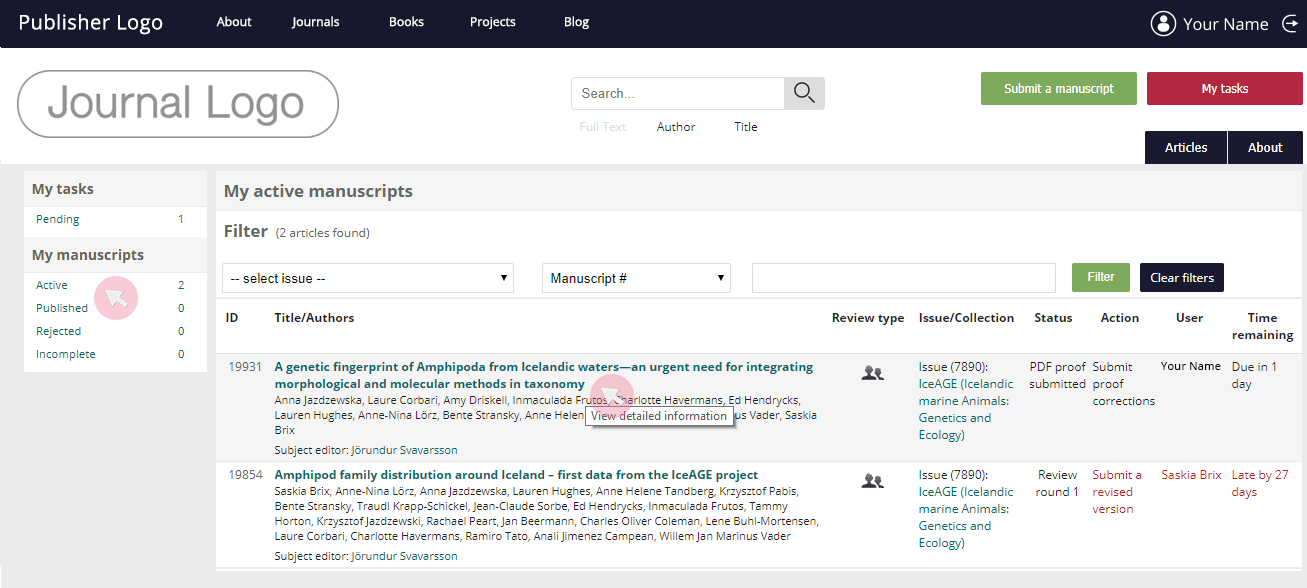
2 Go to the Current status tab to see the first proof of your manuscript uploaded by the Layout editor. Use the button on the right-hand side to download the proof in PDF format.
Note: Ensure that you carefully examine the proof. Your article will be published in the way it appears in the latest proof approved by you.
3 Use the two available options to select: either to submit corrections to the proof or confirm that it is ready to proceed to publication. Note that the space below will change according to your choice.
4 To submit your proof corrections, type in a title in the File label field and then click the Upload file button to upload the PDF file containing your track changes and/or inline notes. Use the Author’s reply text field to leave your comments to the Layout editor.
Note: All authors can access and download the proofs, leave comments and upload files. However, only the submitting author can submit. The submitting author can also edit and delete the files and comments provided by his/her co-authors.
5 Click the Proceed with publication or Submit revised version button at the bottom. Showing will be the button corresponding to the option selected above.
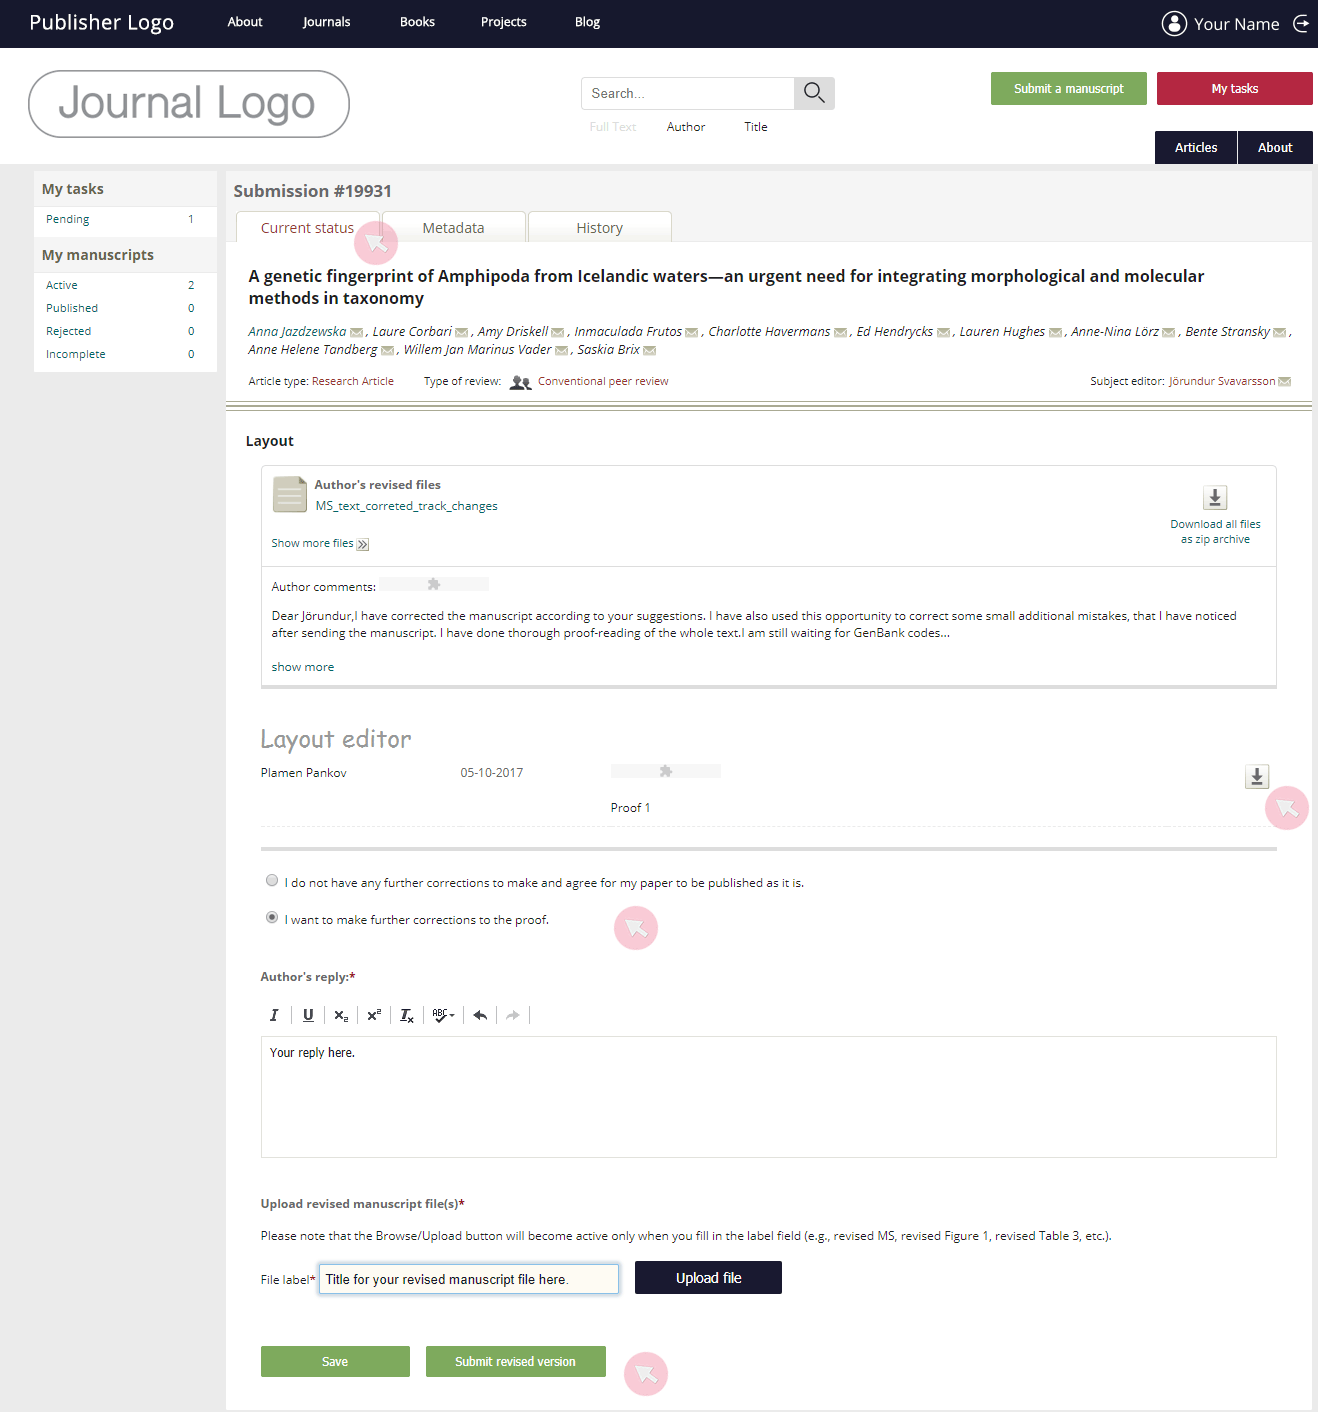
The layout stage will take as many rounds as necessary until you confirm that a proof is ready for publication.
Note: In case you have made significant changes to the content of your manuscript during the layout stage, you will be contacted to justify your edits. Please do not alter the content of your manuscript following its acceptance for publication.
Access published articles
1 Access all your published articles from the Published tab in the My manuscripts menu. Click on a title, to access the submission or use the clickable link in DOI column to go to the published article.

2 Go to the Metadata tab to see your article’s metadata used for indexing.
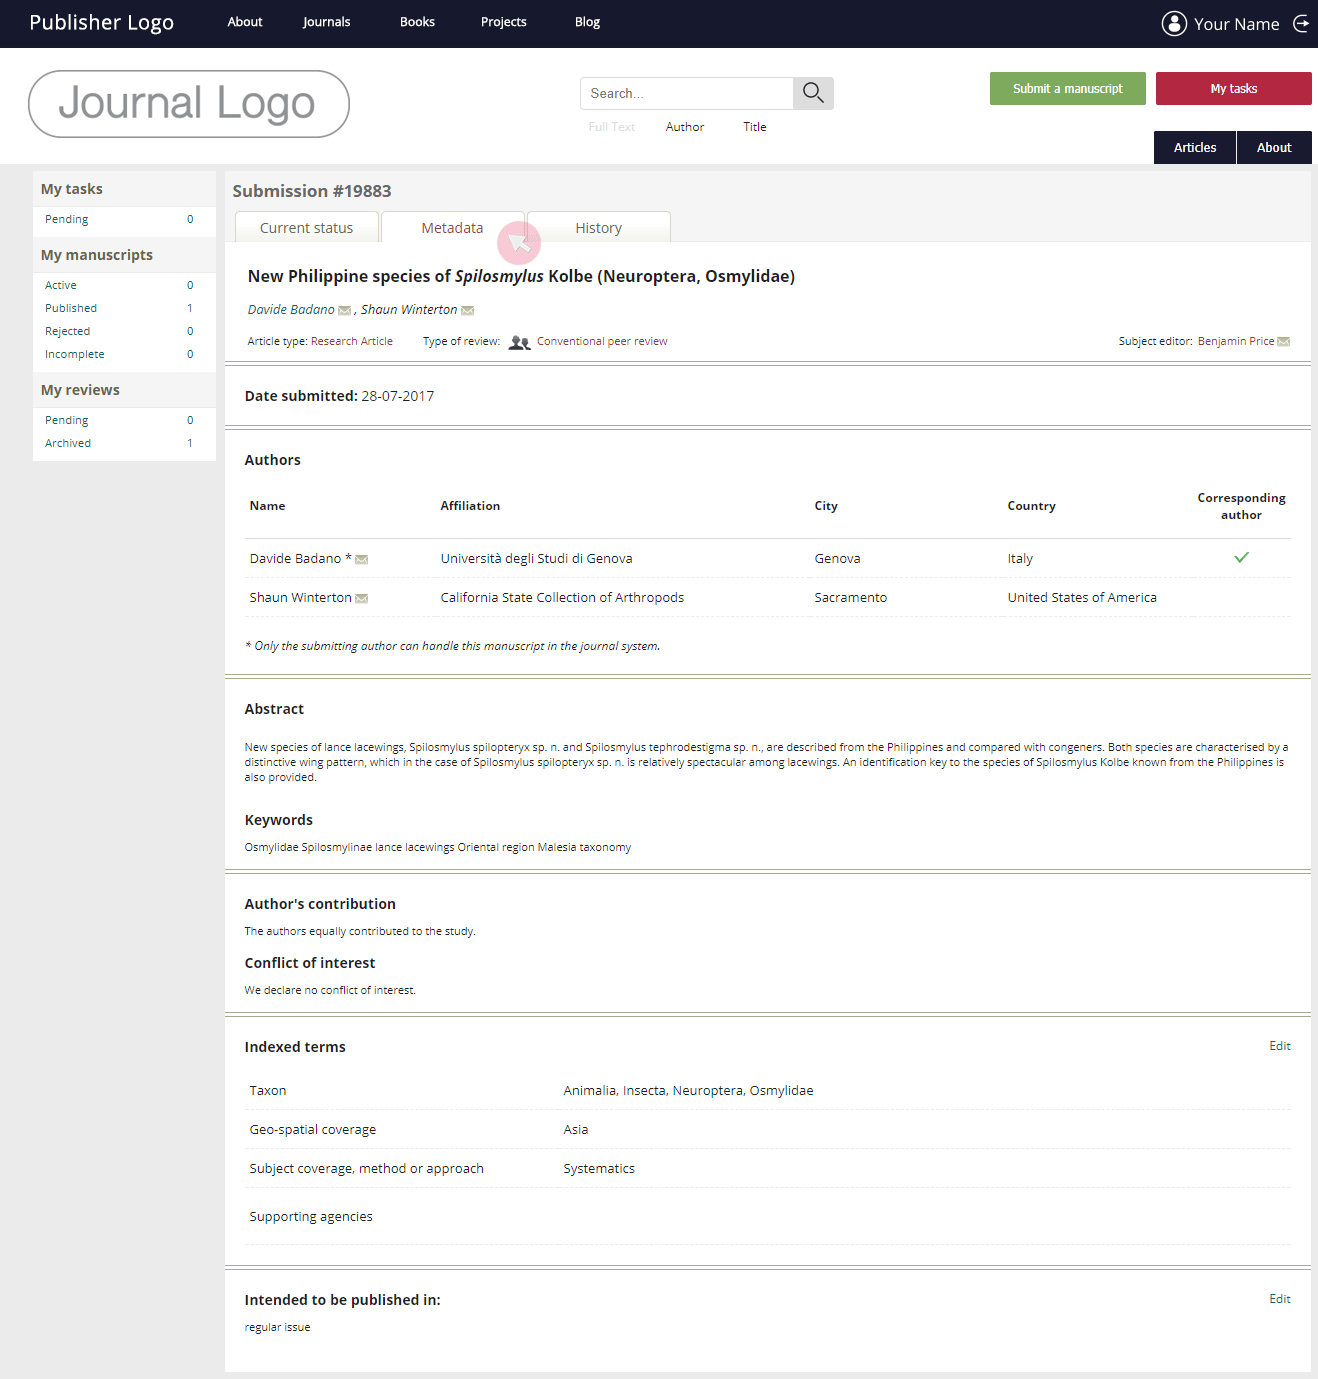
3 Go to the History tab to access your article’s past revised versions throughout the review, copy editing and production stages along with all reviews and Editor’s notes submitted via the system. Click on the symbol on the right-hand side to download the corresponding files. To download files one by one, click on their titles.